I build decks in Rhode Island, the Ocean State, and I regularly work on the coast where high winds, constant humidity, and wind-driven rain take their toll on decks.
Always in the front of my mind is that as deck builders we are responsible for keeping people safe during evening cookouts, family gatherings, and even wild college parties that exceed design loads. In addition to the obvious joist, beam, and footing sizing, we need to make sure our decks are fastened and flashed to the house to withstand the extra demands of a northern coastal climate, and we need to use fasteners that will hold up not only to wet conditions but to salt water, even though that sometimes means spending more money.
Fortunately, the extra cost of using the right material isn’t usually a problem with coastal decks. They’re typically high-end jobs — which also means that I can add all the bells and whistles and walk away from the project with a fair degree of pride.
Design in Practical Extras
Wind whipping off the water is a constant, even when the sky is blue. During the design stage I try to sell the client on building as many seats and pieces of furniture into the deck as possible (Figure 1). The built-in furniture may not be as comfortable, but it’s much more convenient than chasing a wind-blown chair across the lawn or storing it out of the weather after each use.
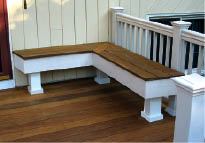
Figure 1. The constant winds common to coastal decks can blow lightweight outdoor furniture into the next county. This makes it easier to sell upgrades such as built-inseating.
I research the location before I meet the customer, as one area may get regular northeasterly winds while a few miles away another spot gets southwesterly winds. A decorative privacy panel may be enough to cut down the uncomfortable winds; a guard rail made from tempered glass also blocks wind — and maintains the beautiful coastal views as well. I note what time of day the clients believe they’ll spend the most time on the deck. Along with the sailing furniture, umbrellas blow away with ease, so I offer built-in alternatives such as pergolas for shading the area (Figure 2).
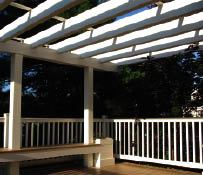
Figure 2. Midday sun on the coast in the warmer months is intense. Shade structures such as pergolas are great upsells that in the long run will improve your clients' satisfaction.
Deck Protection
Often the homeowner won’t see the evidence of a leak at the ledger. If left alone long enough, the leak will rot the framing to which the deck attaches, possibly leading to a catastrophic deck failure (www.deckfailure.com). Coastal decks experience a fair amount of sideways rainfall — and in Rhode Island, a considerable amount of snowfall as well — and rain and snow can find their way into some tight spots. Because of this, ledger flashing takes on even greater importance on the coast than at inland locations.
I always flash using Vycor peel-and-stick flashing products (W.R. Grace & Co., www.graceconstruction.com). My employees are familiar with them, they are easy to work with, and they come in different sizes for different applications. My first step in flashing the ledger is to install a layer of 12-inch Vycor on the surface I am attaching to (Figure 3). This layer will help to seal any penetrations into the house from the nails and ledger bolts.
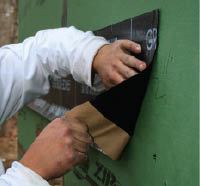
Figure 3. The first step in the ledger flashing sequence is to apply peel-and-stick membrane directly to the sheathing where the ledger will go, as shown above. The peel and stick is wide enough to extend above and below the ledger. After the siding is installed, the release film along the bottom will be removed so the peel and stick can be adhered to the face of the siding.
I then install the ledger on top of the Vycor following the fastener-placement details in the 2007 Supplement to the IRC (PDB, July/August 2007, page 79; also available online at www.deckmagazine.com).
The next step is to install Vycor 18-inch detail membrane over the ledger. This product was originally meant for roofing; however, it works perfectly in this application. I apply it to the face of the ledger, over its top, and up the wall (Figure 4). This leaves at least 5 inches of Vycor against the wall above a 2×12 ledger. The detail membrane protects the ledger bolts from the salt air, so I’m comfortable using hot dipped galvanized bolts rather than stainless steel. And the 18-inch membrane also helps to slow corrosion both by sealing the top of the ledger where it meets the house and by isolating the joist hangers from the treated ledger.
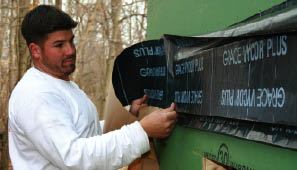
Figure 4. A second layer of peel and stick covers the installed ledger and laps up the wall. This layer protects the ledger fasteners from salt air, isolates the joist hangers from the corrosive effects of the pressure-treated ledger, and keeps water out of the joint between the top of the ledger and the wall.
The house shown in the photos in this article had no building paper, as it is sheathed with Zip System sheathing (Huber Engineered Woods, 800/933-9220, www.huber?wood.com), which has an integral weather barrier. But most houses do have building paper, and I’d ordinarily cut that out where the ledger was to be attached, before applying the Vycor. The first layer of Vycor would lap the building paper below, and the subsequent upper layer of Vycor would be lapped by the building paper above. I would seal any remaining slits where the building paper joins the Vycor with strips of Vycor or housewrap tape.
After the second layer of Vycor is in place, I install a drip cap on top of it, at the top of the ledger (Figure 5). In the past, I’ve used either custom-bent copper or galvanized steel. Lately, however, I’ve been using a vinyl flashing such as DuraFlash (P&G Solutions, 888/835-4171, www.dura?flash.net) or Pro-Trim DuroBend (Alum-A-Pole, 800/421-?2586, www.alumapole.com). Vinyl flashing completely sidesteps the corrosion issue.
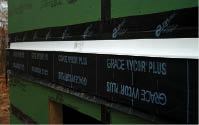
Figure 5. A corrosion-proof vinyl drip cap tops the ledger and is in turn capped by a third application of peel and stick. The sheathing used on this house has an integral weather barrier. On most houses, the building paper would lap these final waterproofing layers.
Once I install the drip cap, I apply a layer of 4-inch Vycor to the top of the flashing. If the house had building paper, that would then lap over the Vycor and the flashing.
It’s a good idea to explain this system to the homeowners on the sales call. They are usually aware of failing decks and are impressed to learn that I take pains with the flashing.
Avoiding Hardware Corrosion
Although salt air accelerates corrosion, it’s not the only factor in play. By now we all know that some of the chemicals currently used to treat lumber corrode fasteners and hardware to a greater extent than the old CCA preservatives did.
This corrosion occurs when the fastener or hardware contacts wet lumber.
To separate the hardware from the lumber and thereby slow down the corrosion, I wrap the ends of the joists (Figure 6) and the posts with Grace Deck Protector.
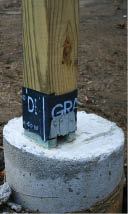
Figure 6. To isolate the framing hardware from corrosion-inducing wood preservatives, the author first wraps the wood with peel-and stick-membrane. Finish materials will cover the membrane, both for looks and to protect it from degrading in the sunlight.
Another spot where I use Deck Protector is on top of the joists (Figure 7). Not only does it help slow down the fastener corrosion by keeping the joists drier, but it also protects the joists from water intruding into splits. Lumber’s core frequently escapes penetration by the preservative, and water reaching there can cause rot. Doubled joists are worse: It’s easy for moisture to find its way between the two members and never completely dry out if they aren’t protected. I apply Deck Protector over the tops of doubled joists to prevent water from collecting between them.

Figure 7. Even treated lumber is susceptible to rot if water is allowed to accumulate or to enter cracks. Covering the tops of joists and beams with peel and stick avoids this problem.
On decks that are right on the coast and subject to constant salt air, I use all stainless steel hardware and fasteners. Simpson Strong-Tie (800/999-5099, www.strongtie.com) and USP Structural Connectors (800/328-5934, www.usp?connectors.com) both make stainless steel hardware in addition to their other corrosion-resistant offerings. I also use stainless framing nails as well as decking fasteners. Stainless steel isn’t cheap, but neither is a lawsuit should a fastener corrode and someone get hurt as a result.
Winds, Floods, and Weathering
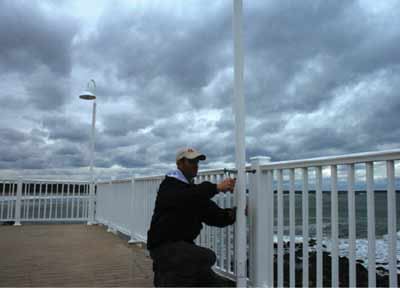
More so than inland decks, coastal decks may be subject to floating away in a flood or blowing away in a hurricane. A positive connection that resists uplift is always required between the footings and the posts; the posts and the beam; and the beam and the joists (Figure 8). Often an architect or engineer will specify the proper connectors and hardware to meet the local requirements. If not, I take care of the calculations myself and reference Simpson’s Web site for proper connectors.
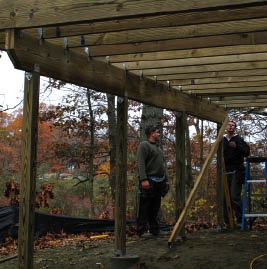
Figure 8. Because of the potential for uplift from high winds and floods in coastal areas, joists, beams, and posts must all be connected to the footings through a chain of hold-downs.
Seaside decks experience the most extreme weather, and more often than not they will be wet. Most customers don’t have time to paint or stain their decks and don’t want to pay a professional once a year to do it for them. I always recommend using low-maintenance decking and railing material, like PVC, or exotic hardwoods, like ipe (Figure 9).
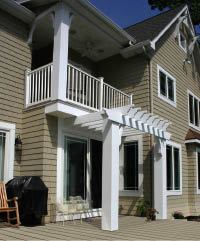
Figure 9. The harsh sun and regular moisture take a big toll on decks built on the coast. Low-maintenance decking and railing are easy upsells in this environment.
Between the extra labor required to protect the joists and hardware, and the more costly materials, seaside decks can get very expensive. However, the builder is responsible for the safety of the deck. Not only are these extra precautions great selling points, but they can prevent an injury-causing deck collapse — and keep you out of court.
Robert Arnold is a contractor and deck builder from Hopkinton, R.I.


