Panels Sizes and Types
Drywall comes in 24-, 48-, and 54-inch widths; in 8-, 9-, 10-, 12-, 14-, and 16-foot lengths, and four thicknesses:
- 5/8 in. is the stiffest and provides the best sound- proofing and fire retarding
- 1/2 in. is the most common single-layer sheet
- 3/8 in. is used in remodels over old walls
- 1/4 in. is easily bent to make curved surfaces and is installed in two layers
For estimating drywall coverage, try
this calculator.
Specialized Panels
Fire-code panels have a gypsum core with chemical additives and glass fibers. Fire codes require their use on ceilings in garages and furnace rooms. Type X, the most common used in homes, is 5/8 in. thick and has a one-hour fire rating.
Lightweight panels are 30% lighter than regular drywall. They’re used on ceilings. Most are ½-inch thick, but a lightweight,, 5/8-in. Type X board is available for fire code applications.
Moisture-resistant, or MR drywall has a colored facing paper (the color depends on the manufacturer) that’s coated to make it resistant to water vapor (but not to liquid water). It’s used in humid areas: baths, laundries, utility rooms, and returns around condensation-prone windows and skylights. It’s prone to sagging, and so should not be used on ceilings or as a tile substrate.
Foil-backed drywall has a perm rating of .06 and doubles as a vapor retarder.
Soffit boards are wrapped in a special moisture-resistant paper. They’re used on exterior soffits and porch ceilings.
Drywall Fasteners
Although nails are acceptable for fastening drywall, most installers prefer screws—they’re less likely to pop, and they leave a clean dimple for finishing.
Wood framing. Use coarse thread Type W screws when fastening drywall to wood framing.
Metal framing. Use Type S screws with metal studs. These are self-tapping and have a hardened point that easily penetrates light-gauge steel studs. For heavy-gauge steel studs, use a fine-threaded drill-point screw.
High-low screws are sold as a “universal screw” for attaching drywall to light-gauge steel studs or wood.
Double-layer applications. In two-ply installations over wood framing, use a Type G screws for the outer layer. These have a deeper thread than Type W screws. They need to penetrate 1/2 inch into the first layer, which means the first layer has to be at least 1/2 inch thick.
Drywall Adhesives
The use of a construction adhesive can reduce the number of fasteners needed (and possibly the number of screw pops) by up to 75 percent. A glue-screwed wall also has greater racking strength and sound-deadening ability than a screw-only installation.
The adhesive must bond the drywall directly to the framing;
it cannot be used, for instance, where insulation batts are stapled to the
faces of the studs. Drywall adhesives should meet ASTM standard C-557.
Framing Preparation
To prevent drywall, pops, sags and ridges, make sure the framing is dry, properly blocked, and shimmed where needed.
Straightening bowed framing. If studs or joists are bowed or out of line, the imperfections will show up in the drywall. A stud can be straightened by cutting a notch and then scabbing on a piece of plywood. To flatten a ceiling, install strapping and shim all the strapping to the same plane.
Drying wet framing. Wet lumber will dry and shrink as soon as the heat is turned on, leaving cracked corners, ridged seams, and popped fasteners. In winter, drying the framing requires a working heating system; temporary heaters don’t provide enough heat.
Four Problem Areas F
our common details- at tub/shower units; at fire blocking locations; at inside corners; an near joist hangers – are shown in the illustrations below. Pay close attention to these to avoid drywall problems.
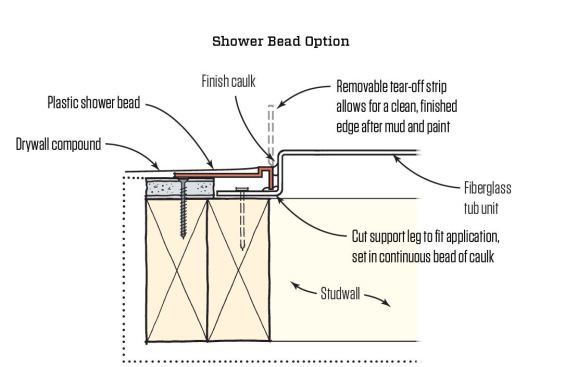
2) Or you can use specialty PVC drywall trim, such as the Shower Bead, which bridges the gap created by the flange and provides a clean, finished edge against the tub/shower unit.
Installing Drywall
Don’t use more fasteners than you need. With ceiling panels, put a screw at each edge and three screws in the field along each joist. With walls, two screws in the field and one at each edge is plenty. This assumes sheets run perpendicular to the framing, and you have a regular joist or stud layout at 24 or 16 inches on-center.
Note: If the framing is tighter than this, you don’t need to put a screw in every stud (e.g. around windows and doors). The fewer screws, the fewer opportunities for problems.
Minimize butt seams. To keep the number of butt seams to a minimum, use the longest sheets possible. Place butt joints in easy-to-hide locations, like above windows and doors or where furniture will likely be placed. Also consider the room’s lighting—natural light from windows as well as wall and ceiling light fixtures washing across a wall can highlight otherwise invisible butted seams.
When you have to include a butt seam, float the butt edge between framing and use a specialty backer (such as “rock splicers” (butthanger.com) or “butt boards” (trim-tex.com), as shown in the photos below.
Linda Ferguson
The author typically floats butt joints between joists and studs, and creates a recessed joint with a backing board.
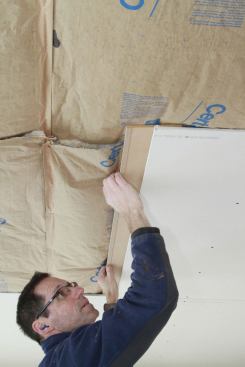
Hanging sequence. Hang the ceiling first, and keep ceiling panels tight to the walls. When hanging the walls, install the top sheet first, lifting it up and keeping it tight to the ceiling to support the edge of the ceiling panel. If the wall is less than 8 feet tall, hang a full sheet at the top and put your rip along the bottom.
Cut sheets so they fit easily without being forced into position. Place tapered edges next to tapered edges, butts next to butts. Butt joints should be staggered.
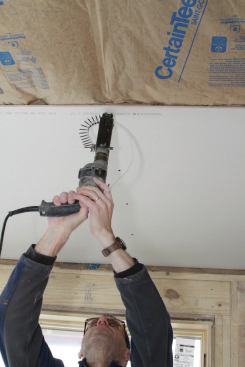
Fastening. To
minimize nail pops, keep the drywall tight to the framing and choose the right
length fastener.
Hanging Tips For Minimizing Seams and Fastener Pops
Hanging ceilings. Drywall installed perpendicular to the framing can float over slightly uneven joists and studs, making them less conspicuous. Framing transitions are bad places for seams, which is why the drywall in the photo spans over the flush beam. Don’t drive screws into beams.
Fastener Spacing
| Framing Type | Framing Spacing | Max. Fastener Spacing |
|---|---|---|
| Ceiling Joists | 16 inches o.c. | 12 inches |
| 24 inches o.c. | 12 inches | |
| Wall Studs | 16 inches o.c. | 16 inches |
| 24 inches o.c. | 12 inches |
Maximum fastener spacing. Don’t use more fasteners than needed. With ceiling panels, put a screw at each edge and three screws in the field along each joist. With walls, use two screws in the field and one at each.
Linda Ferguson
Fasten across the sheet, installing screws in sequence to take out any sag. Don’t put one screw in one corner and then jump to the end and fasten it in the opposite corner.
Fastening sequence. Fasten across the sheet. Don’t put one screw in one corner and then jump to the end and fasten it in the opposite corner, as doing so can make it difficult for the drywall screw to pull the drywall tight against the framing because the screw has to push the drywall tight and fight against the screws on each edge.
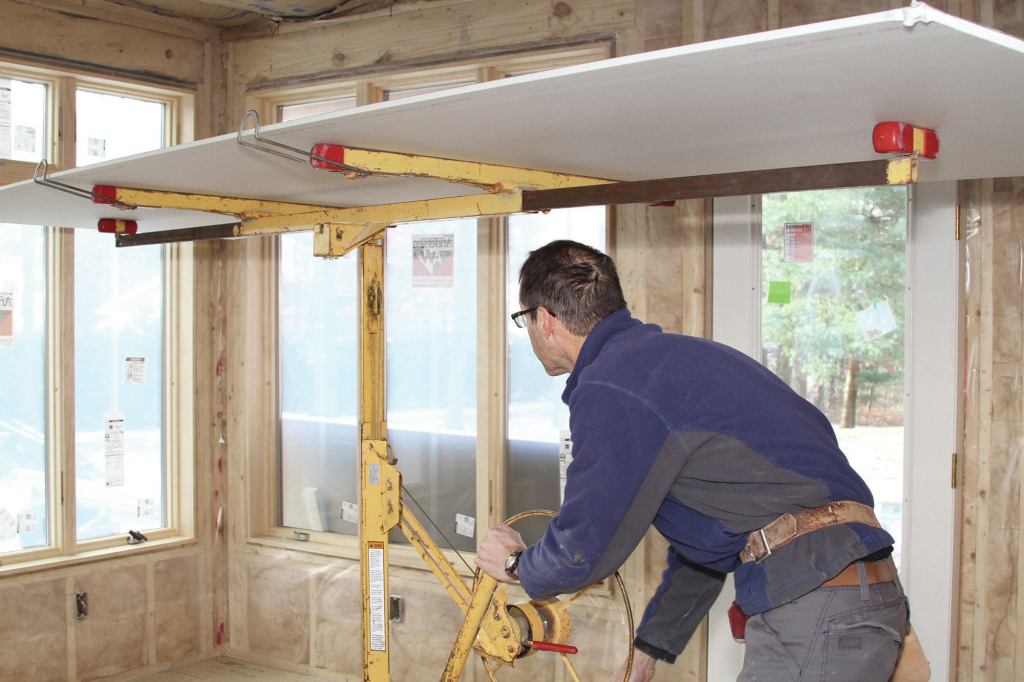
Advantages of a lift. A drywall lift is an efficient way to hang ceilings. (Lifts can be rented.) It supports the sheet tight against the joists while the screws are being driven, thus reducing the chance of fastener pops.
Hiding fasteners. Around windows and door openings,
and at the base of walls, keep the fasteners close to the opening so they will
be covered by the trim.
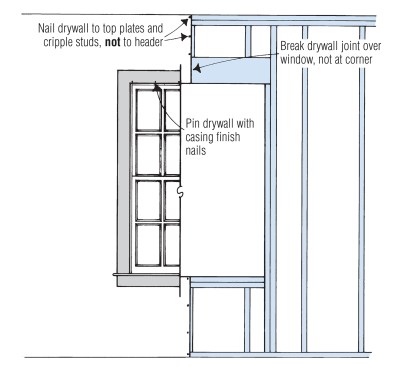
Minimizing cracks at openings. To prevent cracked drywall joints at the corners of windows and doors, place the sheet so the joint falls in the center of the opening, and then cut out the waste. Do not fasten the drywall to the header; use the interior casing to secure the loose edge of the drywall at that location.
Floating corners. Minimize nail and screw pops at wall-to-ceiling intersections by holding back the fasteners on both the wall and ceiling panels. At wall-to-wall intersections, leave the first panel unfastened in the corner and hold it in place with the abutting panel.
Single- and double-layer construction. In most residential jobs, drywall is applied as a single
layer. In single-layer applications, always hang 3/8-in. drywall perpendicular
to framing members. Sheets 1/2-in. thick and thicker can be applied either
parallel or perpendicular to the framing.
Two-ply construction will increase a wall’s fire resistance and sound-deadening ability. While the layers don’t have to be laminated with adhesives, doing so makes the wall less likely to crack over time. Apply the first (base) layer with the long edges parallel to the framing and the second (face) layer with the long edges perpendicular to the framing.
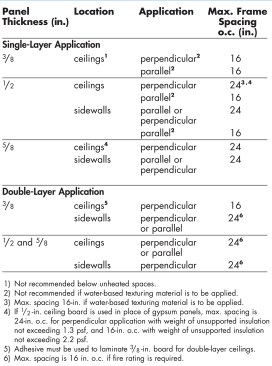
Panel direction and frame spacing. Drywall panels of different thickness will span the framing spacings indicated in the table. “Application” refers to the direction of the long edge relative to the framing members.
Installing drywall over foam. While rigid foam is more commonly used on the exterior, it
sometimes maybe used on interior walls and ceiling. To attach drywall use both
construction adhesive and screws (long enough to penetrate through foam into
framing. Installations with foam that is more than 1-inch thick is not
recommended, as there is an increased risk of dimpling drywall, particularly if
foam expands when attic temperature increase in summer.
For best results use adhesive with fewer screws, but it’s critical that you first confirm (test before installing) that the foam, drywall, and adhesive are all compatible. Extruded polystyrene is denser than polyisocyanurate foam and less likely to dimple.
Tips for Handling & Cutting Drywall
Store flat on the floor. Don’t put the drywall on stickers because they will cause the bottom sheets to deform.
Long rips. Score the face, then when cutting the paper on the backside, start the cut an inch in from the end. This will keep the scrap piece attached until you’re ready to snap it off. One worker can usually manage a panel up to 12 feet long; bigger sheets require two sets hands.
Keep it short. Undercutting the length by about ¼ inch will leave space for out-of-plumb framing. Trying to jam a too-tight piece in will bust it, leaving a big repair to deal with.
Linda Ferguson
Position the sheet in front of the outlet box and poke a hole saw through the drywall at the center of the box. Install the top line of screws so that the sheet is hanging, plunge a drywall router in at the mark, move the bit to the edge, jump over that edge, and cut out the box in a counterclockwise direction. At the end of the cut pull the bottom edge of the sheet out a bit from the wall to relieve the pressure and keep the cut from busting out.
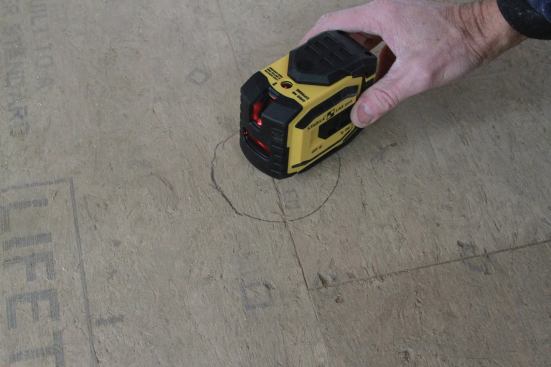
Linda Ferguson
Use a small laser to project a dot on the ceiling to find the box location for the router plunge.
Compensating for Truss Uplift
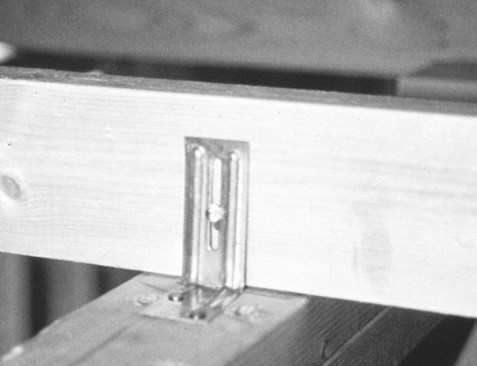
Instead of nailing trusses to wall plates, use truss clips as shown. The clips allow each truss to flex up and down freely, while preventing it from moving from side to side.
Finishing Drywall
Joint Compound
Joint compound comes in regular and setting types.
Regular joint compound comes in ready-mix and powdered forms and dries as the water in it evaporates. Drying takes at least a day— more during damp or cold weather. Compound that’s spread on too thick will shrink and crack.
Setting-type compound is a powder that’s mixed with water at the jobsite (to the consistency of peanut butter) and hardens by chemical reaction. It’s great for patching gaps and cracks: it dries rock hard, won’t shrink, and can be recoated as soon as it sets. Adding an accelerator or using warm water can reduce the drying time for a 90-minute compound to as little as 30 minutes.
Drywall Tape
For flat seams, self-adhering fiberglass mesh tape is easier to apply and less likely to blister and bubble than paper tape. Mesh tape is considerably weaker than paper tape, but using setting-type compound can compensate for the difference.
Don’t use mesh tape corners—it does not hold a crease and is
easily cut by the taping knife. Paper tape is stronger and creases easily. Some
finishers prefer perforated paper, claiming that it’s less likely to bubble.
Durability of Drywall Finish
Improperly applied joint compound, poor drying conditions, and shrinking house frames can cause a number of problems. Here are a few of the more common ones:
Blistering. Blisters in the tape arise where there’s too little compound beneath the tape or where powdered compound was mixed too thin. To fix a blister, cut it out with a utility knife, fill the hole with compound, and patch with new tape.
Cracking. Cracks along the edges of joints are caused by a poor bond between the tape and the drywall, usually because compound dried too fast or was mixed too thin. Small cracks can be gouged out, coated with shellac, and recoated with compound. Larger ones may have to be cut out and retaped.
Cracks at the center of flat joints are usually caused by movement of the framing members. These cracks tend to show up during the first year after the house is finished. To fix, retape the joint and feather over a large area.
Cracks at corners can be caused by deflection of the framing, a too-thick coat of joint compound, or tape that was slit by the edge of the taping knife. To fix, retape and refinish. “Floating” interior angles are much less likely to crack. [See “Floating Corners” under Installing Drywall, above.]
Ridging. A ridged joint is caused by framing movement. Wait until the ridge has fully developed and then sand the joint down to the tape. Fill the area on either side of the ridge with compound. After the compound dries, skim- coat the joint, feathering it over a wide area. Rounded-edge panels are much less likely to ridge.
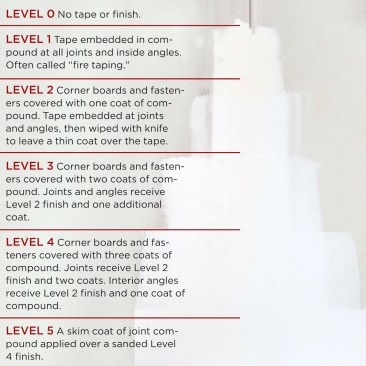
Specifying finish level. The drywall finish level should be specified to match the lighting conditions and the type of decorative coating that will be used over the drywall. Higher levels of finish are required with glossy paints, thin wall coverings, and critical lighting angles.


