“Synthetic Stucco Without Failures,” by Mark Parlee (Dec/14; Letters, Jan/15).
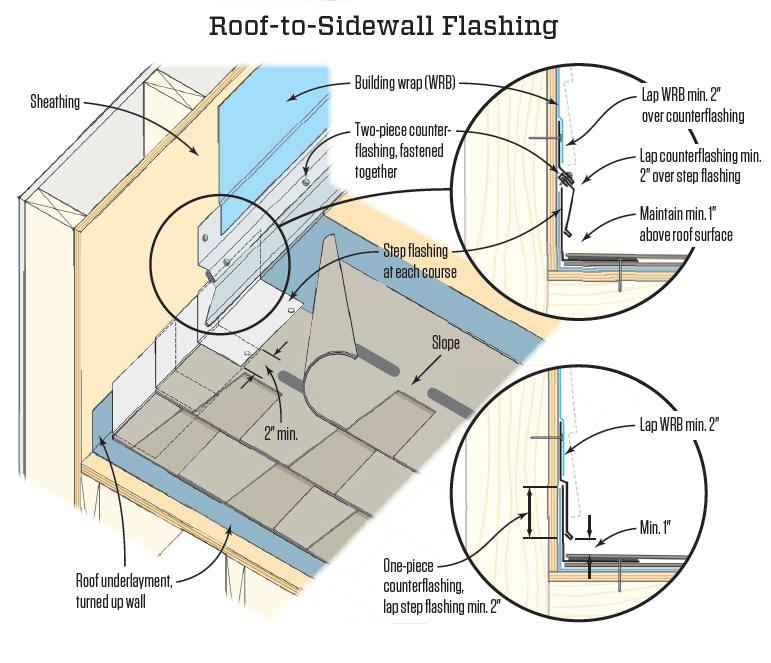
Chris Hoppe, P.E. (online, 2/21/15): Fastening step flashing on the vertical leg is not recommended by many asphalt-roofing manufacturers or the National Roofing Contractors Association (NRCA). See — detail ASPH-12A. Fastening the vertical leg of the step flashing prevents one from removing it without removing the siding. Leaving the step flashing in place when reroofing does not allow one to inspect the underlayment at the roof-to-wall junction. It is my experience that most roof leaks occur at improperly installed penetrations and flashings.
Editor’s note:The illustration at left is adapted from Chapter 4 of The bubble at lower right shows the detail in NRCA ASPH-12A, which uses a one-piece counterflashing. The bubble at upper right and the main drawing show the detail in NRCA ASPH-12, which uses a two-piece counterflashing.
“Air-Sealing Techniques From a Passive House Pro,” By Indigo Ruth-Davis (Mar/15)
Rollie (online, 3/21/15): I didn’t understand the I-joists on 36-inch centers: How does one sheathe with 4×8 panels efficiently?
Indigo Ruth-Davis responds: Using 36-inch centers for our I-joist insulation curtain wall was unique to this particular assembly. The inside finish material was 1×6 V-groove wood paneling that was attached to the timber frame and therefore didn’t need a particular spacing. The outside of the wall had no dedicated plywood sheathing, as the timber-frame bracing had sufficient shear strength. In place of exterior sheathing, Solitex Mento+, a super-durable WRB, holds in the cellulose insulation. This was first strapped vertically along the TJIs with 2x3s. Horizontal purlins were then added, spaced for vertical siding nailers. This made for a nice vented rainscreen.
The wide TJI spacing and rainscreen was designed collaboratively by Chris Miksic, the builder; Greg Whitchurch, the designer/home owner; and me to both minimize framing and encourage drying to the exterior.
TRBuzz (online, 3/20/15): I got excited when my new issue of JLC had “Air-Sealing Techniques From a Passive House Pro” as the lead article, since [air-sealing] has been an obsession of mine for some time. Quite a letdown. There seems to be little connection between the drawings, photos, and text. The photos show the air barrier between the 16-inch-o.c. I-joist curtain wall and the structural wall. The article then states that with a superinsulated wall, the air barrier should be on the inside to prevent condensation. Huh? Maybe 16 inches of insulation isn’t enough to keep the sheathing warm enough to prevent interior moisture from condensing on the sheathing. An additional airtight barrier on the inside can’t hurt but would not seem to be a priority in this case.
Indigo Ruth-Davis responds: In our climate [Vermont; climate zone 6], an interior air barrier in deep walls is pretty important. All that insulation does make the exterior sheathing colder and therefore at greater risk for condensation from moist interior air making its way through the assembly.
Editor’s note: In the presentation of this article, Indigo and the editorial team were trying something a little different. As noted in the introduction (third paragraph), the photos show techniques that Indigo and company used in a recent Passive House build. But how these techniques can be used in more conventional buildings is shown in the illustrations. We recognize that Passive House is not for everyone, but as a building standard that is pushing the envelope (no pun intended) on house energy performance, the materials and techniques adapted from Passive House projects can be applied to conventional projects. That’s why the illustrations differ from the description and photos. Likely, we could have made that clearer, so thanks for the comments.
“Q&A: Finding Buried Outlets,” by Sean Kenny (Jul/97)
Spencer Field (online, 3/17/15): I found a simpler method to try after chasing overzealous board hangers. If installed, remove the baseboards. Open a small hole at the base of the wall where you suspect the outlet to be. Insert your cellphone and snap a picture of the stud cavity. Didn’t find it? Move over a bay.
“Raising the Roof,” by Lee McGinley (APR/14)
Lee05491 (online, 3/7/15): I wonder why this technique hasn’t gained more popularity, particularly for multistory houses. I’ve fallen through rafters, only to be caught by my rib cage. Ouch! And years ago I was foolish enough to walk 2×4 top plates. Not anymore. As soon as I told my guys we were going to build the roof on the ground, there was an immediate sigh of relief. Much safer on the ground. Higher quality. Less expensive. You do, however, need an open space on the ground where the roof can be framed up.
“How to Double R-Value Without Adding Insulation,” (online, 3/5/15)
Paul Wahler (online, 3/5/15): So, I should tell my insulation subcontractor that if his crew puts the stuff in all full of lumps that he should expect a reduction of 25% in his payment.
LThomas (online, 3/15/15): It shouldn’t take a math course to figure out that if you have hills and valleys [in attic insulation], then you have heat loss. Tell me what happened to common sense in building and repairs.
“Slideshow: Sealing a South Carolina Crawlspace,” By Ted Cushman (Online, 3/9/15)
Mike O’Handley (online, 3/13/15): I’m bothered by the idea of applying poly-faced fiberglass to the face of those block walls in a known flood zone. Even if the crawlspace doesn’t technically “flood,” any moisture carried up through the footings to the foundation walls will normally evaporate into a crawlspace and dissipate via the vents. By placing that insulation over the face of the block, won’t that moisture want to migrate through vapor diffusion outward to the crawl, at which point it will hit that poly, cool to dew point, and condense inside the insulation and turn it to a soppy mess?
We here in Washington state live in such a damp environment that despite having sufficient ventilation to meet code requirements, builders add vapor barriers to further limit exposure of crawlspaces to moisture. We keep the vents, though, and most of the time it works despite the fact that the vapor barriers and crawlspaces aren’t “sealed.”
I’ve seen sealed crawlspaces here too. In those cases, unfaced fiberglass was used on the foundation walls, over the top of a barrier that extended almost to the top of the foundation wall. The barrier prevents moisture from evaporating from the concrete into the crawl, and the insulation prevented temps in the crawl from getting so low that condensation became an issue. Most significantly, I’ve seen “sealed” crawlspaces where a barrier is installed against both the walls and the floors, and all overlaps were sealed, where this technique kept that space dry as a bone. In those cases, insulation had still been installed against the floor. The insulation kept the feet warm while allowing enough heat to migrate downward that the crawl stays warm enough to ensure any vapor in the air can’t condense on any plumbing. Some of these houses dated from the 1970s and this seems to have worked really well.
Clint Allen, owner of Energy One America, responds: Thank you for your response and valid concerns regarding moisture in exterior walls of closed crawlspaces. According to IRC Table N1102.1 or IECC Table 402.1.1, sidewall insulation is a required element of a closed crawlspace assembly. We choose to use various methods of sidewall insulation in our crawlspaces, dependent on the site specifics. Each of these product choices is designed to provide insulation value as well as passive moisture resistance. Many times we will apply rigid board insulation, sometimes poly wrapped, and at other times (when not in high termite pressure zones), closed-cell insulation. Since this crawlspace was located in a high termite pressure zone, closed cell was not an option. It is our opinion that when installing closed crawlspaces in flood zones (where hydrostatically actuated vents are required), we should install the most sacrificial and least vapor-retardant materials possible so that in the event of a major water-intrusion event (requiring replacement of insulation regardless of type), we are able to replace them quickly and at the lowest possible cost.
As for the concern that passive moisture creates a dew point or excessive moisture concern during normal conditions, we simply have not seen this realized in the field. We overcome concerns over passive ground water by wrapping our primary liner system up a minimum of 18 inches from exterior grade and do not see excessive airborne humidity transferring through the higher block. Further, any moisture present in the block and traveling via capillary action would be removed to the inside of the crawlspace by the mechanical dehumidifier.
With thousands of completed installations in this climate zone, real-world experience has shown us that these sidewall assembly options are effective and without negative side effects.
“Slideshow: Retrofitting New Windows – Part 1” (online, 2/26/15)
David Orona (online, 3/2/15): I thought current flashing width was 9 inches, minimum? It doesn’t look like the sides are getting that much. AAMA 2410-02 (5.5.3 Method A), states: “A strip of approved flashing material shall be at least 230 mm (9 in) wide. Flashing shall be applied in a weatherboard fashion around the full perimeter of the opening …”
Mike Guertin (online, 3/3/15): David, AAMA standards wouldn’t kick in unless Manny was participating in AAMA’s Installation Master Program. The building code (namely, the International Residential Code, or IRC) dictates window installation and flashing minimum practices. AAMA 2410 is not listed as a referenced standard in the IRC.
The window-flashing section of the 2009 IRC (the model code that’s the basis for the Massachusetts residential code) just says that self-adhered flashing shall comply with AAMA 711, which addresses testing for various characteristics like bonding percentage, UV resistance, and water resistance. Nothing in it addresses flashing installation or size. The Vycor Pro that Manny used does conform to AAMA 711. The 2009 IRC goes on to say that window installation and flashing “shall extend to the surface of the exterior wall finish or to the water-resistive barrier for subsequent drainage.” The 2012 and 2015 IRC kick up the flashing section with more specific language—window installation and flashing must conform to the window manufacturer’s installation instructions. And if there are no instructions, an installer must install a flashing pan that is sloped to the outside or sealed (I guess that may mean a “backdam”). The IRC goes on to say, “Openings using pan flashing shall also incorporate flashing or protection at the head and sides.”
“Ice Dams and Roof Collapses Plague Wintry New England,” (Online, 2/23/15)
Larry Glickfeld: According to the articles cited, it was mainly on decks, barns, and large, flat-roof commercial buildings where roofs failed. Although the former were not likely engineered for anywhere near the occurring snow loads, in the case of the commercial buildings, roof failure is often a result of clogged drains. Heat escaping the building tends to melt snow above, which then flows toward the drains. But if the drains are clogged, either significant ponding occurs or the melted snow freezes—either way creating heavy, concentrated roof loads in the area of the drains, thereby causing localized over-stress and partial roof failure. This was a common occurrence here in Washington state in the winter of 1996–97, where there were some 400 to 500 reported roof failures. But not one of them was a gable-roof, wood-framed residence (many were pre-fab steel buildings, mobile homes, and large flat-roofed warehouses and commercial buildings). It is critical that roof drains be cleaned on a regular basis.


