Exterior cladding, including vinyl siding and manufactured stone, is essentially the first line of defense against water penetrating a home. To the untrained novice, it would seem that siding and stone veneer are the primary housing materials that prevent infiltration, but veteran installers know that these exterior cladding works in tandem with underlying water-resistive barrier (WRB) materials to repel and drain water so the structure stays dry.
Installation of exterior cladding without a WRB system leads to costly failures and homeowner dissatisfaction, not to mention the voiding of manufacturer warranties. General contractors must provide a professional installation of these water-proofing materials or face the consequences when an unhappy customer calls because water has penetrated the exterior cladding and caused damage.
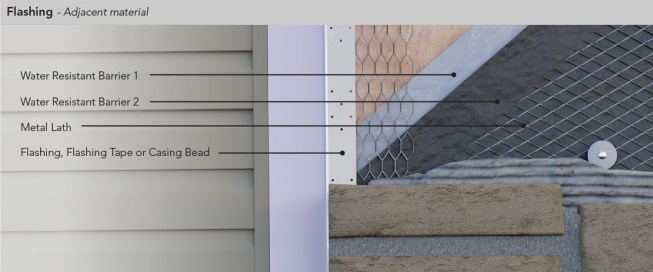
Water-proofing systems typically consist of a water-resistive barrier material integrated with metal or adhesive flashings around wall openings and over adjacent enclosures. These materials must be properly overlapped or sealed to maintain continuity of the barrier. For all cladding types, it’s critical that water-resistive barriers be vapor-permeable to ensure that wall assemblies can dry.
The following tips will help to ensure quality workmanship and minimize water damage, but they are not comprehensive instructions. Be sure to refer to and follow manufacturer’s recommended installation procedures.
Preparation of the surface wall is important for proper adhesion of water-proofing materials. The wall must be clean, dry, free of coatings that might impede bonding, and smooth. Dirty, damp, uneven or cold walls make poor surfaces on which to work; they will inhibit the adhesion process.
Installation order. When applying the moisture barrier material, always begin from the bottom, so subsequent layers overlap the layer below. If the lower layer overlaps the upper, water that penetrates the siding or
stone will collect and funnel into the wall.
Metal flashing. When metal flashing has been trimmed to size and lapped over the piece beneath it, make sure to form the flashing so water is directed away from the wall or toward a WRB-protected area, especially in
vulnerable areas such as windowsills.
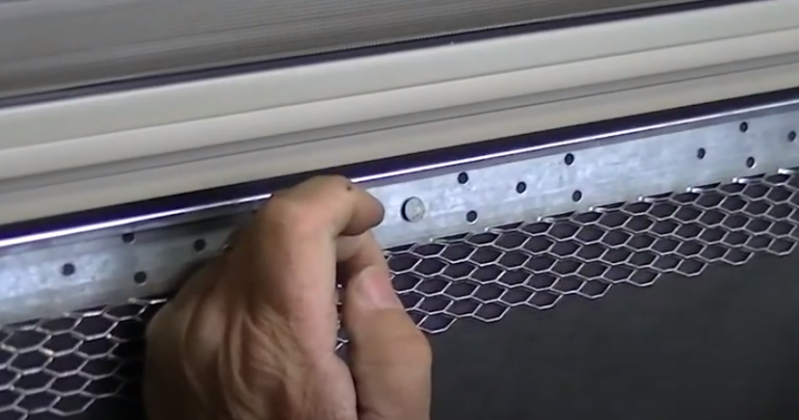
Preformed flashing can be an efficient product, but it is not made to be field formed. Metal coil flashing is malleable and can be formed to fit a space perfectly. Metal coil flashing is great for use in flashing windowsills, fascia, and door casings.
Adhesive flashing. When using adhesive flashing, avoid driving a fastener through the material, even if it is self-sealing. Ensure that the strip of flashing is applied carefully and smoothed to release air and promote good adhesion.
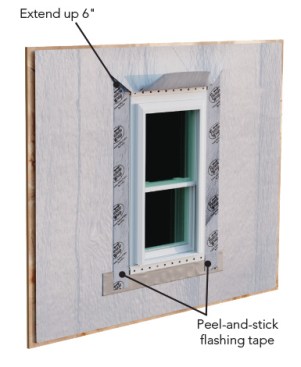
Integrated window and door flashings. When installing flashing around windows and doors, be sure to integrate adhesive flashing tape and housewrap. At the bottom and sides of the window, the flashing should lap over the housewrap, but at the top, the housewrap should lap over the flashing.
First, apply adhesive or metal flashing to the underside of the windowsill or door, then apply to the sides, ensuring that both sides overlap the bottom. For the top, metal flashing can be used to direct water outward and away from the window or door. The flashing should extend past the nail flanges of the window, to divert water outward and over the flanges of the siding panel.
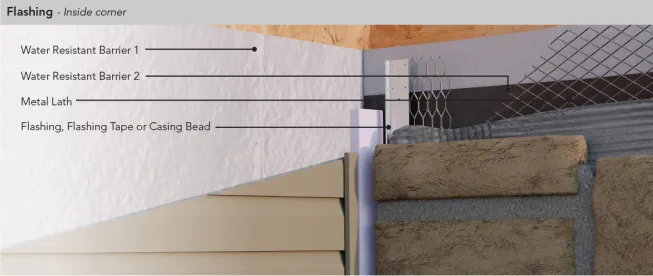
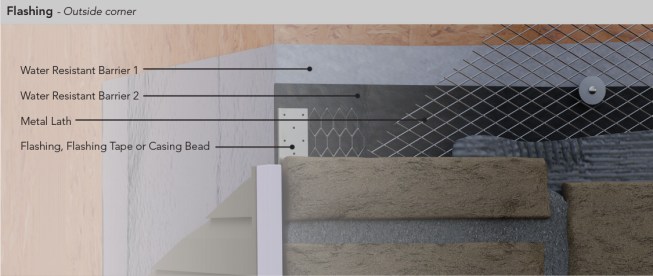
For inside corners on siding, use extruded aluminum inside corner W flashing to prevent water seepage. For transitions – areas where siding meets trim or stone – install metal J flashing between these products to create a water barrier.
For manufactured stone installation, all flashing materials must be corrosion-resistant, integrated with the WRB, and installed at all through-wall penetrations and at terminations of adhered manufactured stone veneer (ASMV) installations. One layer of house wrap covered by two layers of WRB is recommended.
Siding transitions. Where siding meets up with manufactured stone, the proper flashing materials must integrate between the transitions, or water will flow down from the siding and weep into the WRB and sheathing behind the stone. The wall must have a continuous drainage plane behind the siding that draws water away before it drains into the stone. The water-resistant barrier materials should be extended at least 6 inches above the transition.
Use a metal L-shaped flashing and tuck it under the bottom row of siding, allowing the horizontal edge to be positioned over the top row of the manufactured stone.
A rainscreen mat is strongly recommended to be installed over the housewrap and water-resistant barrier material to create an air cavity behind the stone that protects the WRB, allows moisture to drain away from the building, and accelerates evaporation.
Weep screeds and other base flashings should be used at the base of the wall to allow water to drain and exit. They should be held a minimum of 4 inches above grade or a minimum of 2 inches above paved surfaces.
For more information on siding and manufactured stone, please visit ProVia.