Q. I have heard that 5/4 PVC trim can be bent with “heat blankets,” but I do not know the best kind to use. Are there other heat sources that would work, and how do you form the curve once the material is heated?
A. Nathan Nebbia, owner of Built Better by Nate, based in Berwick, Maine, responds: I do all of my PVC bending with Heatcon heat blankets. I use the deck forming kit, which works for PVC trim stock and includes blankets wide enough (8 inches) and with enough heat output to also bend solid PVC decking. (Note: They do not work for composite or cap-stock materials.) The blankets are 10 feet long. A kit comes with two blankets, which will work for one 10-foot length, or four blankets that can do up to 20-foot lengths. They are not cheap (currently $2,700 for the 10-foot kit), but I think they are worth the investment.
For the best and quickest results, you should use two blankets—one under the stock and one on top of it. To make an “oven” that fits the blankets and the stock, I build a box with a hinged lid out of solid 2-by stock and screw cement backerboard to the inside surfaces. I have also used two insulation batts, sandwiching the blankets and trim between them, but that method takes longer, as it doesn’t hold the heat as well as the box does.
The cheap way to do it—without blankets—is to make a box, put a propane torpedo heater at one end, and blow heat through. This, too, can be made to work, but the heat doesn’t disperse as evenly as you want it to for bending an entire length of trim. Also, it’s almost guaranteed that you will overheat the end of the trim near the heater, which will make it floppy and can distort the material, while the far end will be stiff. As a result, the trim will be very difficult to handle.
Bending Form
When bending trim, you want to slowly heat up the material. Don’t crank the controller right to the maximum, especially on more delicate molding. With flat PVC trim stock, I shoot for a temperature of 250°F to 280°F. The tighter the bend, the more tempted I am to max out the temperature, but I never go over 300°F; higher temperatures will result in rippling and distortion. If that does happen to your trim, tugging on the ends of the boards can help straighten some of it out. One way to help prevent distortion is by slowly heating up to around 200°F, then cranking the heat to 280°F for just a short time—no more than five minutes. With a deck board, I always max out the temperature because the “skin” on the board is much more durable than trim stock, but you still don’t want to heat it up too fast.
If you are using 5/4 trim stock, you can expect to wait 25 minutes or more for the board to come up to temperature.
I do all the temperature readings with an infrared temperature gun. I even drill a hole into the middle of my oven to get accurate readings while the material is heating up inside.
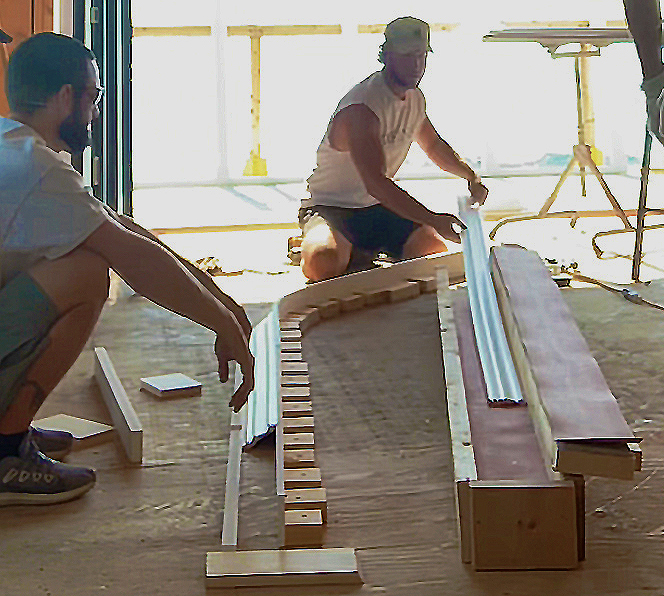
I make a bending form on a convenient area of subfloor on the job that we can keep clean while we’re doing the bending. The warm plastic is almost like a liquid, and it will conform to whatever you put it against, so it’s important that the form have a continuous edge that follows an even curve. To achieve this, I build a form with two stops, one on the inside and one on the outside. I begin by tracing out my radius and screwing a ripped piece of PVC stock to the subfloor following that radius. Then I measure the width of the trim board I’m bending and add a strong 1/16 inch to it because the trim board will be slightly expanded once it’s out of the oven. I then screw another stop along this outer line.
When bending a molding that’s nested, like a crown molding, I make sure the back (inside line) of my form is tall enough to support the molding while it’s in the nested position. An easy way to do this is to rip 1/2-inch PVC sheet stock down to the height needed and screw it to a bunch of mounting blocks following the curve. It’s kind of like one of those wooden snakes you can move around, except you secure the blocks to your work surface.
Nathan Nebbia
Nathan Nebbia
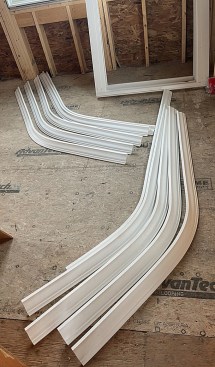
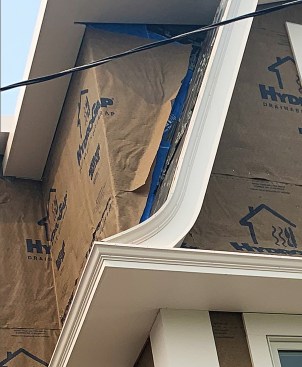
After cooling, the trim retains its curved form (left). For this project, crown molding was used to provide the flared edge common on many homes designed in Dutch Colonial and Tudor Revival styles (above).
Handling Hot Trim
Taking the heated PVC out of the oven is tricky. I’ve done this many times by myself, but at first, it’s best to have helpers. Make sure everything you need for bending is set up so you can pull the PVC out of the oven and set it into the form as quickly as possible. Waste a minute, and it will cool and stiffen up, and you will need to try again. Also make sure to wear gloves, as your hands will be on the hot material for a couple of minutes.
For flat stock, the process is pretty cut and dry once you place it between the form boards. A good tip is to drag the stock into the form instead of trying to pick it up in its wet-noodle state. The same is true for a nested profile, but make sure to hand press the top edges of the profile against the tall back of the form to prevent the trim from rippling.
After two to five minutes in the form, the trim should be good to go. I usually wait the full five minutes so I know I won’t get any springback. A good way to be sure is to check that the temperature has fallen below 140°F.


