In many ways, clay brick is the ideal exterior cladding for a building. It’s fireproof, nothing eats it, it doesn’t rust, and it doesn’t rot. As Jerry Painter, a masonry contractor from Gainesville, Fla., puts it, “Brick is like three-and-a-half-inch-thick paint that you’ll never have to touch again. Brick is forever.” As a brick mason, Painter has a certain bias. But you don’t have to believe him — you can see for yourself how well brick handles the coastal weather. Just go climb the world’s tallest brick lighthouse on Cape Hatteras, on North Carolina’s Outer Banks. Built in 1870 with one and a quarter million Virginia bricks, the nearly 200-foot-high tower has stood up to severe coastal storms, year in and year out. The structure is rugged enough that in 1999, with beach erosion threatening to wash away the ground it stood on, engineers were able to move it a half mile inland and set it on a new foundation, where its light still serves as a safety beacon. Of course, a residential brick veneer wall is not quite the same as a massive brick lighthouse. The bricks themselves are just as durable, but they’re part of a whole assembly that has its own vulnerability to wind pressures and moisture. For the walls to live up to brick’s promise, the builder has to pay careful attention to key details. Let’s take a look.
ANATOMY OF A BRICK VENEER WALL
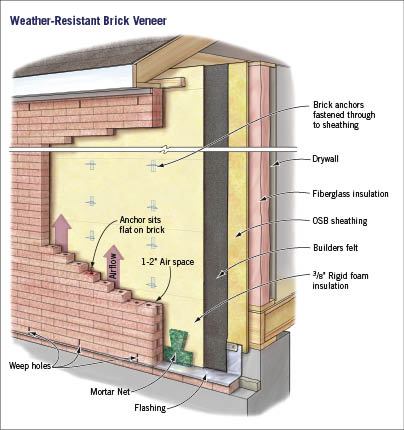
Brick veneer is basically a self-supporting wall one layer, or “wythe,” thick, built outside a main structural wall framed with concrete block, or with wood or steel studs (see
Figure 1). The brick carries its own weight down to the concrete foundation, which must be wide enough to support both the house frame and the brick, while also spanning a 1- or 2-inch air space (2 inches is better) and the thickness of any rigid insulation attached to the outside of the structural wall.
FIGURE 1. A brick veneer wall should be self-supporting on the home’s foundation, and should be firmly anchored to the wall sheathing. In much of the country, bricks are held in place by corrugated metal brick ties, but when building in high-wind zones, two-piece commercial anchors with wire legs are a better choice. The anchors should be attached to the wall with screws that penetrate all the way to the sheathing, and their legs should sit flat on the brick. The brick should also be backed up by a secondary water barrier (foam insulation in this case) that’s flashed in place, and should be separated from that barrier by a 1- or 2-inch air space with weep holes at the top and bottom, so that the wall can dry out when water or water vapor gets behind it. In this drawing, the Mortar Net product at the base of the air space is a mesh that’s designed to catch mortar droppings so that they don’t block the weep holes. Bricks and mortar are porous materials, and windblown rain (or even water from a lawn sprinkler) will soak through them in a matter of minutes. Moisture that penetrates will usually drip down the back of the bricks — that’s the reason for the air space — but it can bridge across spilled mortar collected in the gap behind the brick and come into contact with the main wall sheathing. In fact, the cavity is likely to reach 100% relative humidity quite often, so the builder should assume frequent condensation on the main wall. To protect the main wall, a moisture barrier — asphalt felt paper, housewrap, or a waterproofing membrane — is attached to the sheathing. Flashings are also installed as needed to direct water out of the wall cavity, and weep holes are built into the base of the brick veneer wall to allow water to flow out. To hold the brick in place against the pressure or suction of wind, brick ties (either strips of galvanized corrugated steel, or heavier galvanized or stainless steel clips and wire) are nailed or screwed to the wood-frame wall at code-specified intervals, and they’re embedded in the mortar joints of the brick wall. Although this time-tested assembly has performed beautifully on millions of homes, it is by no means foolproof. And in a coastal location, the high winds and sideways rain of a hurricane will likely occur at some point during the wall’s lifetime, putting the wall under extreme stress. To make sure the house is ready when a storm does arrive, the structural and moisture management details have to be done right.
IMPACT RESISTANCE
Brick is hard, and that hardness is a big advantage against one major hazard in hurricane zones: wind-borne debris. Since the 1990s, the ability to withstand the impact of a 2×4 fired out of a cannon has been the standard test for windows and wall materials, and brick passes it with flying colors (
Figure 2).
FIGURE 2. In standard impact testing at Texas Tech University, a 9-pound 2×4 launched at 35 miles per hour punctured a wood wall section sided with fiber-cement (left), but bounced off brick veneer, leaving barely a scratch (right). Tim Reinhold is currently vice president for engineering with the Institute for Business and Home Safety (IBHS). As an engineering professor at Clemson University in the 1990s, Reinhold and his graduate students launched 2x4s at a number of different wall assemblies as part of an extensive program of destructive field testing. A flying 2×4 punctured vinyl-covered OSB walls at around 20 miles per hour, says Reinhold. “But when we shot into brick with the air cannon, we were up around 50 miles per hour before knocking brick out of the wall into the sheathing, and it took 60-something miles per hour to actually stick the 2×4 through the Sheetrock into the room.” The standard for hurricane shutters on windows is 34 miles per hour. In IBHS’s “Fortified . . . for safer living” program (a voluntary guideline that specifies above-code disaster-resistant construction details), when brick veneer siding is used over a wood-frame wall, the builder can reduce the thickness of plywood or OSB sheathing from 1/2 inch down to 7/16, says Reinhold. “The 1/2-inch material is no longer needed for impact resistance. And the 7/16-inch panel still provides adequate shear resistance [against racking forces],” Reinhold explains, adding that shear resistance is more dependent on the number of nails used to attach the panel than on the thickness of the panel.
WIND RESISTANCE
Like any other wall cladding, brick veneer on the coast may have to handle varying air pressures caused by hurricane-force winds. And in that regard, suction on the leeward house wall is a bigger concern than pressure on the windward wall. “Most of the failures we see are on the side away from the wind,” says Tim Reinhold. The larger the building, the more problems wind is likely to cause. “There have been some spectacular brick failures on tall commercial buildings,” says Reinhold. “If [the brick] hasn’t been tied on well enough, then you can get a whole side of the building popped off.” While brick veneer failure is less common on small structures, it’s not unheard of. In the aftermath of Hurricane Katrina, damage assessment teams found enough examples of failed brick veneer to give the topic mention in their report, FEMA 549: Hurricane Katrina in the Gulf Coast. The team blamed the failures on deficient wall tie attachment details (
Figure 3).
FIGURE 3. Hurricane Katrina’s winds pulled a large section of brick off a Mississippi home (top left). Brick was also blown off a partially constructed wall (top right; investigators found insufficient tie spacing, and noted that some ties (bottom left) had been nailed to the wall, but not embedded into the mortar joints. Mason Jerry Painter is vice president of the Masonry Association of Florida and a technical committee chairman for the Mason Contractors Association of America. He says that wall ties generally get less attention than they deserve in the residential market. He says that brick ties should ideally last as long as the brick, but that the inexpensive, 22-gauge corrugated metal ties used on most residential jobs won’t — especially if they’re not hot-dipped galvanized. “The ties we are using in the residential industry will not serve as a lifetime anchor [for the brick].” Even bending the light metal strips up and down to keep them out of the way while laying brick can fatigue the ties and crack the galvanizing, Painter says. By contrast, says Painter, “A mason in commercial work uses a two-piece anchor made with 3/16-inch wire and attached to the wall with screws rather than nails. When we do cast stone or limestone, we use nothing but stainless steel. What makes residential work any different?” For peace of mind, Painter uses commercial ties on every job, even single-family homes. “I sleep at night. I don’t worry. And the closer to the coast I get, the more I’m going to a heavier tie.” Building science consultant Joe Lstiburek of Building Science, Inc., based in Boston, recommends tying commercial anchors into cored bricks. “Typical brick ties pull out of a mortar joint like a knife in hot butter. So we like to use stainless steel ties. These are typically two-piece ties, and they are used in commercial construction. . . . They should also be used in residential construction when you are on the coast.” After Hurricane Katrina, FEMA issued an advisory, Attachment of Brick Veneer in High-Wind Regions. Like Lstiburek, the agency recommended that builders use two-piece adjustable anchors, and that anchors within 3,000 feet of the coast be made from stainless steel. (FEMA doesn’t mention using cored brick.) If the mason chooses to use corrugated steel strap ties, said FEMA, workmanship is critical: the ties have to be carefully aligned with the mortar joint and fully embedded in mortar, with a minimum of a 5/8-inch mortar cover on the exterior face of the joint. FEMA’s table of brick tie spacing (
Figure 4) recommends spacing ranges from 10.2 to 18 inches, depending on wind zone. In practice, FEMA teams have found much wider spacings: in one example, a wall that according to the FEMA recommendations should have had 42 ties only had 9.
FIGURE 4. According to a FEMA advisory, higher wind speeds call for closer spacing of brick veneer wall ties. At wind speeds of 120 miles per hour or greater, ties should be attached with 2.5-inch ring-shank nails into studs at 16-inch o.c., with vertical spacing as close as 10.2 inches o.c. for the fastest design wind speeds.
WATER MANAGEMENT
Assuming the brick stays on the wall over a lifetime of weather exposure, it’s going to experience a lot of water. Lstiburek has a simple formula for dealing with that: “You pretend that the brick isn’t there.” In other words, he explains, “You assume that brick leaks, just like wood leaks, fiber cement leaks, and vinyl siding leaks. So you install into your building wrap or your insulating sheathing as a drainage plane, and flash to that layer.” That takes care of bulk water management. But Lstiburek points out that brick also acts as a moisture reservoir: it soaks up rain and stores it. When the sun comes out, heat drives moisture toward the inside of the house. “What you want to do is to uncouple the brick veneer moisture reservoir from the rest of the wall,” says Lstiburek. “And you have two choices. You back-ventilate the brick, with air openings at the bottom, air openings at the top, and no mortar droppings to interfere with the airflow. Or, you intercept the moisture with a vapor-impermeable condensing surface, like foam sheathing.” Flashings at the bottom of the wall, or above any windows or other openings, have to direct moisture out of the wall assembly. In practice, of course, it is nearly impossible for brick masons to keep the cavity behind the brick completely clear of mortar droppings. So for maximum odds of success, it’s best to use a belt-and-suspenders approach: install insulation and a vapor-blocking membrane over the framed wall, provide good weep holes at the wall base, and leave air holes at the top of the wall to ventilate the cavity and help it dry when it does get wet. Problem Details. Steve Easley, principal of building science consulting firm SC Easley & Associates in Danville, Calif., has seen a lot of brick veneer jobs — some good, some bad. “I probably walk 100 or 150 job sites a year with builders,” he says, “just trying to keep them out of court.” As with most moisture-related problems, says Easley, brick veneer issues are usually caused by poor workmanship and a misunderstanding of the details. “One of the biggest problems is not getting the flashing right,” says Easley. For instance, he often sees wood sheathing layered over the top of a flashing membrane. Any water that collects at the base of the wall will be wicked up by the sheathing, causing it to rot (
Figure 5).
FIGURE 5. Good flashing is a key moisture management detail for brick veneer walls. At far left is a typical mistake: OSB sheathing layered over the top of a flashing membrane. Water seeping behind the brick will saturate and rot the sheathing. At left is a correct installation: the building paper has been shingled over the base flashing to direct water down and out. Another problem is a lack of adequate weep holes for water drainage at the base of the brick veneer. “Codes typically require weep holes every 24 inches,” says Easley, “but I recommend one every other head joint [the vertical joint between bricks].” Easley notes that spilled mortar behind the wall often blocks the weep holes. Although he recommends using Mortar Net, an open-weave mesh you install behind the bricks at the wall base to hold mortar droppings away from the weep holes, he says that masons rarely use it. A less expensive but effective alternative is to embed pieces of rope in the head joints (
Figure 6). “Use thick natural-fiber ropes, staple them to the wall, and run them up the wall 3 or 4 feet,” says Easley. “That way, any water that gets in behind the brick will run down and wick into these ropes. Eventually the ropes will rot out, leaving a nice pathway for the water to exit the wall.”
FIGURE 6. Good water management for walls requires an air space for water to drain down to the base of the wall, and an exit path for that water to flow to the outside. The brick at left has been laid without an adequate air space, making it likely that water will get trapped. Above is one way to provide an exit path for water: set natural-fiber rope into the mortar joints so that water can wick out. As the ropes decay over time, a clear drain path will open for the water. Of course, it’s good to install flashing to keep water out of the wall in the first place, especially at intersections where low roofs butt into high walls. At that location, it’s important to install “kickout flashings” that direct water away from the wall and into the roof gutter. Easley recommends a molded polypropylene one-piece component called DryFlekt, which can be integrated into metal step flashing set into mortar joints to direct water away from the brick and into roof gutters (
Figure 7).
FIGURE 7. Details to keep rainwater from flowing behind the brick are the first line of defense. Above, a DryFlekt polypropylene kickout diverter flashing has been integrated into copper step flashing to direct water into gutters rather than letting it soak into the brick wall. Windows and doors are another tricky spot. Flanged vinyl windows can be flashed directly into housewrap or asphalt paper using the same methods recommended for standard installations with other siding materials. But brick mold windows and doors that don’t come with a nailing fin are harder to deal with. For this, Easley recommends a self-adhering membrane product from DuPont called StraightFlash VF, which has adhesive on both faces (
Figure 8). “It’s the only product I’ve seen that works for this,” he says. “You are essentially making your own nailing fin. First you stick one face of the flashing to the back side of the brick mold, and then when you are ready to put the window in the opening, you pull the release papers off the back, which then sticks to the building wrap.”
FIGURE 8. Tying a brick mold window or door unit into the drainage plane behind the brick presents a tricky problem. DuPont offers a flashing solution called StraightFlash VF — a peel-and-stick membrane that is applied to the back of the brick mold trim (left) before setting the unit into the hole (right). This way, brick mold casings can be integrated into building paper. All this careful detailing takes time and costs money. But to mason Jerry Painter, it’s worth the effort. “You are putting something on your house that will outlast anybody living now or in the next generation or two,” says Painter. “You are using basically an eternal product. Are you going to take short cuts? Are you going to cut corners?” ~
?Ted Cushman covers the home building and remodeling industry from his base in the Berkshire Hills of Massachusetts.