1
of 12

Scott Burt
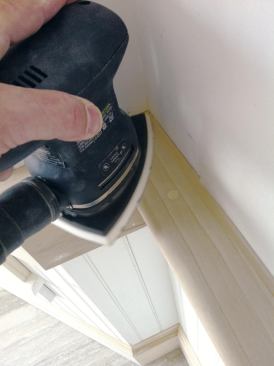
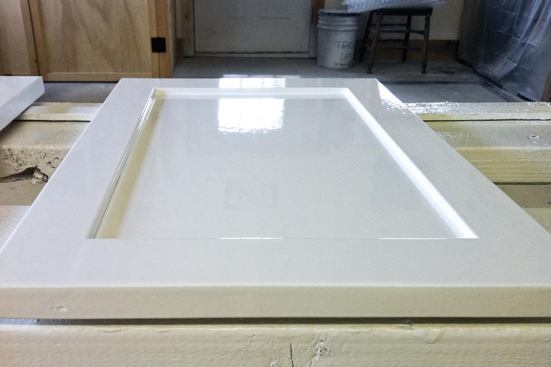
The author sands new trimwork with 120-grit paper before filling…
Scott Burt
The author sands new trimwork with 120-grit paper before filling…
Most experienced painters know about “oil rage,” a psychological phenomenon that can occur after days and weeks of dealing with oil-based paint on a long job. At times I’ve literally had to walk away because the process became so stressful.
However, now that traditional oil-based paints are slowly bowing out of the marketplace — mostly because of tougher VOC regulations — there is one trait I’ll miss about them: their remarkable consistency in finish. Whether brushed, rolled, or sprayed, they level flawlessly, leaving behind a beautiful hard-cured film with a soft sheen. Fortunately, very similar results are possible with today’s premium water-based paints, which aren’t the shiny, plastic-looking latexes of 10 or even five years ago. Now the custom builders and high-end clients I work for can’t tell the difference between my oil-based and water-based finishes.
I like water-based paints because they’re healthier for me, my employees, my clients, and the environment. They also have better color retention — they don’t fade over time like oils — and they can better handle seasonal wood movement. But we’ve had to change the way we approach a typical painting job to get the most out of these products, by adopting new techniques and using different brushes, rollers, and sprayers. It wasn’t easy giving up my badger-hair brush, but it was the only way I was going to get a satisfying finish on poplar with waterbornes.
Waterborne paints don’t contain the VOC-producing chemicals that promote penetration in oil-based paints; instead, they’re designed to bind to the substrate’s surface. The water in the paint is simply a vehicle that delivers the binders, resins, and pigments and then quickly evaporates, leaving those ingredients to tack, cure, and harden to form a sheen.
If a coating doesn’t penetrate wood grain, it has to be able to bind to it like crazy, and the new waterbornes do that in spades. Crusty waterborne films are so sticky they can take the bristles right out of a brush during cleanup. As a result, synthetic bristles are now designed so that they release paint better during both application and cleanup, and the epoxies holding the bristles to the ferrule band are stronger.
Because waterborne paints dry significantly faster than their oil-based counterparts, it’s harder to keep a wet edge and lay down an even coat. And when wet paint is pulled onto an already-dry surface, unevenness in the sheen of the finish coat — or flashing — can occur.
Complicating matters, waterbornes are much more sensitive than oils to temperature and humidity during application. Keeping a wet edge becomes even trickier when it’s warmer than 77°F or the relative humidity is less than 50 percent (the conditions under which the drying times for most paints are calculated). We much prefer painting on cool and rainy days, when drying times are slower and it’s easier to get a good finish.
Because these differences may be overlooked, waterborne finishes are often incorrectly applied. One of the first things we learned is that you can’t use the same brushing techniques you use with oil. So what do we do when the paint is faster than we are? It’s counterintuitive, but we slow down. These paints are unforgiving and will win if you try to race them. Instead of trying to keep an entire piece wet while working with it, you need to break it down into workable sections.
If we’re painting a door, for example, we paint the panels, then the rails, then the stiles, working the entire piece from the inside out and from top to bottom. To avoid flashing where two elements join, we have to be precise and treat each element as a separate component, since even a small overlap will be noticeable. On the other hand, we can stop painting at a logical break in the sequence, take lunch, and resume painting later without affecting the final finish.
Once laid out and leveled, a waterborne paint quickly dries to the touch as it cures; it won’t sit there in a clammy state collecting dust for 24 hours the way oil paints will. Dust contamination can be a real problem when painting trim and cabinets, where finish quality is critical; using waterborne paints reduces this risk considerably.
Faster drying times, of course, make it easier to meet project schedules. In the past, when we were building entirely oil-based three- and four-coat systems, we were limited in the number of steps we could complete in a single day. Now we can take raw trim through several stages — filling nail holes, priming, light sanding, caulking, and even applying the first coat — in a single day. And we can do so while working closer to the carpenters on the project.
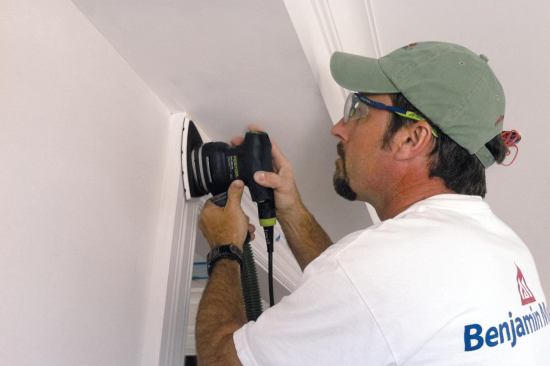
With newly installed carpentry, we start by finish-sanding with 120-grit paper to smooth out joints, ease edges, and remove mill glaze (see Figure 1). We used to spend a lot of time hand-sanding, but this phase of the job is a lot faster and cleaner now that we use Festool gear with dust extraction (888/337-8600, festoolusa.com) for 90 percent of our prep and between-coat sanding.
The Festool finish sander we use most often — the DTS 400 — has a triangular pad that makes it easy to get into corners. We also use Festool’s Granat paper, a fast-cutting aluminum oxide and ceramic hybrid that’s made for sanding painted surfaces and doesn’t load up or leave swirls. For detailed profiles like crowns, coves, and scotia moldings, we use Festool’s LS 130 linear sander, which can be fitted with different sanding-pad profiles. We have a CT 26 vacuum, which is HEPA-rated, so we can also use it on our occasional RRP jobs.
After initial sanding, we fill the fastener holes with Zar Wood Patch (800/845-5227, ugl.com), a heavy-bodied latex filler, puttying the holes until they are overfilled. After an hour or two of drying time, we come back and sand again with 120- or 150-grit paper.
Before we switched to Festool equipment, we filled holes with lightweight vinyl spackle and took extra time in the filling to try to minimize tedious hand-sanding. The process was still hard on the hands, though, especially on big jobs, where eight hours of sanding would leave us covered with a sickening amount of dust. Now that we’re power-sanding with dust extraction, we can apply fillers that dry faster and harder than the lightweight fillers yet finish up a lot faster, without giving us sore arms or a head-to-foot coating of dust.
Though a small percentage of them will dimple, usually we try to fill nail holes before priming. The dimpled holes are easy to spot once the primer dries, and can be skim-coated with quick-drying spackle. Before painting, we lightly sand these holes smooth with 180- or 220-grit paper.
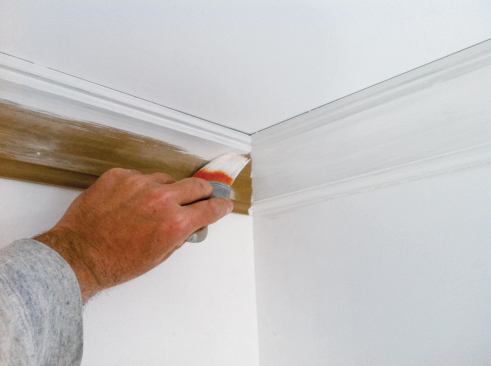
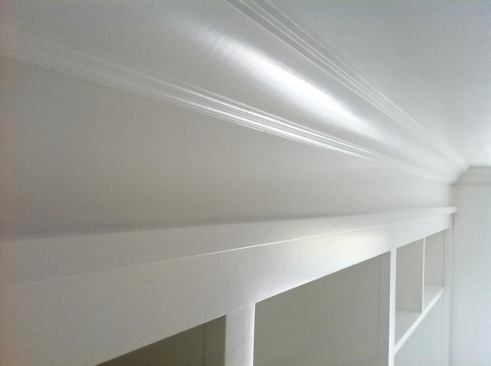
In interior work, the primer’s function is to seal the grain and bond well to the wood substrate (Figure 2, previous page). It also provides a sandable base coat so that the top coat can glide over it with little resistance, which is critical with faster-drying paints. Some manufacturers offer hybrid water-based paint/primers, but we don’t use them because they don’t eliminate the need for multiple top coats on most projects.
To speed up our between-coat cosmetic work and our finish sequence, we generally use fast-drying water-based primers when working with water-based paints (though water-based top coats can also be used over thick-bodied — and slow-drying — alkyd primers). Two of our favorite primer-and-paint combinations for trimwork are Sherwin-Williams Wall & Wood primer top-coated with S-W Cashmere acrylic latex in a medium-luster finish (800/474-3794, sherwin-williams.com), and Benjamin Moore 046 Fresh Start all-purpose primer top-coated with BM’s 314 Waterborne Satin Impervo (866/708-9180, benjaminmoore.com).
Most all-purpose primers don’t block stains well, so if there are knots or stains from tannin or grain bleeding, we seal them up first with three spot-coats of Zinsser BIN shellac-based primer (847/367-7700, rustoleum.com). We apply the BIN with a throwaway chip brush, lightly sand after the third coat, then brush on (or sometimes spray) the primer.
Since water-based primers typically raise the grain of the wood slightly, it’s important to finish-sand after the prime coat has dried. We use 150- to 180-grit paper to remove grain and any visible brush strokes or other imperfections. If we’re sanding by hand, we vacuum and wipe the trim down with a damp cloth; if we’re sanding with our Festool equipment, we can then go straight to paint.
With preprimed material, some spot priming is usually required to feather back any factory primer that was sanded out during prep. We also inspect and correct cosmetic flaws exposed by the prime coat, such as dimpled fastener holes. Then we caulk gaps with DAP Alex Plus (800/543-3840, dap.com), an acrylic latex caulk fortified with just enough silicone to give it flex, so it resists cracking.
When we were working with oil-based paints, we would shut down an entire floor of a house with plastic Zip Walls during the final coat to keep other subcontractors out and protect against dust, which can continue to settle on the paint for as long as 24 hours after the final coat has been applied. Even with that protection, we’d still usually have to buff the finish a little. Since water-based paints dry so quickly, we don’t mind when other subs are working in the next room, even if they’re cutting trim or sanding drywall, as long as we can seal off our work area for an hour or so.
As with oils, we sometimes brush, sometimes spray, and sometimes roll water-based top coats, depending on the project.
Brushing. Using the right brush to minimize the number of strokes and bristle marks in the finish is one of the keys to success with waterborne paints. “Lay it out clean, then leave it” is the best advice. Natural China bristle brushes will shed and fall apart if you try to use them with water-based paints. For that reason, we’ve switched to the new generation of synthetic filament brushes, which are specifically designed to pick up and release heavier-bodied, faster-drying waterborne primers and paints, including low-VOC formulas.
For trimwork, we’ve had good luck with soft-bristled Purdy Nylox Elasco (800/547-0780, purdy.com) and Wooster Chinex FTP (800/392-7246, woosterbrush.com) brushes. Unlike cheaper versions, which have stiff, hollow, uniformly sized filaments, quality brushes have solid (for strength) round filaments that taper from the base to the tip, mimicking the shape and action of natural bristles. While a cheap brush is typically assembled and then trimmed to size, a good brush receives a blend of filament lengths and tapers (tailored to how the brush will be used) before it is assembled. Since coarse tips tend to leave more prominent brush marks, the filament tips on a good brush are usually flagged (sliced) or tipped (narrowed to a point). A quality brush is also easier to clean and rebounds well from daily use, despite getting caked up at times by the fast-drying paints we work with.
When it’s hot or very dry, we use Floetrol (954/929-3905, owatrol.com), a paint additive that extends open time. We follow the manufacturer’s thinning recommendations, adding Floetrol until the paint doesn’t drag, which makes it easier to lay out an even coat that levels out nicely.
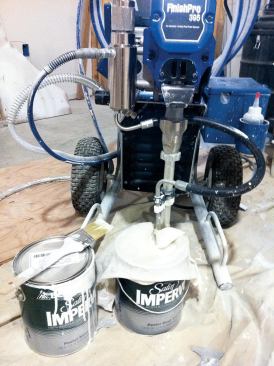
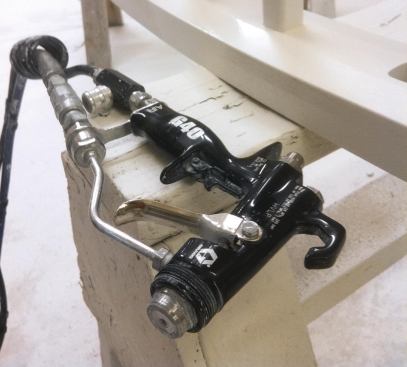
Spraying. High-volume low-pressure (HVLP) rigs are great for oil-based trim finish spraying, but many don’t work as well with the heavier viscosity and temperature sensitivity of water-based paints. Instead, we use air-assisted airless sprayers — either our Graco Finish Pro 395 (800/334-6955, graco.com) or our Titan MultiFinish 440 (800/526-5362, titantool.com). These rigs are essentially traditional airless piston pumps except that they’re also powered by an air compressor and have a separate air hose that mixes air with the paint where it emerges from the tip. With an air-assisted airless sprayer, the fan of paint hits the surface at significantly lower pressures than with conventional airless sprayers, greatly reducing overspray and bounceback. Both our rigs came equipped with high-transfer efficiency HVLP-rated guns, which enhance the performance of these systems (Figure 3, page 52).
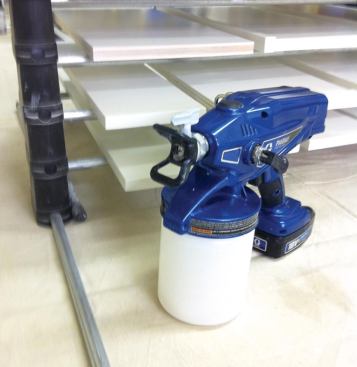
On smaller jobs or when a truly fine HVLP finish is required, we use our Apollo 1050VR HVLP sprayer. This unit has a five-stage turbine for atomizing higher-viscosity coatings like latex. And to spray a few doors or a stack of shelving, we use our Graco 18-volt ProShot cordless sprayer, which lays down a very nice finish and cleans up easily afterward (Figure 4, previous page).
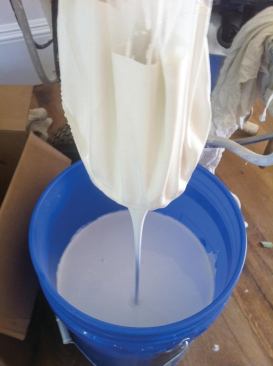
Sprayer manufacturers often recommend additives to reduce wear on sprayer pumps, guns, and tips. Penetrol is the preferred lubricant for oil paints, but for waterbornes (which are more abrasive) we use Floetrol or XIM Latex X-Tender (800/262-8469, ximbonder.com). Before application, we strain our “slicked-up” mixture through a net (Figure 5, previous page). We also set aside a pour-off can where trim paint batches go at the end of the day; when the can gets full, we strain the paint again and use it as a main batch.
One of the tricks when spraying waterbornes is not to get greedy and spray too much at once. We use a “tack coat” approach, where we keep building thin layers with multiple passes of the gun. This results in the best adhesion, and if done in workable sequences where no layer dries before the next is added, all the layers lay down together as a single even coat.
Rolling. When spraying is impractical, we often roll larger surfaces (such as cabinet or entry-door panels) using foam or short-nap velour rollers. Rolled waterbornes can be backbrushed, but it’s not necessary. Backbrushing changes the texture of the finish, so we either roll and backbrush or roll only, but never both.
After we’ve applied the first coat, we lightly sand everything with 180- to 220-grit paper. On those rare occasions when we’re not using our Festool equipment, we vacuum again and wipe down the finish with a damp tack cloth. (We’re always careful to follow the manufacturer’s recommended drying times before sanding and recoating.)
If we’ve masked off, we remove the tape as soon as possible, moving slowly and evenly as we pull it at an angle away from the finish edge. If the paint finish is particularly heavy, scoring with a sharp blade can help, but this is risky business in inexperienced hands. For masking, we use ProMask Plus (800/474-8273, intertapepolymer.com) and FrogTape (877/376-8273, frogtape.com) painter’s tape.
Waterborne satins can be buffed quite effectively to smooth out the finish, but we seldom do this anymore (Figure 6). The process isn’t as necessary as it was with oil-based paints, because of the lower risk of airborne contamination.
Scott Burt owns and operates Topcoat Finishes in Jericho, Vt.


