A typical situation
Yes, there are such things as “paint emergencies”. They can be time based emergencies, such as: “our daughter is getting married in the dining room next month and we need to get it painted, decorated and refurnished.” Or, they can be the uglier flavor requiring water damage repair on ceilings, walls and floors.
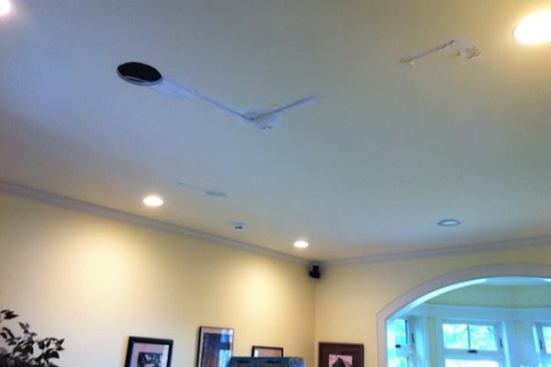
Without doubt, water damage repair of ceilings are the most popular paint emergency call we receive at Topcoat. Water damage comes in a few different flavors. Here in the northeast, ice damming on roofs is a common culprit…blocks of ice forming around the roof perimeter, going through a constant freeze/thaw cycle, and slowly infiltrating to the interior. The other flavor is the plumbing leak. Just about without fail, it is the shower drain on the top floor of the house that bursts and sends dozens of gallons of water down through the ceilings and floors below.
Most common reasons for water damage repair:
- roof leaks
- plumbing leaks
From a painter’s standpoint, water damage is water damage, but the first criteria before embarking upon a water damage repair is to make sure that the source of the problem has been corrected, so that it does not become a repeat repair. It is difficult enough to do it just once.
In the water damage world, ceilings see the most damage because they are horizontal surfaces that lend themselves well to internal water pooling. In general, when you see the water stain on the ceiling, the visible stain is usually just a fraction of the actual amount of damage.
When Drywall gets Wet
In sheetrock ceilings, water damage causes the following:
- water stains
- tape joint failure
- paper veneer lift from the gypsum
- crumbling and disintegration of the gypsum itself
- mildew or mold formation inside the ceiling
Drywall is gypsum wrapped in a paper face and thick backing. Hence the common name: sheetrock, or drywall. Gypsum is a very soft mineral (rock), so when it gets wet, it becomes spongy and quickly compromised. Invariably, water finds its way to sheetrock, from the topside, up inside the ceiling where it can pool for a considerable amount of time before manifesting on the visible painted paper face of the ceiling. Obviously, water sitting in an enclosed space for lengthy periods is not a good thing. Point being, the cosmetic damage that you see when you discover a water leak is the easiest part of the overall problem.
During home construction, drywall is “hung” on ceilings and walls, fastened by screws into the framing lumber. Where one sheet of drywall meets another, they are “taped”. Sheetrock installers use a paper tape which is bedded in joint compound, or “mud”, and then skimmed over multiple times to blend flawlessly into one large, smooth surface. The screws are also skimmed over with mud.
When water infiltrates a ceiling, it has a remarkable capacity to find the screws and the tape joints, and this is its quickest route to being detected. It will enter the screw holes from the topside, loosen the connection of the drywall to the framing, and rust the screws. These show up as screw “pops”. Water also gets to the tape joints and weakens their connection. Even after the water has dried out, it leaves air pockets everywhere that it has been. The tape bubbles and lifts, becoming proud from the previously flat surface. If you try to apply paint over surfaces that have been compromised in this manner, the water in the paint only worsens the problem. It has to be repaired.
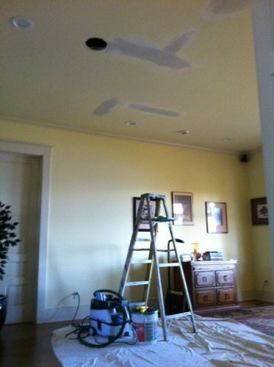
Clear the Space and Lay Out Drops: This is gonna get ugly.
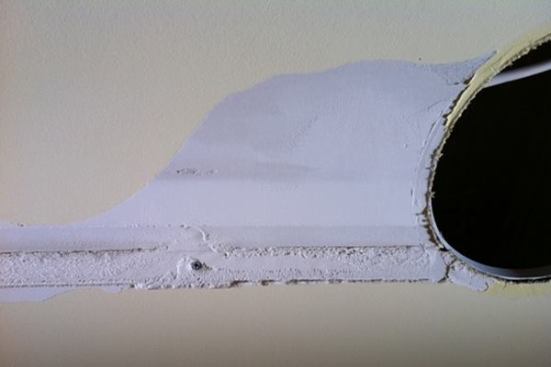
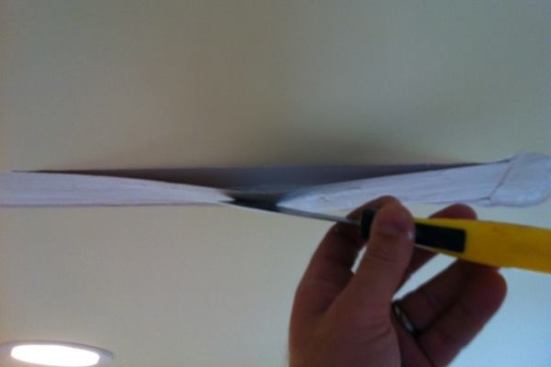
The first thing we do when called in for a water damage repair is to open up the can of worms. First, it is critical to clear the area. Get furniture and rugs out of harms way. Then, we put down drop cloth floor protection. Surgery starts by cutting out the area where the most blatant staining is visible. This quickly becomes an exercise in peeling out tape. It is critical to peel back and remove tape until it is absolutely solid and intact. This is determined by lightly tapping on the tape. If it sounds hollow underneath, keep pulling until the tapping sound is solid. At this point, cut off the failed tape nice and square with a sharp utility knife, and dispose of it. Also, remove any screws that have become rusty or loose, and install new sheetrock screws in a few inches away. Don’t overdrive the screws, or you will go right through the compromised substrate.
In most non-catastrophic, garden variety water damage scenarios, the repair is a retaping and skimming exercise. Once in a while, it becomes necessary to cut out sections or entire sheets of drywall, but this is not typical. In most cases, it is cosmetic work. But it is imperative to allow plenty of dry out time after cutting out the damaged tape joints. It is ugly to look at for a while, but to try to button it all back up in the same week you discovered it is just asking for trouble. Understand that the removal process is very messy. Many feet of funky tape, chunks of gypsum and insidious, stinky dust, and even paper veneer tear out must be bagged up and disposed of, and constant vacuuming is a must.
Removal of the damaged surfaces and cleanup is almost as labor intensive as the repair and repaint work itself. But, it is important to do a clean job of tearing out the damage, because you will later be bedding new tape and skim work into the same areas, and it is essential to end up with a perfectly smooth, flat surface when done.
When the ceiling has dried out, we use joint compound and tape to recreate the joints. For repair work, it is possible to use either paper tape or mesh fiberglass style tape. The fiberglass tape is a bit easier to use for repair work because it beds in mud easily and blends well. It is less likely to show lipped edges through mud that is skimmed over it.
Before bed bedding the repair tape, it is important to make sure all loose gypsum and debris is off the surface, so that small chunks aren’t pulled into the new mud. To “bed” tape in the repair area, use a 6? mud knife, and skim a layer of mud into the damaged area. Do one section or “run” at a time, and immediately lay tape into the area while the mud is still wet. Once the tape is in the mud, skim your mud knife over the tape in a smooth but firm pass to really set the tape cleanly into the bed of mud.
For efficiency, stay “in sequence” when doing this type of repair work. Do all of the bedding at the same time, and let it dry per the mud manufacturers recommendation. The next step is the first skim. While tape is just over 2? wide, it is often necessary to create a skim that is 16-24? wide to perfectly blend a repair joint into its surroundings. Several sizes of mud knives come into play, with the 6? being the smallest. It is handy to have several sizes, and a “hawk”, which is a large flat plate with handle, used to hold the mud that you are skimming with the knives. It is usually necessary to do as many as 3-4 rounds of full skimming in a repair job. It is critical to keep the skims as thin and smooth as possible, to minimize the amount of sanding that is required between coats of mud. Ideally, you are just taking the “edge” off the dried skims before applying the next. Skimming is a real art, to do it well, and it is a great skill to learn and master.
We use orbital sanders with dust collection for this type of repair work. This provides a far superior user experience compared to
sanding by hand with sponges and getting covered in mud dust, which is the most insidious of all dust forms. Proper dust extraction and containment keeps the dust from becoming airborne where it can travel through the space, and also enter human lungs (not good).
Once the skimming is complete, the real test of of the results is to apply primer. Using a 9? roller and drywall primer, spot prime or “feather” the mudded areas. This seals the mud and reduces the risk of “flashing” when paint is applied. After spot priming, we usually apply ceiling paint to the primed areas. This helps to catch up the repaired area to its surrounding, from a coverage standpoint, and also helps to reintroduce roller texture to the repaired area, which helps with the overall blending of the repair. At this point, we put inspection lights on the repaired and touched up areas. If we see anything that doesn’t look right, we skim more as needed, then do the spot prime and first coat paint steps again. Repeat as needed.
Now, the paint job can begin. The repair and touch up is never enough. If the room has any kind of natural light, you can almost always see the repaired areas because the primed/touched up areas look more freshly painted than the surrounding surfaces. We always finish off with two coats of cut and rolled flat ceiling paint. Cutting ceiling finish coats into existing walls does take some cutting skill and time. If changing wall colors has ever been on the radar, this is also a very good time to do that, since the room is emptied and drop clothed.
This is a basic overview of how we approach this most common of residential paint emergencies. Every situation is a little bit different, but this covers the basic, common factors to consider in planning the repair.
Click here to read the original article.
Topcoat tests and reviews new product technologies, in many cases, months in advance of their release to the public. Our projects and state of the art shop facilities are the testing grounds for our paint tool reviews. For more information, visit topcoatreview.com


