by Mike Sloggatt
Working on Long Island, we have to prepare our homes to weather the occasional nor’easter. This type of storm occurs when a powerful low-pressure area forms during winter, producing strong northeasterly winds combined with heavy rainfall or snowfall. (If you’re not familiar with one of these storms, watch the movie The Perfect Storm.) The rain literally travels parallel to the ground, propelled by intense winds that invariably drive water into places one would never expect. So when it comes to installing windows and doors, I’m not afraid of overkill. I’d rather spend the money and time up front than hassle with the callback later on.
A recent job of mine illustrates the flashing routine I typically employ. On this particular project, I had to replace an existing steel window with a sliding glass door. The home was slightly inland of a 100-mph wind zone, so it did not require the laminated glass and seacoast fastening required on beachfront homes. However, it had its own challenges. Typical of a 1950s “Long Island Split” (a split-level ranch), the home had a brick-veneer exterior, and the existing window had been installed before the brick, making removal difficult.
Remodeling contractor Mike Sloggatt depends on self-adhesive flashing to create a drainable flashing assembly. He has never had a callback using this method.
Window Demolition
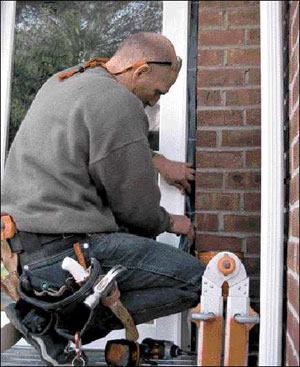
I wanted to avoid removing the brick to get at the steel flange, so we set about removing the glass and the frame first, which would allow us to pry the flange loose. I’ve dealt with many windows just like this, so I knew there was no polite way to go about the task. The fastest way by far would be to break away the glass and then cut the steel frame into sections. To contain the glass and avoid the dangerous mess of shattered glass, I used Protective Products’ Carpet Protection (http://www.protectiveproducts.com), a thin polyethylene film with an adhesive backing, made to protect carpet during construction. The film also sticks well to glass. By applying it to both sides of the glass, we were able to break the window out of the frame without having it fly all around the job site (Figure 1).
Once the glass was removed, a reciprocating saw made quick work of the frame. To extract the frame from behind the brick, we slipped a 6-inch metal-cutting blade behind the flange and cut through the nails. This allowed us to pry the frame out from behind the brick using a fireman’s 36-inch halligan bar.
The client selected a Marvin Integrity slider — one of the few 9-foot factory-constructed doors that fit our existing opening. Preparing the opening for the new door simply required removing the remaining low wall below the window and a few courses of brick.
FIGURE 1. Carpet Protection — a strong, self-adhesive plastic film — adheres well to glass (top). When it’s applied to both sides of the window, the glass can be broken out without creating a hazard (bottom).
Outside, we will be installing a deck, so I had to plan the door installation to work with the future deck design. I have two major concerns with deck-level door installations: water infiltration and air infiltration.
Drainage Details
The usual way of coping with water entry is to try to create a barrier to keep out the water, never letting it get past the exterior envelope. That approach rarely works, however. There are too many pathways for water to find and too many elements — caulk, siding, and roofing — that can fail. Moreover, any barrier that keeps water out will also keep water trapped in the building cavity once it gets there.
Instead, I always use the drainage method. This approach assumes that water will eventually find its way past the primary line of defense — the siding and trim — and relies on a secondary drainage plane that diverts the leaking water down and away from the opening.
I start establishing my drainage plane from the bottom up. First, I set a layer of self-adhering flashing tape over the rough framing and lap it on top of the brick veneer to direct wind-driven rain away from the void between the sheathing and the brick veneer (Figure 2). There are a number of peel-and-stick membranes on the market that can be used for this. We typically use Grace Vycor Plus — an asphalt-based flashing tape that I have relied on for many years (http://www.graceathome.com). It’s economical, and I have never had an instance in which the tape has failed. When I return to install the deck, this first layer of Vycor Plus will be integrated into a protective layer that will isolate the ledger board from the house sheathing.
FIGURE 2. Deck-level sliding doors are susceptible to water and air infiltration. To reduce problems, the author begins with a layer of self-adhesive flashing beneath the subfloor and lapped onto the brick veneer.
The next step is to install a copper flashing pan (Figure 3). This is a positive drainage pan that will prevent any wind-driven water from pushing into the structure from under the door unit. I bend the pan on site with a metal brake and solder the corners for maximum protection.
FIGURE 3. The best defense against blowing rain is a drainable assembly. A drainable sliding door assembly depends on a copper sill pan (top). The back lip of the pan will be caulked to the interior hardwood floor and the door’s oak saddle (bottom). This helps seal the air leak that would otherwise create a strong pressure differential between the indoors and the outdoors, causing water-laden air to be sucked in.
By bending a 3/4-inch lip on the interior, I can protect the hardwood flooring from any stray moisture that might be blown in from underneath or that might migrate from the door sill or frame. The top of the pan will get caulked against the back of the door frame prior to installing the oak saddle. This is a very important seal. Its primary function is to prevent air infiltration. By sealing this, we are, of course, stopping drafts. But we are also minimizing the pressure differential between the indoor and the outdoor air when a storm is blowing. A strong difference in air pressure can literally suck in water-laden air through the tiniest cracks. Sealing the opening shuts off the air drive that might otherwise force water under the door unit. And by leaving the front of the pan open, any stray water that might find its way to the pan will drain out and away from the building. This keeps the outside environment outside, where we want it.
Installing and Flashing the Door
Before installing the door, I wrapped the trimmers with the Vycor Plus (Figure 4). This flashing strip should lap over the upturned edge of the copper pan so that any water that might drip down the flashing will drain into the pan and toward the exterior. It’s important to remember to never reverse-lap, or water can seep into the interior cavity.
FIGURE 4. The author sandwiches the door’s nailing flange in Vycor Plus (both photos) — one layer hugging the trimmers and a second layer lapping the flange. While sometimes considered a redundancy, this “belt and suspenders” approach provides protection from the hard-driving northeasterly winds that blow across Long Island in winter.
To install the door, we removed the sliding panel to make the unit as light as possible. We then lifted the door up onto our scaffolding. The sill was already dead level, so shimming the bottom sill was not necessary. (On large door units, I find it better to reset the sill and get it perfectly level rather than try to shim the door.) I checked that the door was square in the opening by using a diagonal measurement across the unit. We double-checked for plumb and level before installing the sliding panel, then checked to make sure the door operated smoothly.
This door model called for nailing the flange to the sheathing with 11/2-inch roofing nails and side jamb screws. The side jamb screws were not a problem; I first shimmed behind each side jamb screw before setting the factory-supplied screws into the existing trimmer studs, repeatedly checking the door operation as I went. But nailing the flange would have been tough because of the brick veneer. Not willing to risk damage from an errant hammer head, I instructed my helper to screw it in with 2-inch coated deck screws instead of using the roofing nails. Most manufacturers require a bead of caulk on the back of the nailing flange as well. While this barrier by itself is unlikely to keep out water over time, it’s always wise to comply with the manufacturer’s instructions. This will cover you in the event of a problem later.
Next, I installed another strip of Vycor Plus flashing to prevent driving rain from getting into the cavity between the rough framing and the door unit. To make this piece, I stripped smaller widths out of the standard 9-inch width. To facilitate slicing the flashing tape, I use a scrap strip of plywood into which I’ve cut saw kerfs at 3, 4, 5, and 6 inches from one edge. I can then lay the tape over the board and easily run a utility knife down the slot.
It’s a good idea to wipe down the door frame with alcohol to clean the flange before applying the flashing tape. When installing the flashing, I cover about 1/4 inch of the flange — enough to cover the mechanical joint but not so much that it can be seen after the exterior trim is installed.
This particular home had a large soffit overhang, which is a good design for this climate. First, it protects the windows and doors from a lot of the rainwater. Second, there is less heat absorbed through the glass panels in the dead of summer when the sun is high. The winter sun, however, is low enough to shine under this overhang so it can warm the room during the day.
Even with such an overhang protecting the opening from water, we still take care to seal the top flange (Figure 5). The lesson I’ve learned is that, invariably, someone will decide to power-wash the soffit, siding, and door. By carefully sealing above the door and pushing the flashing membrane up into the soffit area, I know it won’t leak even with water sprayed into the joint at 3,500 psi.
FIGURE 5. Even though a deep overhang protects the head jamb of this opening, the author takes care to seal the head as well (above). He’s learned from experience that unless this is done, someone will inevitably power-wash the exterior and inadvertently create a leak.
Finishing Up
Though it’s not shown in the photos, the final exterior treatment will be a wood trim, such as WindsorOne preprimed 5/4 trim stock (http://www.windsorone.com). In more severe exposures, I would use Azek cellular PVC (http://www.azek.com). We will caulk the exterior face against the brick with a high-quality polyurethane caulk but will leave the bottom joint open for drainage.
Some builders feel the multiple layers of Vycor are overkill for door flashing, particularly for such a protected opening as this house design affords. But I have never had a callback on a door we’ve installed using this method. I have, however, repaired many doors that I did not install. In one case — a waterfront home on the north shore of Long Island — water infiltration damaged the hardwood flooring, the wallboard, and the door slab. Four attempts to stop the water had been made by the home builder before the homeowner asked us to remedy the problem. Using the method I’ve described here, we removed and reinstalled the door, properly layering the weather barrier and removing the caulking the builder had applied in an attempt to stop the water. On that job, I confidently told a very skeptical client to pay me after the next nor’easter. I received my check three months later. ~
Mike Sloggatt has been remodeling old homes on Long Island for more than 27 years and is a member of the JLC Live construction demonstration team. All photos by the author and his crew.


