Last winter, the company I work for, TDS Custom Construction, built a screened-in porch with an exterior gable roof overlay and interior hip roof that required precise framing to accommodate a beadboard ceiling finish. Faced with the cold weather and lack of space that plague many jobsites, we decided to cut and test-fit the frame in the shop, then assemble it on site.
Establishing a Foundation
While production coordinator Phil Busch was transforming the architectural plans into construction drawings (see drawing, below), our team built four boxes—each 2 feet wide by about 3 feet tall with internal 2×4 frames, 1/2-inch plywood side skins, and 3/4-inch plywood tops—to arrange on the shop floor to represent the four corners of the porch. To establish the centers of each box, we drew lines across the midpoints and from corner to corner. We then used a laser to snap layout lines on the floor and placed the boxes square to each other and spaced such that the midpoint of each box sat where an outside corner of the roof would rest.

Phil Busch/TDS Custom Construction
Working from the architect’s 2D drawings, TDS production coordinator Phil Busch built a 3D model of the roof in SketchUp, then field-verified all relevant as-built and existing condition dimensions. This step allowed him to make the necessary modifications to yield a model that would reliably fit the real (no longer only digital) world. Next, Busch worked with the model to be able to graphically show the setup, fabrication, and assembly of all the parts. Because SketchUp itself does not do this, Busch arranged the components in his model based on his 40-plus years of experience as a builder and exported the information to SketchUp’s 2D graphics program, Layout. Shown here are selections from Layout’s PDF output, which the crew referred to when fabricating the roof frame.
With the corners established, we leveled the boxes using a 2-foot spirit level, laser, and target in combination. We shimmed the boxes to bring the tops into level individually and into plane as a group, then added 2×4 legs. Finally, after adjusting the position of the boxes to maintain square, we ran 2x4s from box to box and diagonally across, locking our shop-foundation in place.
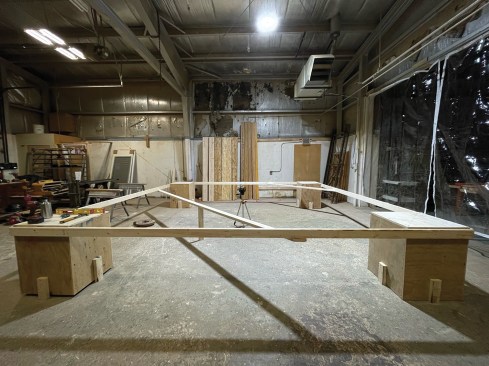
The crew started by assembling plywood boxes to represent the four columns that would support the roof framing, squared and leveled them, and tied them together with 2x4s.
Milling the Components
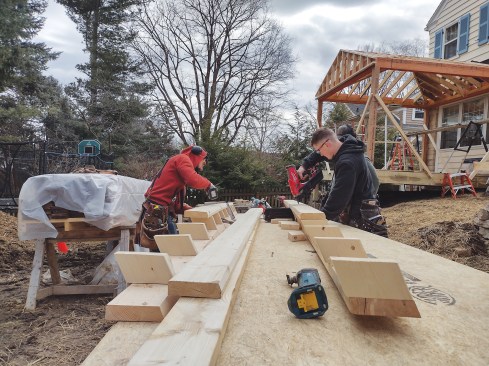
A key benefit of working in a shop is an increased ability for a team to multitask. While I fine-tuned the position of the boxes in one half of the shop, my colleague, Ethan Butler, was in the other half helping to mill bevels on the beams and hip rafters with our lead, Martín Gutierrez, who was toggling between us.
We cut the pieces based on cut sheets drawn by Phil, who had translated the design department’s drawings into a thorough outline of each component (see drawing, opposite). This included details such as a V-bevel on the underside of the hip rafters to create crisp ceiling corners, and beveled beams to allow the roof sheathing to shoot across and onto the overhang.
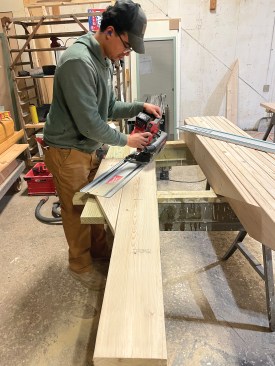
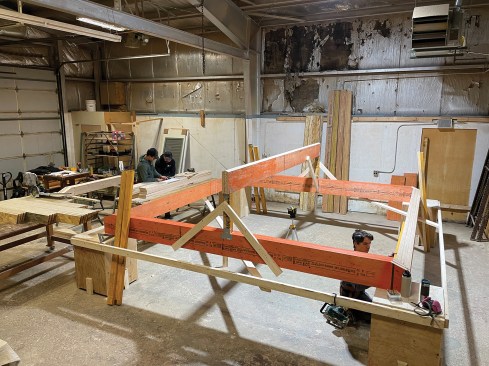
Working from a detailed cut sheet (drawing, above), workers prefabricated the components (left) and assembled the woven perimeter beams for the 13 1/2-ft. x 13 1/2-ft. frame on top of the four plywood box "columns" (above).
Working in the shop also allowed us to run the LVL material through our big SawStop table saw and, for the larger beams, to use the “million miles” of track-saw tracks that live in the shop. Instead of trying to make long cuts on a sloped and muddy jobsite, we had a flat, even surface to work on.
Test-fitting. Once the larger framing members were ripped and cut to size, we began erecting the frame by tacking the woven beam corners together. We then screwed on the center posts, braced them plumb, and lifted the ridge beam into place before moving to the hip rafters. The 3-foot-tall boxes put the perimeter beams at a comfortable height, allowed us to navigate inside the roof without undue crouching, and kept the ridge within easy reach of a 6-foot stepladder.
The two 11 13/16 LVLs that make up the structural ridge have a 22.6-degree bevel at the top, and are supported at either end by 4×4 PSL posts.
Due to a slight whip in the ridge beam, the intricacies of the framing plan, and inconsistent material thicknesses, we needed to recut the ends of the hip rafters several times to fit them properly. On site, they might have been deemed good enough, only to doom a finish carpenter to a litany of custom cuts; in the shop, we were able to shoot multiple lasers from every conceivable angle to ensure the rafters ran as desired. A question about straight or square could be answered in under a minute without a ladder, and Phil could drop in frequently to check the framing and suggest alterations to Martín.
The top edges of the 5 15/16-inch wide LVL hip rafters were cut with a double 16-degree bevel, with a matching V-cut along the bottom edge.
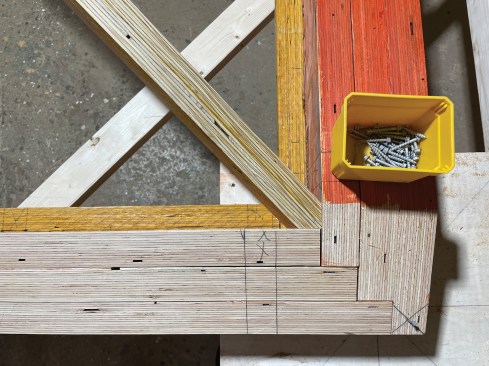
The beveled hip rafters fit neatly into the woven corners of the beveled perimeter beams.
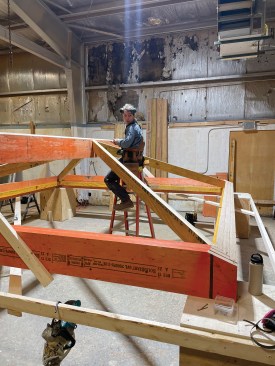
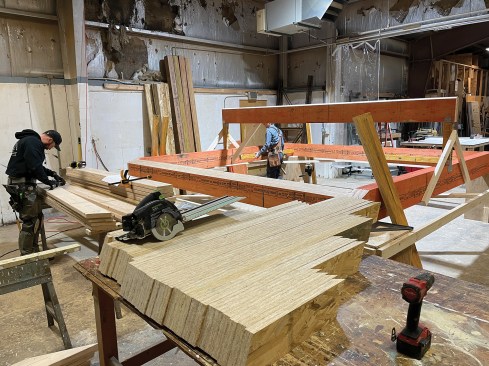
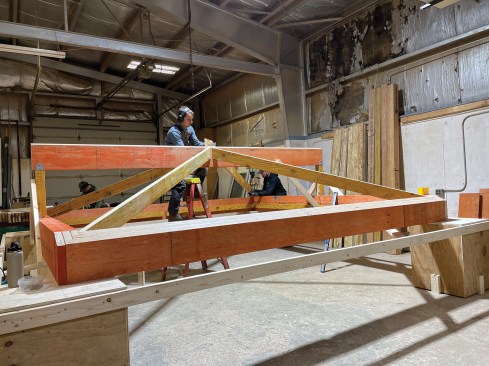
Raising the assembly a couple of feet above the shop floor made it easy to work on the roof framing…
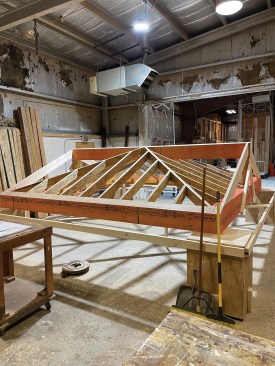
…as the crew installed the beveled hips and cut and fit the jack rafters for the 5/12 pitch roof.
Cutting the jack and overlay rafters. With the backbone in place, we filled in the frame with jack rafters cut from LSL material. Martín cut these from the schematic dimensions, passing them to me to test-fit and label according to the surroundings (house, neighbor, yard, and addition). Working off a plan and test-fitting meant few measurements needed to be taken and any requisite corrections to the angle and length could quickly be identified. I was able to comfortably work in the rafters and easily converse with Martín to ask a question or share feedback. There was no shouting, “It doesn’t work” or “Come take a look at this” to a carpenter who’s on the ground and can’t see “what the holdup is.”
While we worked on the jack rafters, Ethan set up a station on the other side of the roof to cut the overlay rafters that form the topside gable. Despite making progress on multiple fronts, we finished the roof framing without fully assembling the overlay. However, the hip frame was fully standing in our shop.
With the roof cut, Martín moved on to another project and Alex Bartlett, another lead carpenter, took over for on-site assembly after dropping by the shop to see the finished product. The screwed-together frame was easy to disassemble and package for transport. I backed a dump truck into the shop, filled it with roof, and drove the components to the site.
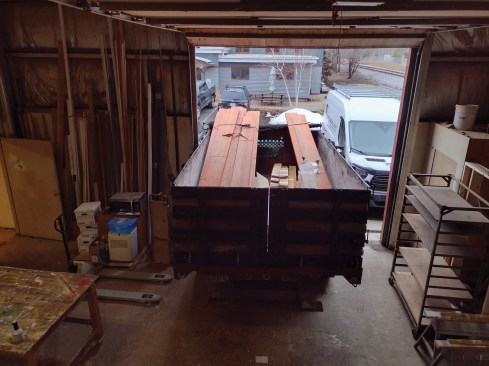
After fine-tuning the fit and labeling the parts, the crew disassembled the roof and loaded everything into the back of a truck for transport to the jobsite.
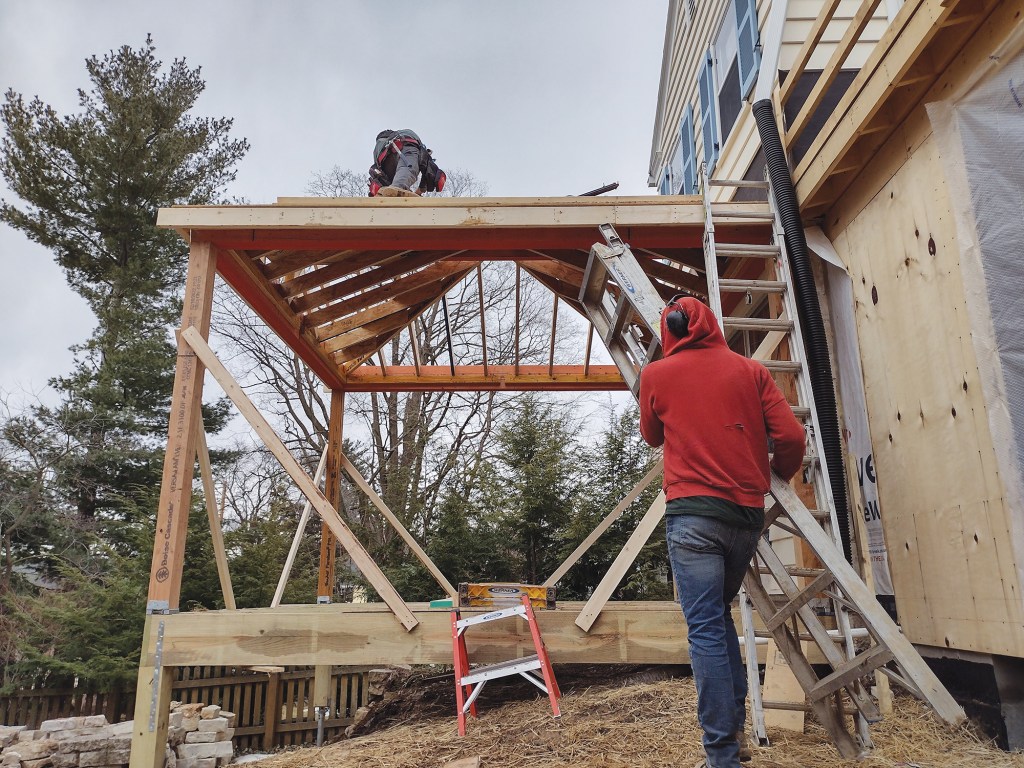
On-Site Assembly
On a brisk but sunny day, we began erecting the frame. After setting and bracing the corner posts, we assembled the pieces in the order described above. In theory, it should have gone together like a puzzle, but in reality, we had a few alterations to make.
First, the underside of the jack rafters sat slightly below the bottom of the hip rafters. We never tracked down why this was the case, although in hindsight, I have a shim or two in mind as the culprits. This discrepancy was uniform and would not overly impede the finish work, so we continued with assembly.
Second, we switched up our plan for the gable overlay rafters. Originally, these were to rest on blocks that were sandwiched between the jack rafters. Once on site, we changed tack and simply ran sheets of 3/4-inch OSB up the relevant sections and fastened the overlay rafters to those after trimming them accordingly.
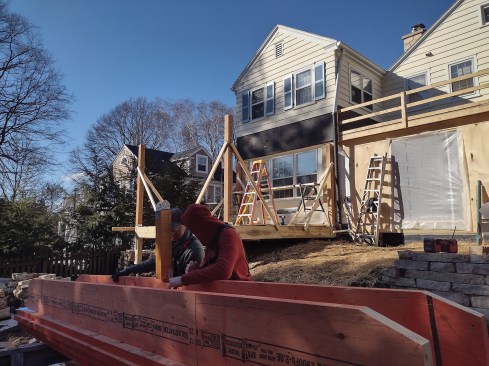
On site, with the corner posts installed and braced, the crew starts reassembling the roof components, starting with the perimeter beams and posts that support the ridge.
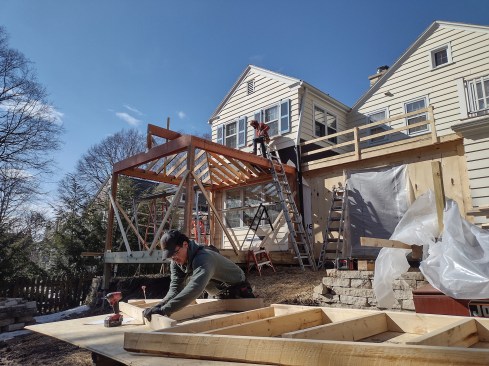
Framing the overhangs and sheathing the roof. Despite working as a three-person crew, we were able to divide and conquer because we weren’t shoehorned into the traditional one-on-the-ground, two-in-the-air arrangement. Instead, once the heavier pieces and most of the jack rafters were in place, Alex and I continued assembling the overlay while Ethan cut and built the gable-end overhang, which, instead of being a ladderbox up the rake, dropped down to allow the eaves to continue around the gable. To do that, Ethan built the gable end wall in two halves on a pair of sawhorses, with studs on 16-inch centers. We then dragged these up the roof, hung them out over the end of the gable, and lagged through the studs into the perimeter beam and through the end gable rafter into the studs, adjusting them into plane with the rest of the roof as we went.
In the foreground, a worker assembles the gable end wall in two halves to make it easier to hoist into place.
With the roof framing reassembled and the gable end wall in place, the crew then framed the eaves on the ground.
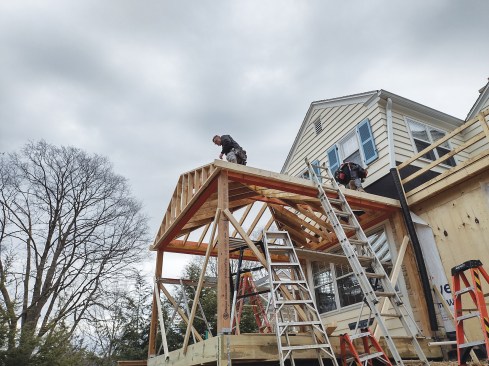
Then the eaves assemblies were lifted into place to complete the roof framing.
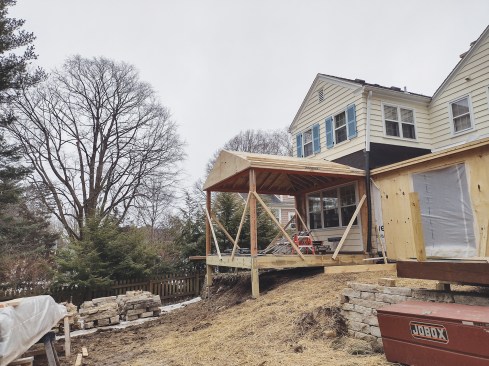
Here, the roof and gable end wall have been sheathed and are ready for finishes.
We moved on to building the eaves with the help of Chris Andersen, an intern from Madison College’s construction and remodeling program (he ended up joining our team a few months later). We built the overhangs on the ground, hoisted them onto the roof, and attached them with lag screws, adjusting them into plane similar to the gable overhang. Sheathing the roof and the gable end was done in the usual manner.
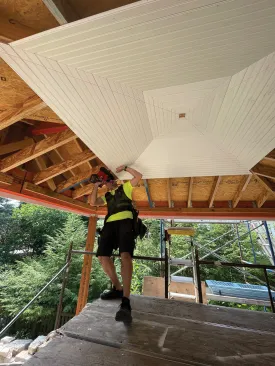
Beadboard Ceiling
Months later, with a flat, sturdy deck beneath our feet and nicer weather, we started on the beadboard ceiling. Martín began by using a laser to check that all the hip rafters ran straight and square to each other. He then installed blocking on the top of the ceiling to support a plywood center panel. He cut this panel to size and beveled the edges to allow the beadboard to transition from the flat panel to the ceiling’s slope. After clamping the panel to a worktable, he cut beadboard pieces at 45 degrees and nailed them to the panel, gluing the miter joints and holding them together with spring clamps.

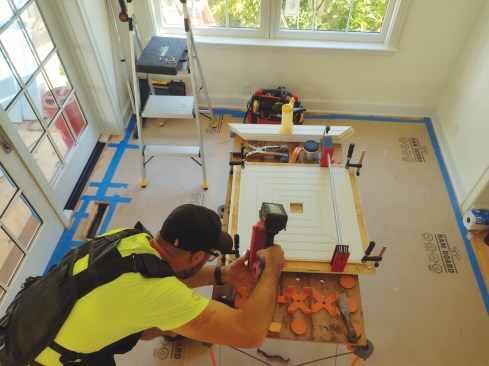
Blocking was installed in the center of the ceiling (left) for the beadboard center panel (above), which was assembled on the ground and fastened to a plywood backer. This allowed the panel to be precisely positioned and then fastened to the blocking as a unit.
Once the panel was completed, excluding the central piece, we tacked it to the center of the ceiling and put a screw in the middle. From that, we strung lines to the end of the hip rafters at the midpoint of the V-groove we ripped earlier. Rotating the panel so the mitered corners aligned with this string ensured that the beadboard would start parallel to the beams below and the joints would line up as we moved into the field.
The slope of the ceiling was exponentially more complex. We wanted to install the beadboard with no mid-row joints, so the lengths and angle of the miters had to be perfect. To achieve reliably tight joints, Martín spent a solid day tracking down the compound miters needed, and we set up a pair of miter saws, one for each end of the beadboard. We also set up a third saw for other work on the site so that these two would not be disturbed.
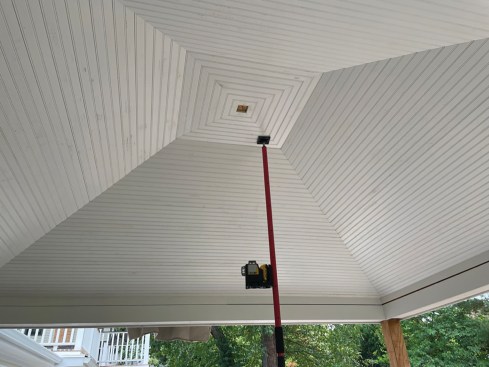
Lines stretched from a screw in the middle of the ceiling along the centerlines of the hip rafters were used to help align the beadboard joints (left). Precision framing and attention to detail resulted in a near-perfect ceiling installation (above).
Martín cut measuring blocks, with a known distance from the long point to the square point, and used them to begin cutting the beadboard. This is where we re-encountered the discrepancy mentioned earlier of the inside face of the jack rafters sitting slightly below the hip rafters. To adjust, we shimmed the mitered ends of each piece of beadboard. While this added an extra step, it also provided a little room to maneuver the miters into perfection. With the pieces in place, Martín shimmed the corners until the miter was tight and tracked the strings we ran down the hips earlier when he sighted them from below. By ensuring the joints tracked the strings, we kept the ceiling diagonals running straight and maintained the joint angle heading down the ceiling. Glue, 18-gauge nails, and spring clamps locked the joints in place. The work proceeded through to the last courses, with adjustments along the way.

The screen porch was part of a larger outdoor living project.
Framing took about 15% longer because of the assembly, disassembly, and transport required, but we recouped some of that time at the finishing stage, where shop precision allowed for a near-perfect beadboard installation without our fighting the framing. Being able to work in a warm shop, wait for an ideal sunny day, and all mobilize to launch a roof in the air—doing things the easy way for once—was definitely worth it.
Photos courtesy TDS Custom Construction


