- Q. Often my customers request that we insulate vaulted ceilings when we’re reroofing. These roofs usually have 4×6 rafters, 2×6 T&G planks exposed to the inside, and composition shingles on the outside. Our technique has been to strip the roof, lay out 2×4 or 2×6 rafters over the open beam area, install R-30 rigid insulation in the bays, then install plywood and shingle roofing above. Recently, I had a problem with one of these roofs. In an area about 2 feet down from the peak of the living room ceiling, the paint started to peel and mold spots are growing. I checked with a moisture meter and found that water is condensing on the surface of the ceiling. Do I need to somehow vent this assembly?
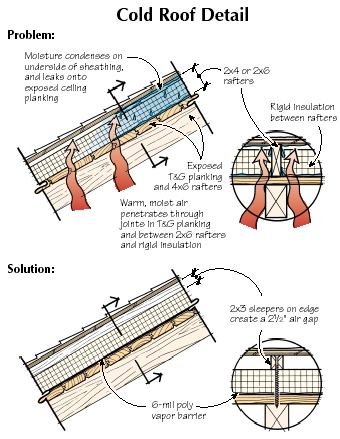
A.Henri de Marne, a consultant on light-frame buildings in Waitsfield, Vt., responds:What is probably happening is that interior moisture is being carried by air convection through the joints in the T&G planking, the rigid insulation, and the rafters, and is condensing on the underside of the new sheathing. From there, it drips down through the joints of the same components back into the living space.
There are some changes you can make to this assembly that should prevent the problem. The first thing you should do is to install a 6-mil plastic vapor retarder over the roof side of the T&G plank ceiling. This will stop the convection of moisture-laden air into the roof cavity. This should be done preferably in one piece. If that’s not feasible, start from the bottom and overlap the upper sheets by several inches, then tape the joints.
The second problem with your assembly is that you are placing the rafters directly over the T&G deck and laying the rigid insulation between them. It would be much more efficient to lay the rigid insulation directly over the decking, thus minimizing the joints between materials and increasing energy efficiency by eliminating the short circuits provided by the rafters. Good-quality extruded polystyrene foam has plenty of compressive strength to handle a roof load.
On future jobs, instead of rafters, use 2×3 sleepers on edge 24 inches on-center, and fasten them to the deck with long screws. If you mark the location of the beams below, the screws can be driven without concern about coming through the ceiling. With shallower-pitch roofs, a 1-inch penetration into the roof decking should be sufficient as long as you put enough screws in. With steeper pitches, you should provide greater penetration and use strapping across the ridge.
Finally, you should provide continuous ventilation on the underside of the plywood. Extend the tails of the sleepers 3 inches beyond the existing fascia, install a new fascia, and provide soffit ventilation by means of an off-the-shelf ventilation strip. You should also install an externally baffled ridge vent such as Shinglevent II at the ridge.
Q&A: Condensation on Ceiling
Condensation on Ceiling
2 MIN READ