Every time it rained, water would soak the carpet under the windows of an acquaintance’s Southern California condominium. Built about 20 years ago, this former apartment complex had a standard three-coat stucco and lath finish applied over building paper stapled directly to framing; 2×6 rough-sawn wood trim was nailed through the stucco around the windows and horizontally around the entire building. Because the window, trim, and surrounding stucco appeared to be undamaged on the exterior, I suspected that water was probably following the trim’s nails right through the stucco and into the walls.
Hidden Bugs and Rot
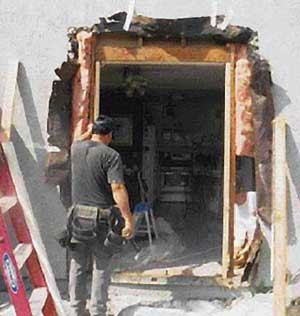
When we went inside the house and opened up the gypsum wallboard underneath the window to expose the wood framing and the building paper, we found an enormous amount of damage. Not only were the framing members water-stained and starting to rot, they were also damaged and infested with termites. The king, trimmer, and cripple studs underneath both window jambs were almost completely destroyed, robbing each member of virtually all load-bearing capacity. And water damage had completely worn away the building paper in several places, exposing the back of the stucco.
Our architectural firm, Lohse2, specializes in investigating water leaks and other building failures. To locate sources of leaks in building envelopes, we often perform water tests on window and wall assemblies with a spray rack built to ASTM E1105 specs. In this project, as soon as we turned on our spray rack, water poured in around the window in several locations. Spray tests are normally conducted for 15 minutes, but we had to turn off the water after only a couple of minutes because so much water was pouring through the window and wall assembly.
When we removed the exterior trim from around the window, we found holes as big as 1/4 inch in diameter blown through the stucco where the nails attaching the wood trim had once been driven. We then removed the stucco 12 inches around the window, all the way down to the stucco screed. Our original hypothesis was correct: Everywhere there had been a trim nail driven through the stucco, there was corresponding water damage to the flashings, building paper, and wood framing.
The termites seem to have favored the wood that had been affected by water intrusion. We found the greatest termite damage on wood that was already stained and that got wet during our spray test. With the stucco removed, that damage was even more evident.
Considering the damage to the framing around the window, it was a wonder the wall was still standing. The king, trimmer, and cripple studs had not only been completely eaten away — they were not even bearing on the mudsill. Fortunately, damage to the wood framing in this part of the building was limited to the window area, but we suspected that other walls in the complex — which have both the same window trim detail and an additional horizontal trim detail — had similar damage.
Waterproofing Details
Needless to say, we had no choice but to replace the entire wall assembly. The trick was to rebuild it so that it looked the same as it had before we started, yet was still watertight.
As we reframed the wall, we added 2-by blocking around the window; this would provide solid backing for the waterproofing membranes we planned to install, since there would be no wall sheathing. And before reinstalling the window, we covered the sill and jamb framing with Moistop flashing, a 12-mil-thick fiberglass-reinforced membrane covered on both sides with water-resistant polyethylene (Fortifiber Building Systems Group, 800/773-4777, www.fortifiber.com).
After applying sealant to the window flanges and installing the window, we lapped Moistop over the head flange. For an additional layer of protection, we taped the window flanges with 12-inch-wide strips of 40-mil Jiffy Seal Ice & Water Guard (Protecto Wrap Co., 800/759-9727, www.protectowrap.com), a self-adhering, rubberized waterproof membrane. Besides sealing the joint against water leakage, this thicker membrane does a good job of sealing around fasteners that penetrate it, helping to prevent the kind of damage we were repairing from recurring. In preparation for the stucco patch, we stapled 60-minute building paper to the framing, lapping it over onto the Jiffy Seal.
Next, we nailed primed 1x6s directly to the framing around the window, as a kind of sub-base for the window trim. With these in place, we could avoid having to nail the 2×6 trim directly through the stucco; also, they made it easier to create sealant joints between the window, trim, and stucco.
We left one 3/8-inch-wide gap between the window and the 1×6, and another between the 1×6 and the stucco J-mold surrounding the window. And we installed a primed G90 galvanized steel drip edge over the trim at the head of the window. (If the original assembly had included drip metal over the trim at the head, it may have kept some of the water from getting into the wall assembly.) Then, after the 7/8-inch-thick three-coat stucco was applied, we inserted 1/2-inch-diameter closed-cell backer rod into the gaps.
Finally, we primed all surfaces of the new rough-sawn 2×6 Douglas fir trim and nailed it on over the 1x6s. (Because the original trim had not been back-primed before being installed, it had warped and twisted and couldn’t be reused.)
To finish up, we caulked the sealant joints with a bead of SM7100 Permathane polyurethane sealant (Schnee Morehead, 800/878-7876, www.schneemorehead.com).
Looks Good, But Does It Leak?
To test the wall assembly, we set up our spray rack at the window and — because we wanted to be sure the assembly was watertight — sprayed it for an hour instead of the typical 15 minutes. We set the water pressure as high as we could, to get the greatest possible amount of water to hit the window and wall assembly. There was no leakage.
Two weeks later, the homeowner asked us to do the same repair on another window at his condo, which had the same damage. To his chagrin, I had to tell him that the damage we found probably exists throughout the entire condominium complex — anywhere trim is nailed through the stucco. Originally, we had thought that weather exposure had a lot to do with the amount of damage we found on the first window, since it was located on the south wall at the southeast corner of the building. But after we discovered that a neighbor had the same problem with windows facing to the north and west, we realized the problem wasn’t an isolated one.
Since we performed this repair, Southern California has experienced heavy rains, and the homeowner called again to tell me that there was still leakage underneath the dining room wall. We went out to investigate one more time right after a rainstorm. Convinced that it wasn’t our repair that was leaking, we went upstairs to examine the floor and wall in the closet above the window, and found that they were soaked, indicating that water was entering the wall higher up. We suspected that either the roof or a series of stucco cracks that we found in the same wall where we’d conducted our repair was the culprit.
So, on a dry day, I went back and sprayed the previously repaired window and wall assembly with a spray nozzle placed 18 inches away from the wall, to re-create the leaks that the homeowner saw during the rains. But, after spraying the wall for 20 minutes with a blast of water directed at the joints around the window and trim, I detected absolutely no water intrusion inside the condo. I then sprayed water on the wall over one of the stucco cracks, so that the water would sheet down the wall where the cracks occurred. Within just a few minutes, there was water leaking out of a soffit about 10 feet around the corner from where this crack was located, proving to me that water was also entering the wall assembly via cracks in the stucco.
Meanwhile, I also suspect that water damage from both nailed trim and stucco cracks is a widespread problem in this complex, and have recommended to the homeowners association that we conduct an investigation to determine the scope of damage.
David Dobson, AIA,is an architect, licensed general contractor, and glazing contractor in San Diego.


