
My home-improvement company, Professional Building and Renovations, works closely with Bill Franklin, a Realtor with Long and Foster Real Estate, in the Baltimore/Washington Metro area. We are frequently called upon to provide a wide range of remodeling services, from painting and drywall to concrete and structural repairs. In June 2016, I received a call from Franklin to provide an estimate to repair termite damage that was discovered during a home inspection prior to the home’s sale. The residence was a modest three-story Colonial built in the mid-1990s with a two-car garage, partially finished basement, and brick façade. The seller had the home treated for termite infestation a few years earlier upon discovering that the little pests had dined on a small section of wood trim on the home’s front porch.
After receiving an “all clear” from the exterminator and repairing some very minor wood damage, the homeowners breathed a collective sigh of relief and went about their daily lives, never really giving much thought to the matter again. That is, until they decided to sell the home and received the report from the buyer’s home inspector, just weeks before the scheduled closing date. He had found extensive damage to the rim joist on the right side of the home. The inspector’s report also recommended that all necessary repairs be made before the home was sold. This is easier said than done with a home that has a brick façade.
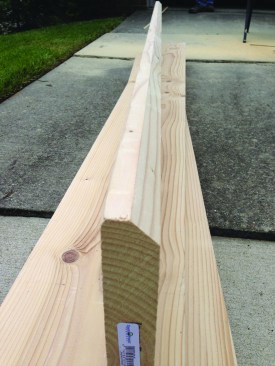
To simplify getting these new joists between the sill plate and the floor, the author first rip-beveled one edge for the length of the joist.
Extent of Damage
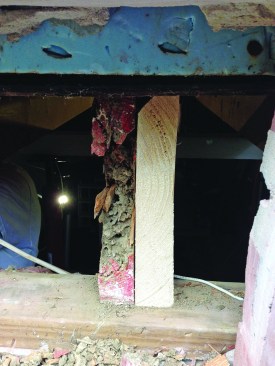
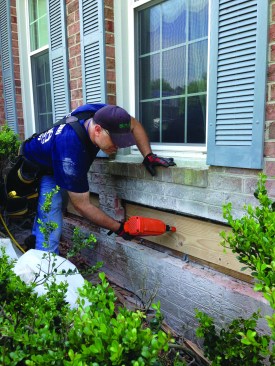
The damage was not readily apparent nor was it easily accessible. The floor above the suspected area was solid and the homeowners never noticed so much as a squeak in the floor or mud tunnels on the exterior wall, a sure sign of subterranean termite activity. I began my inspection by removing obstructions above the sill plate at the top of the poured concrete foundation walls. I checked all along the front exterior wall until I observed the first signs of trouble on the right side of the house. The rim joist in this area was covered with a white powdery substance and evidenced signs of previous moisture damage, but otherwise the wood appeared to be solid—until I pressed on it with my finger.
The rim joist completely crumpled, the surface being paper thin while the rest of the material had been hollowed out by termites. It was bad. I estimated that approximately 10 feet of rim joist and as many as five floor-joist ends had been completely destroyed. To make matters worse, this area was near the home’s 200-amp panel box and all of the wiring to the home ran through the damaged floor joists. I took copious notes and pictures and went back to the office to come up with a game plan.
He then applied construction adhesive to the old joists.
How Much Brick Can Be Removed?
My first call was to architect Steve O’Neill. We concluded that the best way to repair this situation was to remove the rim joist from outside, by gaining access through the brick wall. I would need to support the floor joists in the basement with Lally columns and sister new 2×8 joists to the existing ones. This would strengthen the damaged floor-joist ends, while providing a solid nailing point for the new rim joist. We surmised that it would be nearly impossible to fit one continuous rim joist in place, but it would be easy to install two equal-length boards, no matter what the length. Now the only remaining problem was how to remove enough brick to complete the repair while maintaining the wall’s structural integrity.
For that, I sought the advice of stonemason Brad Nicholson, of Other Brother Masonry. Nicholson estimated that he could remove four courses of brick up to 8 feet in length, as long as he left one brick pier in the wall for support. This, he believed, would give me enough room to remove the old rim joist and install the new one without the wall falling on my head.
Of course, the goal on this project, as on every project, was to complete the project on time, on budget, and with as little inconvenience to the homeowner as possible. With all the trades involved, we would need to schedule each in successive order and stay in close touch as the project progressed so we wouldn’t burn time if something went awry or at a different pace than predicted.
After threading the new joists past the temporary support and into position, he rolled the new joists into place against the old ones.
Sistering To Rot
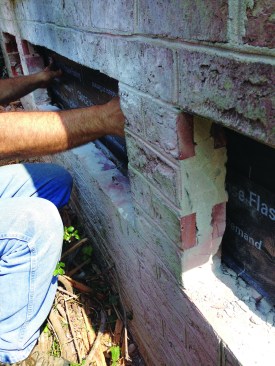
Upon receiving the homeowner’s approval to complete the work, Nicholson and his crew started first. They cut out a section of brick with a gas-powered concrete saw and a small rotary demo hammer with the precision of surgeons. With the brick out of the way, we were able to confirm that the damage to the rim joist was extensive.
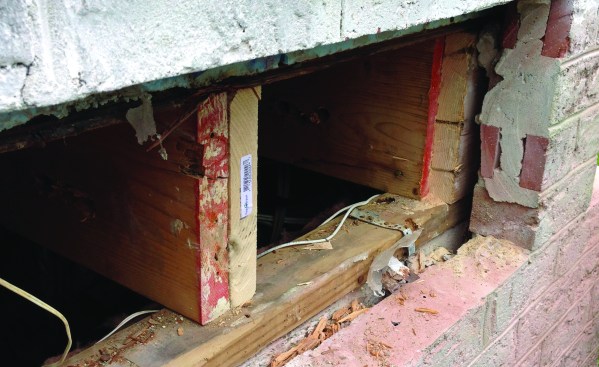
The mason had to remove four courses of brick to expose the entire rim joist, which was cut back until only undamaged wood was exposed.
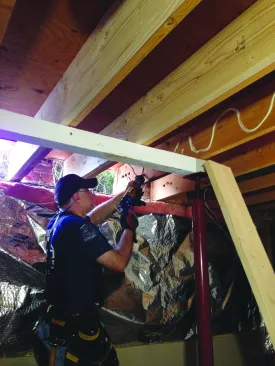
The following day, we arrived along with two electricians from Professional Electric, a local electrical contractor with whom I work. While they labeled and removed all the wiring from the floor joists, we installed a post and Lally columns under the suspect floor joists for support.
With all the new sister-joists in place, the author nailed on a new rim joist.
After removing the damaged rim joist, we cut our new floor joists so they could be sistered to the existing ones. Given the tight quarters and the fact that the new joists had to rest on top of the sill plate, we cut the inside edge off of each joist. This simple step permitted us to set the new joists on the sill plate and simply roll them into place with minimal prodding from a hammer. Prior to installation, we applied construction adhesive followed by clamps to insure a good marriage between old and new work, and then nailed the two joists together in a staggered nailing pattern.
Before the finish brick was replaced, the author applied a flashing membrane to the new rim joist.
After the floor joists were in place, we had a solid surface on which to install the new rim joist. This was accomplished by maneuvering two 6-foot sections of 2×8 into place behind the brick support pier. The rim joist was nailed in place with four nails at each floor joist. The splice in the rim joists was secured with a Simpson plate connector and screws for added strength.
Then he tucked it up behind the existing weather-resistive barrier that covered the sheathing behind the brick.
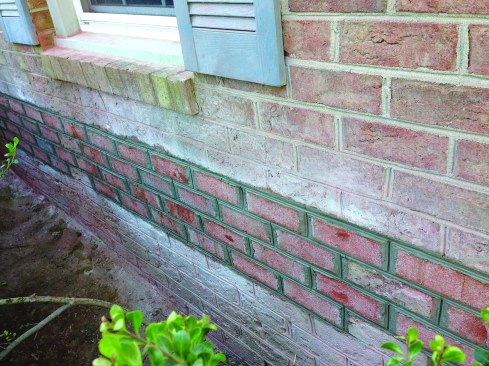
Following that, the electricians returned and began to re-install all of the wiring runs that had been removed. While they worked on that, we covered the entire rim joist with Grace Vycor. Nicholson and his crew returned the following day and completed the brickwork, and after an acid wash a week later, the job was completed. All of the interested parties, including the inspector, were pleased with the final product, and the sale of the home continued without further delay.


