Brick has been used in residential construction for centuries, and it’s not hard to understand why. It’s simple, attractive, and durable. Yet it’s also associated with some of the most troublesome repair jobs I see in my work as a consulting forensic architect in Nashville, Tenn.
In this article, I’ll focus on standard residential brick veneer — that is, nonstructural brick installed as a cladding over wood framing — and share examples of some of the failures I’ve inspected. Sadly, I see the same mistakes made again and again — mistakes that often result in very expensive callbacks.
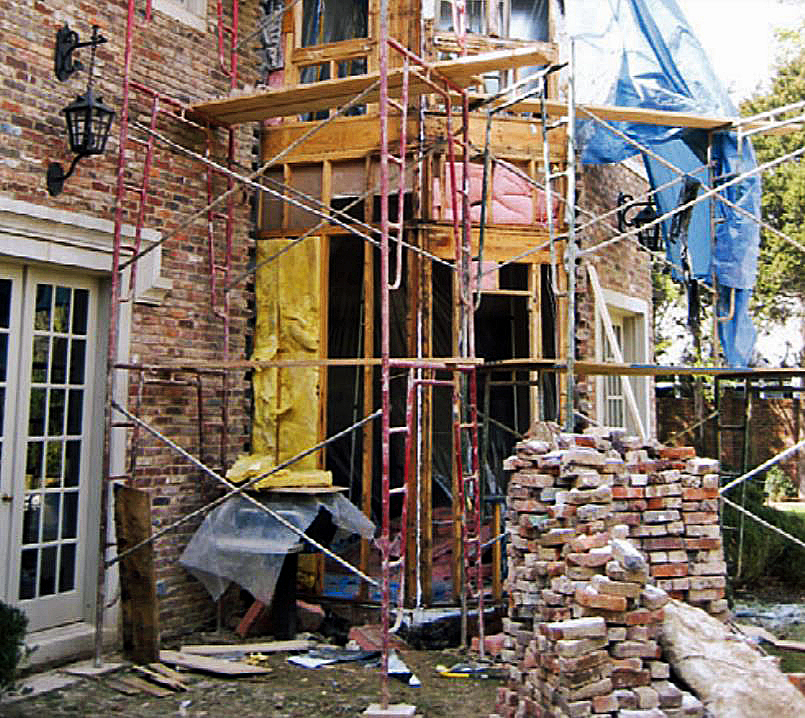
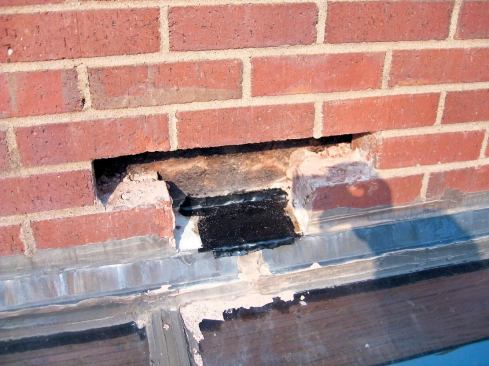
Take the house whose repairs we cover in the slideshows. The owners reported recurring leaks and damage to pricey custom finishes inside. By the time I was called in, they were understandably upset at the many failed attempts to fix the problem. Typically in a case like this, the “repair” consists of applying tubes of caulk or mastic around windows and flashings — inevitably a waste of time. As you can see from the photo, getting to the root of this house’s problem was a little more involved than that.
So how can a material so durable go so wrong? Simple: It doesn’t. As with any building material, successful installation depends on workmanship and details — rarely does the brick itself fail. Laying up a flat wall with straight, even courses and raking the mortar joints is the easy part; the challenge is making sure that the brick is supported properly, that it’s securely tied to the structural wall sheathing, and that adequate measures have been taken to ensure that moisture that gets behind the brick can exit to the outside.
Where Does the Water Come From?
Brick is made from clay and fired at high temperatures. Naturally, that makes it water-resistant, right? Generally, yes — especially modern brick. (Older bricks are more porous, and will absorb a surprising amount of water.) But that doesn’t mean a brick veneer wall is waterproof. One culprit is the joints. Mortar is made by mixing water, sand, and cement. That alone introduces tiny air bubbles. And once it’s troweled on and the water in the mix evaporates, you have even more holes, as well as lots of hairline cracks that form between bricks. Wind-driven rain will soak the wall, and as the moisture moves from wet to dry and warmer to cooler, the back of the brick will eventually get wet — you can count on it.
Plus there are all the other common leak spots — like roof and wall penetrations, and (of course) windows.
Don’t Omit Through-Wall Flashings
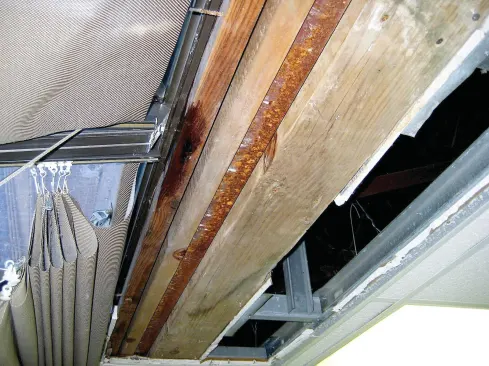
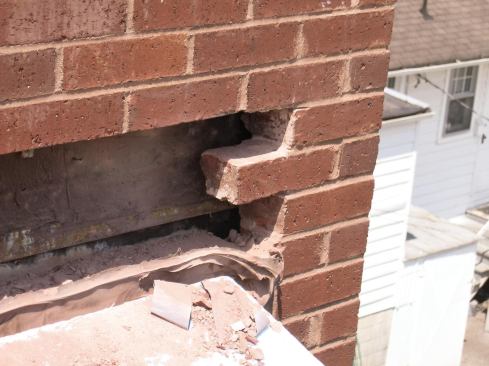
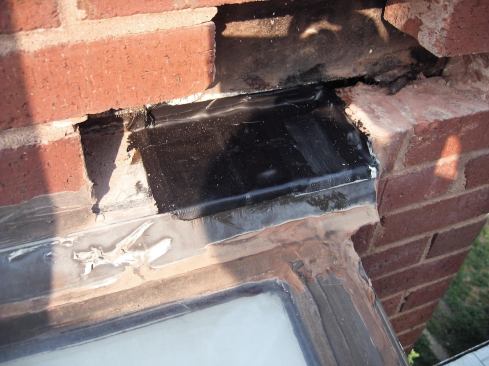
The main cause of moisture problems in the brick homes I investigate is the lack of proper through-wall flashings (see slideshow below). For example, one common source of leaks is the counterflashing installed where a sloped shingle roof abuts a brick wall. The metal is usually 4 or 5 inches high, follows the shingles in a straight line parallel with the roof, and may have an occasional fastener through its face into a mortar joint.


© McCampbell & Associates
The offices under this curved glass roof had been getting wet fo…
Typically, the suspect flashing is turned in about 1/4 inch to 1/2 inch along the top and simply let into a kerf cut in the mortar or brick with a masonry blade. But the biggest warning signs are the nails and the copious amounts of caulk along the top edge. Even when I find the metal installed in stair-step fashion down a brick wall, it’s still most likely a saw-cut job, where the counterflashing was installed after the brick had been laid.
Where to Flash
The building codes and Brick Industry Association ( bia.org) standards call for through-wall flashings at several critical points: where a roof abuts a brick wall, within one course of brick above and below doors and windows, and just above grade below ground-floor level.
Rake sidewalls. Wherever a gable roof — on a garage, for example — meets a higher brick wall, you’d better pay attention. On a lot of the new houses I inspect, the sidewall brick lands right on the roof sheathing, with maybe a doubled rafter underneath. Worse, I actually see houses where the brick comes right down on top of the step flashing — those will be fun jobs to reroof.
Without getting into the issue of structural support, I want to point out that unless there’s a through-wall flashing abov the garage roof surface, any water that gets behind the brick will be headed right down into the framing and the interior finishes.
Unfortunately, the kerf method appears to have totally replaced use of proper through-wall flashings at roof-to-wall intersections. Admittedly, doing the job correctly is a detailed process that requires coordination between the roofer and the mason (see slideshow). But it’s the only way to guarantee that water entering the brick from above will not cascade down into the living space below.
Window and door heads. There should be through-wall flashings below the first course of brick along the top of windows and doors. The steel angle is for structural support only; it should not be used for flashing. For example, some contractors will lap the felt or housewrap over the top leg and rely on the angle to keep water out. More often, though, there’s no flashing anyway, and the steel is installed on top of the housewrap.
Window sills. Through-wall flashing should also be placed under the sloped course of brick (typically rowlock) immediately below the window. This is meant to catch any water that makes it into the wall cavity through or around the window. Sills should always be sloped at least 15 degrees, per BIA standards.
Above grade. Too often, the bottom courses of brick are simply buried in the soil. There should be a through-wall flashing under the last course of brick above grade; this course must also be below the bottom of the first-floor framing. Flashing at this location serves two purposes: It prevents ground moisture from wicking up into the wall, and it catches any water coming from the cavity above and sends it outside.
Integrating the Flashing
Through-wall flashing should extend to the outer face of the brick. Anything short of that is that much less effective at getting the water out. And the back upper leg must be placed under the layers of building paper that protect the sheathing.
Building paper. In my opinion, brick — like stucco — should be installed over two moisture barriers. I like to see a layer of 30-pound felt covered with a plastic housewrap like Typar or Tyvek. That way, the Tyvek protects the felt from the sun during construction. The housewrap acts as a first line of defense against any moisture that might be held by excess mortar in the cavity; the thick felt ensures that the moisture is held at bay until it can evaporate.
There are several new construction materials that claim to be a combination structural sheathing and moisture barrier. Even if these products meet the requirements from a structural standpoint and pass the moisture-resistance tests, their ability to properly shed moisture at critical points depends on adhesives. Unfortunately, peeling flashing tape is all too common, in my experience. The tapes lose their tack and begin to roll down along the top of a window; ironically, the same material that was being relied on to keep water out now traps it. There are of course various primers that can be applied to improve adhesion, but their chances of being used are slim to none.
If you insist on relying on tape over housewrap, at least make sure that both products come from the same manufacturer and that you explicitly follow the installation instructions. (Don’t use your client as a guinea pig!)
Keep the Cavity Clean
If wall cavities were created in a perfect world, they would be just that — cavities. The mortar, and any water it holds, would stay completely away from the felt or housewrap that guards the wall sheathing. But since masons are usually pressed to do their jobs as quickly as possible, excess mortar on the back of the brick will naturally collect along the bottom of this cavity. As a precaution, always make sure that the back leg of the through-wall flashing at the base of the wall reaches above the likely level of the mortar droppings — 8 inches is good for a single-story house, more for additional stories.
There are some new plastic mesh products designed to catch mortar droppings above the bottom of the cavity so as to keep the weep holes clear. One possible problem with this approach is that the mortar may collect above the back leg of the base flashing, so if you use a mortar mesh you have to make sure the flashing extends above the point where the mortar might collect.
Weep Holes
When inspecting leaky brick homes, I often note that there are no weep holes, or that they are in odd locations. Contractors, when pressed on the issue, may insist that there are indeed through-wall flashings behind the brick, though at this point I have my doubts. Sometimes I’ll find head joints that have been drilled out after the fact to provide weeps. In that case, even if there were flashings in the wall, there’s a good chance that they would now have holes.
At this point, destructive inspection is justified, and I typically find that the so-called weep holes serve no function other than to placate a building official or home inspector.
For through-wall flashings to work their best, there should be weep holes to allow the water out. The Brick Industry Association — my preferred source for details on the correct way to install brick veneer — recommends leaving an open head joint every 24 inches. The IRC allows for weep holes that are as small as 3/16-inch in diameter, every 33 inches immediately above the flashing.
On the other hand, even if there are no weep holes but there is a proper through-wall flashing that terminates on the face of the wall, the collected water will eventually evaporate or get out through the tiny cracks in the mortar before it can damage the framing.
Ties That Bind
Brick ties, another code requirement, also seem to be regarded as optional. There have been many cases where entire brick walls have collapsed — sometimes even on two-story homes. High winds can strip poorly tied brick veneer from the frame. Ties not only hold the brick in place; they also transfer lateral loads in both wind and seismic events. Omitting ties goes well beyond just being sloppy — it’s a life-safety issue.
Besides using enough ties, it’s also important to embed them properly so that the wall acts as a diaphragm, not just a stack of bricks hoping to stay in place.
As the photos on this page show, it is actually possible to get a workmanlike brick veneer job, but it takes a mason who cares and a knowledgeable contractor willing to supervise and address the details. Given that combination, the brickwork should protect the structure indefinitely.


