
Flashing Flanged Windows
Flashing details for flanged windows vary, depending on whether on whether the job is for new construction or a retrofit, and whether you are using straight flashing or flexible flashing for the sill.
See this slideshow for best practices and step-by-step details flashing an opening in new construction with a flexible sill flashing.
Replacement Window Flashing
Installing replacement windows adds its own set of complications.
- See this slideshow for best practices and step-by-step details for preparing the window opening using a straight peel-and-stick flashing.
- See this slideshow for the step-by-step guidelines for installing the window in the prepped opening and buttoning-up the job.
Mulled windows and window walls must have a continuous head flashing; the manufacturer’s mullion cover will not prevent water from running between the window units from above.
Flashing Curved-Top Windows
For best results flashing a arch-top flanged window, use an accordion-style flexible flashing that will conform to the curved flange.
While an accordion-type flexible flashing is best, in a pinch, you can
layer strips of straight peel-and-stick flashing along the window’s arc, as shown in the illustration below.
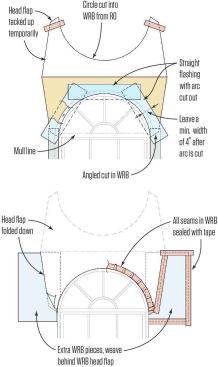
Use as few pieces of peel-and-stick as possible; otherwise, the layers will build up, preventing your trim and siding from lying flat. Use wide pieces and cut the inner edges to conform to the window arc. Rely on proper lapping of the flashing, not on caulk. To maintain proper lapping apply pieces starting from the outer (lower) edges on both sides then put the top piece on last.
Flashing a Door Threshold

Mulled entry doors and sliders are most prone to leaks at the threshold. Provide a formed seat in the slab (far left) or a metal pan flashing to keep water off the floor.
Recessed Windows

In the past, a recessed window required a prefabricated metal flashing pan. Although this is still done, the flexible flashing technique shown here is more common today.
(Fluid applied flashings for this application are just starting to appear in residential jobs, and aren’t yet covered here.)
Framing the Opening

For proper layering of materials, there should be at least 3 inches of solid backing between the window opening and the recess.
The recess needs to be solid framing or sheathing. The sill of the recess needs to slope to the outside by at least 8 degrees.
Flashing a Recessed Window
See this slideshow for recessed window flashing instructions and best practices.


