In Europe — where wood-frame construction is an anomaly rather than the norm — precast concrete panels have been used for residential construction for at least a couple of decades. In the U.S., they’re more commonly associated with commercial projects, from office buildings, dorms, and parking garages to multifamily housing. But as concrete construction (a category that includes ICFs, masonry and block, and tilt-up panels) becomes increasingly popular, more and more precast plants are marketing their products to developers and custom-home builders.
Once you get past the fact that you can’t cut it with a Skilsaw, there’s a lot to like about precast concrete. Like SIPs, the engineered panels are manufactured under controlled conditions and are therefore predictably strong, and they can be quickly assembled with minimal skilled labor, even in bad weather. Moreover, they’re fire- and storm-resistant, energy-efficient, and easy to maintain.
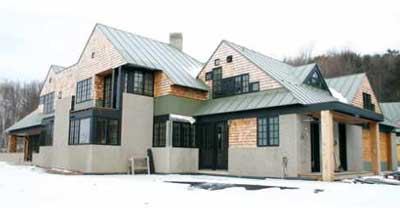
To get a better idea of how precast concrete panels are manufactured and how they fit together on the job site, I recently visited a precast plant and spent several days following the progress of a custom home being built with the panels. Here’s what I learned.
Floor System
Many residential builders are already familiar with precast hollow-core concrete planks. Commonly used for bridge decks and commercial floor and roof decking, these planks are strong enough — depending on their design and size — to clear-span 30 feet or more while supporting loads of more than 100 psf. On a hilly site, they can be used to cost-effectively build garage floors over full basements (see “Installing Precast Garage Slabs,” JLC, June 2002).
Although there are several different proprietary ways to produce hollow-core planks, most are cast on 300- to 600-foot-long beds, then saw-cut to length. To reduce cost and weight, tubes are used to create voids in the continuous plank during casting; for strength, the plank is reinforced with welded wire fabric and prestressed with 1/2-inch strands of low-relaxation #7 wire. When the individual planks are cut to length, they are slightly cambered, which helps them resist their design load.
The panel fabricator for the project I followed, J.P. Carrara & Sons of Middlebury, Vt., uses Dynaspan slip-forming machinery to produce hollow-core planks in a limited number of widths and in 6-, 8-, and 10-inch thicknesses; this home was built using the 8-inch-thick version. Most of the planks were roughly 8 feet wide; the longest plank measured about 33 feet long. Carrara estimates that lead times for hollow-core planks average three to four weeks, and that the installed cost on a small residential project runs between $15 and $22 per square foot.
Hollow-core planks can be used with both block and poured foundations; typically they’re supported by a ledge formed at the top of the wall or by pockets formed in the middle, with embedded and grouted rebar tying the planks and the foundation wall together.
This project had a full basement and a conventional cast-in-place foundation. The top of the 12-inch-wide foundation wall provided bearing for the ends of the first-floor planks and the base of the precast wall panels.
When the foundation was poured, lengths of 3/8-inch steel angle with 8-inch-long anchors extending at an angle into the concrete were embedded at predetermined locations along the inside top edge of the foundation. These plates matched up with similar ones embedded in the hollow-core planks by the fabricator. Once the planks were installed, the plates were welded together, creating a strong connection between the foundation and the floor system.
To accommodate openings in the floor system for a masonry fireplace and stairwell, some of the planks bore on structural steel instead of on the foundation wall. Where the ends of planks met each other over a steel header, workers cut slots into the cores, lay in rebar, and filled the cores with grout to tie the planks together.
Next, workers installed backer rod in all of the keyways between the planks, then filled keyways and joints with 4,000-psi nonshrink grout (Figure 4). After the building shell was completed, a 3-inch-thick topping slab with embedded radiant tubing placed on 2 inches of rigid foam was installed, completing the first level’s finished floor.
Wall Panels
Precast concrete walls are less common in residential construction than hollow-core plank decks, and they require longer lead times — eight to 10 weeks at the Carrara precast plant — and considerable coordination between the designer, the GC, and the panel fabricator.
The architect on this project, Jim Sanford (also of Middlebury), had already collaborated with the Carrara plant on several precast projects and so was familiar with the connection details that would be needed between the concrete panels and the wood framing and millwork used to finish the house. Working from Sanford’s architectural plans, the fabricator’s engineering team prepared shop drawings for each panel.
Panel design. A few different types of precast wall systems are available, including solid-wall and double-wall panels. In special casting beds at its plant, Carrara forms solid-wall precast panels for uninsulated walls and insulated sandwich panels for enclosing conditioned living space.
The company’s insulated sandwich panels can be either loadbearing or nonbearing, and can be built to various thicknesses to achieve different R-values. The ones used on this project were 11 inches thick and had a 3-inch-thick rigid-foam core sandwiched between inner and outer skins of reinforced concrete. According to an ASHRAE 90.1-2001 envelope-performance study for this project, the thermal mass of the concrete combined with the 3 inches of rigid foam makes these 11-inch walls perform like R-32 framed walls.
The 3-inch outer skin and 5-inch inner wythes of concrete are reinforced with welded wire fabric and #4 and #5 rebar grids. Special fiber-composite connectors hold the inner and outer concrete wythes together without creating a thermal bridge between the inner and outer skins.
Pressure-treated door and window bucks and top plates, reinforced welding plates, structural inserts, and other details are specified in the fabricator’s shop drawings, which workers at the plant refer to as they assemble the form. Depending on the desired exterior finish, other materials like form liners of brick veneer can also be added. On this house, an exposed aggregate finish was specified, so the forms were sprayed with a retardant before any concrete was placed.
The wall panels are cast from self-consolidating concrete (SCC) with a 3,500-psi release strength and a 5,000-psi 28-day strength. High-performance SCC concrete is designed to fill formwork and flow around complicated reinforcement without mechanical vibration. Admixtures such as fly ash and silica fume (byproducts of the coal-fired generation of electricity) give the concrete extra strength.
Since the interior of the precast panels in this project would remain exposed, the casting was given a smooth steel-trowel finish. After curing for a day, the forms were removed and the exteriors washed to expose the aggregate. The tallest panels measured a little over 12 feet high, and the longest about 26 feet long.
Installation. Whereas hollow-core planks can be laid flat and stacked on top of each other in a flatbed trailer for transport to the site, large wall panels must be propped at an angle on racks to prevent damage. A delivery might consist of only one or two wall panels.
Once the panels for this project arrived on site, a large crane lifted them directly off the truck and placed them into position. While a gas-driven vacuum lift can be used to lift the floor planks, the wall panels were hoisted into place with the help of lifting rings bolted to inserts cast into the concrete at the plant.
Most of the time, precast wall panels are set directly on footings. However, these panels — along with the edges of the concrete-plank floor system — bear directly on top of the foundation walls.
Panels are cast with #5 rebar pins projecting 8 inches from the bottom; when they’re installed, these pins slide into 1 1/2-inch-diameter holes in the top of the foundation wall. The holes are carefully laid out and cored after the panels have been cast. During installation, the holes are filled with nonshrink grout; small plastic shims are used to support and level the panels. Later, any gaps between the top of the foundation wall and the bottom of each panel are sealed with caulk.
After each of the wall panels has been positioned, leveled, and plumbed with the help of the crane, the installation crew locks it into place with adjustable steel braces bolted to threaded inserts cast into the panel and drilled into the concrete deck. At intersections and corners, wall sections are fastened to each other by welding together steel plates cast into the panels. Any gaps between the panels at corners are filled with caulk.
Once the panels are installed and braced, conventional framing can begin. On this project, the second-story floor system and roof framing were simply nailed to wood plates connected to pressure-treated bucks embedded in the wall panels during fabrication. PT stock was used wherever the framing came in contact with the concrete.
Cost and Performance
Comparing the cost of building with precast concrete panels with that of conventional framing is difficult. Subtrades — such as electrical and hvac — may incur additional expenses working around some of the limitations presented by this type of construction. For example, the hollow-core plank floor system has cavities through which electrical and mechanicals can be routed, while the wall panels do not (though chases and outlet boxes can be cast into wall panels for extra cost).
On the other hand, all the insulation and the finished surfaces for both interior and exterior walls can be included in the cost of fabricating wall panels, which Carrara estimates runs between $20 to $75 per square foot of wall area, depending on the size and complexity of the panel.
A recently completed energy analysis indicated that this house outperforms a comparable Energy Star home by more than 50 percent, thanks in part to the thermal mass of the walls and the house’s low air-infiltration rate. But with rising fuel costs, the viability of precast concrete construction may be more dependent on the proximity of a precast plant in your area, since multiple truckloads will be required to deliver wall panels to a job site.
Andrew Wormer is an associate editor at JLC.


