Footing Layout
Footings can be larger than required dimensions, but should not be smaller. Footings should be straight and level to within 1/4 in. over 20 ft., and should be no more than 1/2-in. out of square in 20 ft.
Footing Width
The bearing width of footings varies according to soil strengths and loading conditions (below).
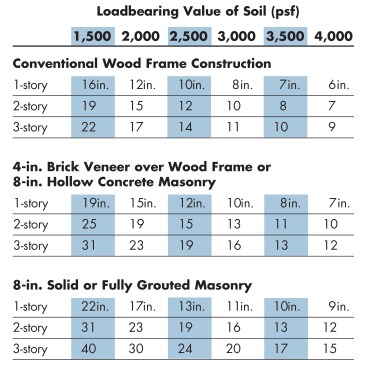
The width of a foundation footing is based on the loadbearing value of the soil. Load-values assume undisturbed, native soils of known type or tested values of compacted soils.
Footing Tie-In
Footings should be struck off level, but should never be troweled smooth. In addition, footings must be tied firmly to the wall above using either a keyway poured into the footing or reinforcing bar projecting from the footing into the concrete (below).
Footing Thickness
Footing proportions for plain concrete (unreinforced) footings are set by code (Footing Dimensions, left and center). Generally, footings should be at least as deep as the thickness of the wall they support. The wall should be centered on the footing so that the projection of the footing on each side equals half the wall or footing thickness.
If a wider footing is required, the footing must be reinforced (Footing Dimensions, right). Typically, 1/2-in. or 5/8-in. rebar will be required on 1-ft. centers, set about 3 in. up from the bottom of the footing.
Frost Depth
The footing should be placed at least 1 ft. below the frost line so it will not heave when the soil freezes. Frost depth varies depending on local climate; check with local codes for the local frost depth. On a hillside foundation (such as a basement walkout), plan on building a frostwall on the downslope side (below).
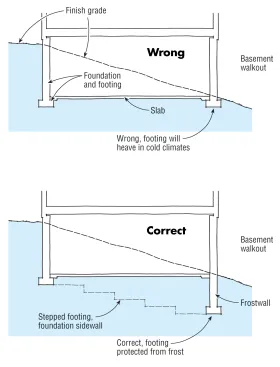
On a hillside foundation, a frostwall should be added on the downslope side to extend the footing below the frostline.
As an alternative to building a frostwall, a walk-out basement may be insulated to protect against frost damage (see Insulation for Walkout Basements)
Shallow foundations may offer an alternative to deep excavations if properly insulated and detailed. See Insulation for Unheated Garage Slabs.
Stepped Footings
On sloped sites, footings must be kept level, so the footings will have to be stepped. Step lengths must be at least 2 ft., step heights must be no greater than three-quarters of step length, and vertical footing sections must be at least 6 in. thick (below).
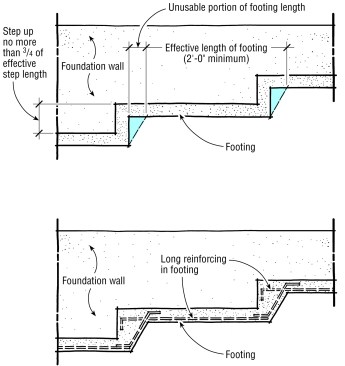
The rise of a stepped footing should not exceed 2 ft., and the footing should run at least 2 ft. horizontally between steps (at top). Typically, the corners of a stepped excavation are unstable. The footing should be sloped and reinforced, so the effective horizontal length of the footing is supported on well-compacted soil (at bottom).
On slopes too steep for stepped footings of these dimensions, consider a pier-and-grade-beam foundation. See Pier Foundations.
Jump Footings
When a short foundation wall ties into a tall wall (such as where a house with a full basement jumps to a stem wall for the garage), the footing can be interrupted and the foundation wall tied together with a reinforced foundation wall section. Masonry foundation walls have no real spanning capability, so the footing must be stepped down when elevations change, but poured concrete walls can be reinforced with steel to span openings (Jump Footings, below). Check with a local code official first; the code on the books may have been written for masonry foundations.
Footing Problems
Foundation walls should be centered on the footing. In the event of a layout mistake, the footing can be repaired. The repair depends on the soil conditions.
A well-compacted gravel support may be allowed, but usually must be based on a good soil analysis and engineer’s approval. Otherwise, an augmented footing must be poured using rebar dowels epoxied into the existing footing (Pouring Footings in a Wet Drench, below).
When footing trenches fill up with water in wet conditions, place a layer of well-tamped 3- to 4-in. cobbles (Repairing Off-Center Footings, below) and use a stiff concrete mix when casting the footings.
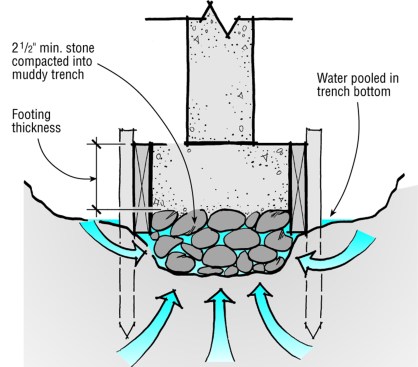
When water pools in a footing trench, place large cobbles in the bottom of the form, compacting them down into the mud. Muck and water may fill the spaces between the stones, but contact between stones will provide bearing. Use a stiff concrete mix when casting the footings.


