I work as a professional builder and remodeler in a community about 50 miles northwest of Chicago. Recently, after years spent working almost entirely on other people’s homes, my wife and I decided that it was time to get a new place for ourselves. We bought a fixer-upper on a nearby lake. The 50-year-old ranch was in need of some major repair and updating, but the price, location, and good interest rates convinced us it was a worthwhile investment.
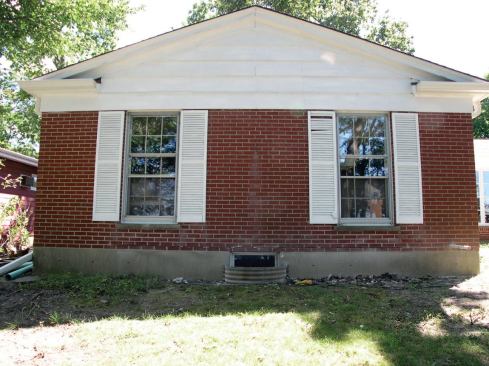
Given the lot’s natural slope and the great view of the lake, we figured a walkout basement would be a big improvement. Part of the downstairs space was finished, including a fireplace and a three-quarter bath, but there was no door to the outside and the tiny windows didn’t offer much light or ventilation. So, we decided to add a patio door with windows on both sides.
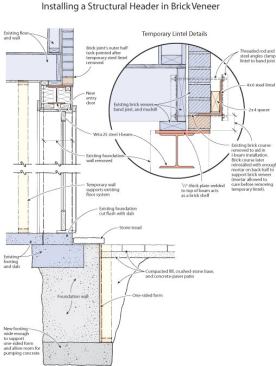
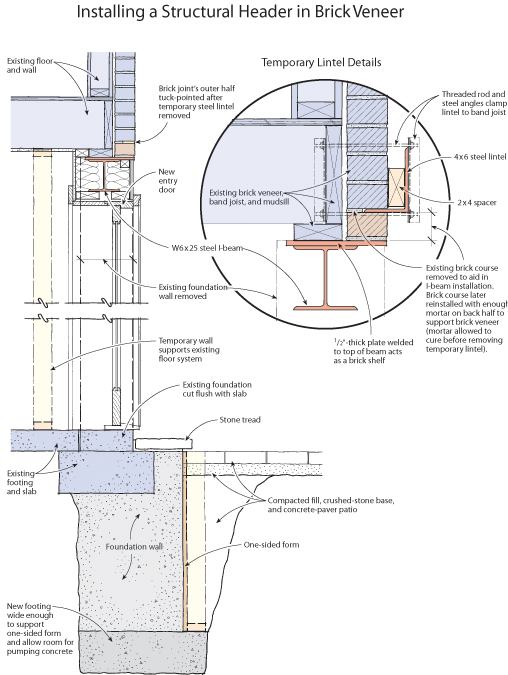
Supporting the home's brick veneer while cutting through the con…
Getting Below Frost
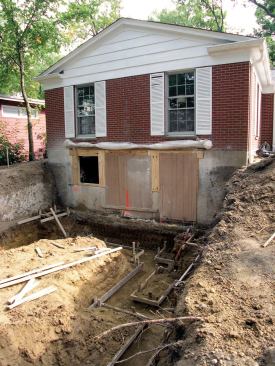
The job was a little more complicated than simply digging a hole and cutting an opening in the concrete foundation. Given the 42-inch frost depth here in northern Illinois, I knew that excavating down to the level of the basement slab would make that section of foundation susceptible to frost damage.
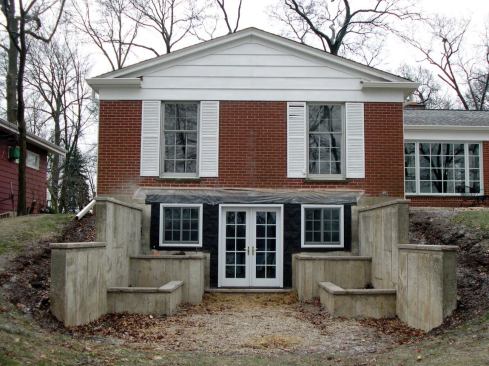
To keep foundation modifications to a minimum, I decided to flank the entry door with two 4-foot-deep concrete planters. The planters would keep most of the existing footing below the frost line, yet still provide enough room for windows above them. They also would act as buttresses for the new retaining walls on either side of the door. I would still have to deepen the foundation below the planned 6-foot door, but this would be easier than underpinning the entire 16-foot-wide opening.
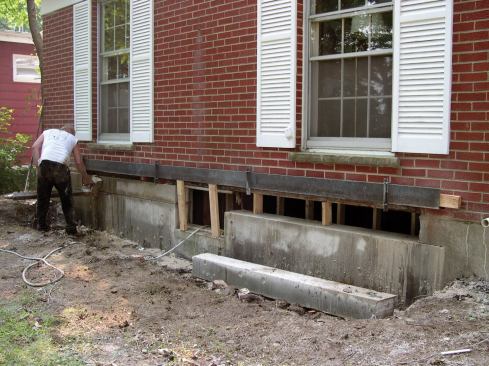
The other problem was how to temporarily support the home’s brick veneer while cutting through the basement wall. I asked several other experienced builders and got various responses as to whether the masonry would stay in place on its own. Then I talked to a structural engineer: He advised me to use a temporary lintel to support the brickwork while cutting and preparing the new opening.
Supporting the Masonry
The first step in supporting the brick veneer was to cut through the mortar one course of brick above where I planned to install the new steel header. This would give me some working room to slip in the header and remove the temporary lintel when I was finished.
My original plan was to cut the joint as deep as I could with a masonry blade in a 7 1/4-inch circular saw, perforate the remaining mortar with a hammer drill, and then drive the 4-by-6-inch L-shaped steel lintel into the cut with a sledgehammer, breaking through the remaining mortar. But soon after I started pounding on the steel, it became apparent that I wasn’t going to break through. I thought about cutting all the way through the mortar with some other tool, but was concerned the brickwork might collapse while I finished the cut. After considering it for a while, I decided the temporary lintel was in far enough to support the brick — about halfway — and went about securing it to the band joist.
I inserted a 2×4 to take up the remaining space between the brick and the lintel, drilled pairs of holes in four locations through the masonry and band joist, then used threaded rod and pieces of angle iron to clamp the lintel to the band so it wouldn’t slide out. With everything secure, I removed the course of brick below the lintel. Nothing budged.
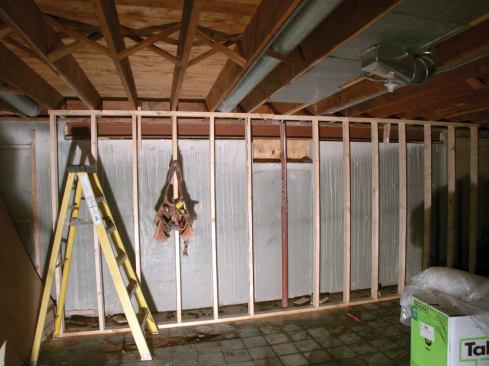
Installing the Header
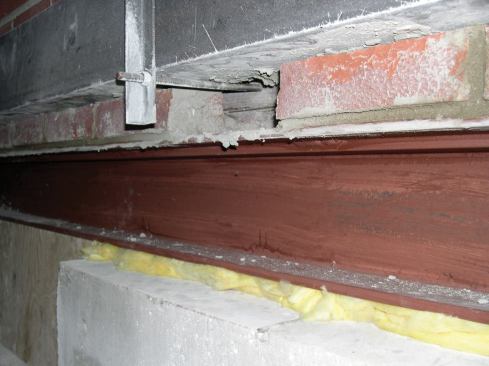
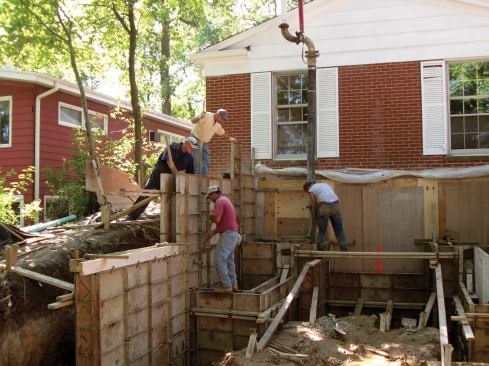
I planned to use a steel I-beam to span the opening and support the wall and floor system above. My steel fabricator welded a 1/2-inch-thick overhanging plate to the top of the beam as a supporting ledge for the brick veneer.
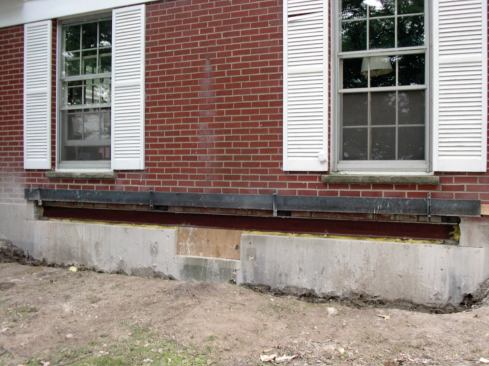
A steel angle under the brick veneer and a temporary stud wall under the floor framing provided support while the concrete foundation was cut open. Removing the course of brick under the lintel made room for slipping in the I-beam. Once the beam was in place, the missing course of brick was reinstalled, with enough mortar on the back half to support the veneer above while the temporary lintel was removed.
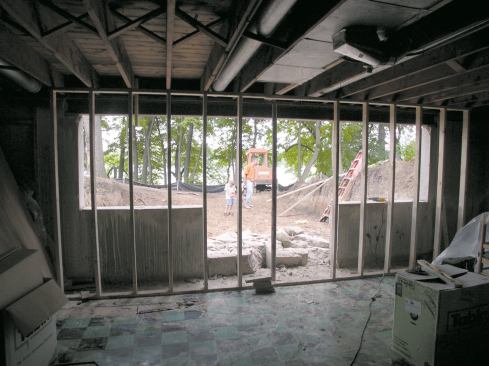
Instead of fighting to get the steel beam in place while working 7 or 8 feet in the air, I decided to install it at grade level before excavating the basement access. This was key, because I knew I would be placing the beam by hand. So, at this point, we built a temporary wall inside the basement to support the floor framing while we installed the beam.
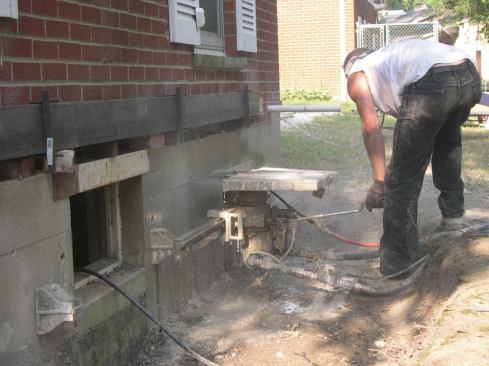
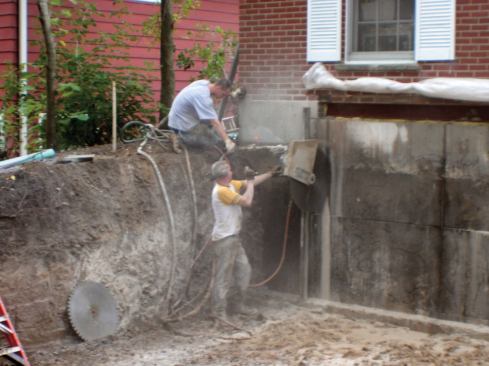
Cutting the pocket. I hired a concrete cutting and coring company to make the pocket for the steel beam and the door opening. In preparation, I had to dig out about 10 inches of dirt from the existing grade so the cutting sub could mount the guide rail for the saw. The beam slot was to be 7 inches high and 17 feet long, which left some space for shimming the beam and mortaring above it, and 6 inches of bearing on both ends.
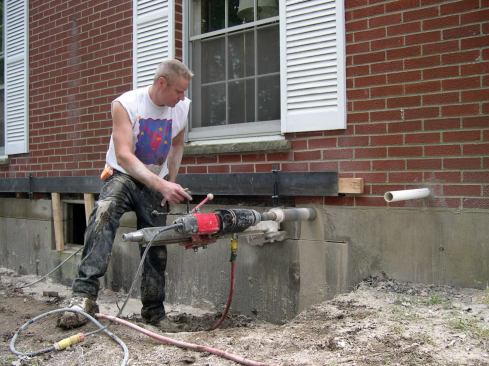
After making the horizontal cuts with the saw, the concrete cutter made the vertical end cuts by stitch-drilling with a core bit. This method avoided the vertical overcuts that the concrete saw would have made in the brick veneer above.
Cutting the beam pocket took about two hours.
Placing the steel. When the steel beam was delivered, I had it craned over the house as far as possible, then we dragged it the remaining 20 feet or so. It took four of us to place it in the slot, but I was pleased with how smoothly everything went when we were working at grade level. We slid the beam into position across some 2x6s and shimmed it level on the existing sill plate without much trouble.
With the header in place, I went about replacing the course of brick above the beam. I needed to do this in such a way that I could get enough support to safely remove the temporary lintel. Since the lintel supported only the front half of the brick, I was able to fill the rest of the space left at the back of the joint with mortar as I slid in bricks from below.
I let the mortar set up for a week while I took a vacation, and then I removed the lintel and tuck-pointed the joint when I returned. Again, nothing budged.

Cutting the Door Opening
The next step was to excavate the walkout to a depth a few inches below the existing footing. Providing a flat, accessible surface for the wall-cutting crew took a full day of my excavator’s time. When the cutting subs showed up the next day, they were pleased: Besides providing them with a level work area, I had marked out all the cuts. They assured me that the prep work would make the sawing go much faster — good news, since they were charging me by the hour. Everything went smoothly, and they finished more quickly than expected.
Footings and Retaining Walls
The next morning, after clearing the cut-out chunks of concrete with a skid-steer loader, we used a compact excavator to dig down about 4 feet below the door opening to deepen the section of foundation left vulnerable by the walkout. At the bottom of the hole, we dug a 24-inch-wide by 12-inch-deep trench for the footing. The following day we poured all the footings, using a bucket attachment on the skid-steer loader to move the concrete.
Over the weekend the footings set up, and on Monday my concrete contractor set the forms for the retaining walls and the foundation under the door. I had already installed rebar dowels every 8 inches where the retaining walls and planters butted against the foundation. We used a concrete pumper to fill the forms. Installing drains to daylight at the base of the retaining walls and laying a base of crushed limestone for the patio completed this phase of the job.
Finishing Up
I installed steel columns between the new door and windows to reduce the header span, and then framed out the door and window openings. I covered the sheathing with 30-pound felt, and I plan to stucco the wall and planters later in the spring.
Even though the brickwork on this house doesn’t have a weep system and there don’t appear to be any problems to date, I drilled some weep holes in the mortar joints directly above the new opening.
Mike Kalstrupis a builder and remodeler in Grayslake, Ill.


