
Doug Horgan/BOWA
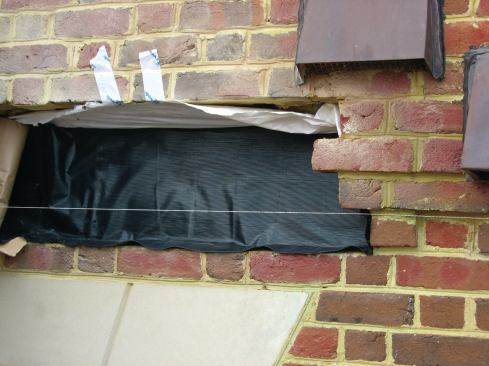
When we finally opened up the wall, we discovered that the throu…
As a high-end remodeling firm in the Washington, D.C., metro area, our company works on many homes that have brick and stone exteriors. We sub out most of the masonry work, and getting the details right sometimes requires careful supervision. We pay particular attention to through-wall flashing, especially at roofs and above and below windows. The through-wall flashing at the head and sill must be planned before the masons are even hired, and we have to be sure the masons follow our plans closely because getting the details wrong is a sure-fire path to water problems.
That was the clear case on one recent job. Our work involved enclosing an open second-story deck above a kitchen. When scoping out the job, we learned that there was a leak: Water was coming through the recessed light in the soffit above the sink, which faced a large window. This window had previously been fixed by another contractor, and from the exterior it appeared to have a good weep system at the header. So, like everyone else, we assumed that the leak was in the roof and that enclosing the deck would solve the problem. But after we finished our work, the leak persisted. Whenever there was a long, windy rainstorm, water still dripped through the light.
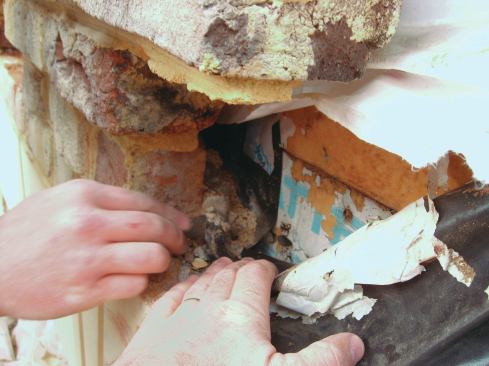
So we investigated more closely, starting with water-testing the wall above the window. After soaking the brick with a hose, sure enough, water began flowing through the light. Still, before launching into a multi-thousand-dollar masonry project, we inspected further by taking off the casing above the window. We could see that there was through-wall flashing at the header, but we could also see plenty of water getting around it.
When we finally opened up the wall, we discovered that the through-wall flashing had been pieced in, with the seams simply lapped, not sealed. Water was draining off the housewrap and onto the head flashing, but it was leaking through the seams. Plus, there were no end dams, so water was spilling off each end of the flashing and finding its way past the housewrap, past a layer of foil-faced polyiso insulation, and into the wall.
Above Openings
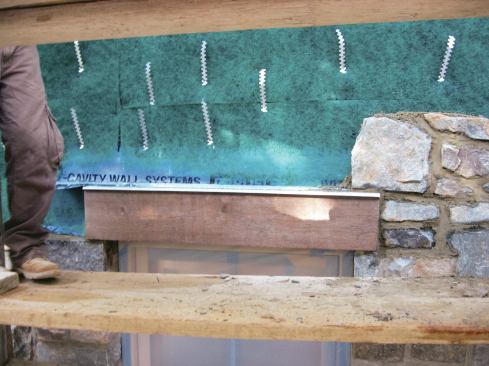
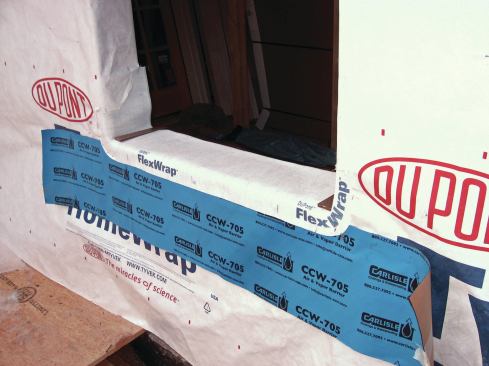
To repair the problem, we opened up four courses in the wall—enough so that we could pull up the existing housewrap and install a one-piece, 18-inch-wide through-wall flashing. We typically try to use purpose-made rubberized asphalt “thru-wall” flashing materials. These are similar to the self-adhered flashings made for roofs or windows but have a stronger polyethylene face layer. The thicker material stands up to abrasion from masonry and tends to come in wider widths, so we can get a good lap behind the housewrap and still bring the flashing all the way out to the face of the brick.
This last point is important because it prevents water from soaking back into the masonry below the flashing and finding its way into the framing. There are purpose-made flashing materials with metal drip edges, but they are expensive, difficult to work with, and aren’t stocked in our area. On some jobs, we have fabricated stainless steel drips along the outer visible edge. Most of the time, however, we just have the masons bring the flexible through-wall flashing all the way out to the face of the brick.
If you try to be clever and hide the edge of the material, know that holding it back any more than a tiny bit will allow water into the veneer. On existing work, we often find through-wall flashing cut back to the middle of the brick, which dumps water directly into the core of the brick and into the open back half of the head joints. Pulling the flashing all the way out to the face is a good way to ensure quality—and it isn’t very noticeable once it’s trimmed off.
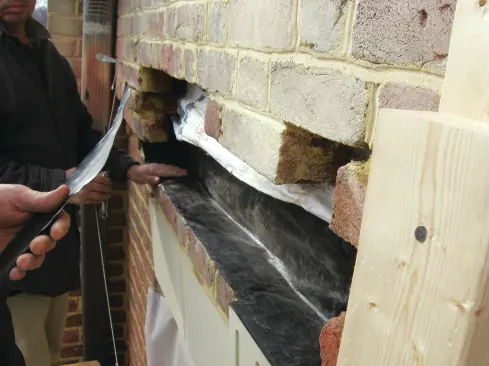
The other critical detail on any through-wall flashing is the end dam, which is simply a fold at each end of the flashing that brings the material up into a vertical head joint. This detail allows the flashing to function more like a collection channel, or spout, than a flat membrane. Creating an end dam is also more reliable than trying to seal overlapping pieces of flashing: Whenever we need a mid-span joint in flashing for a long run, we create end dams, turning the ends of each piece up into a head joint.
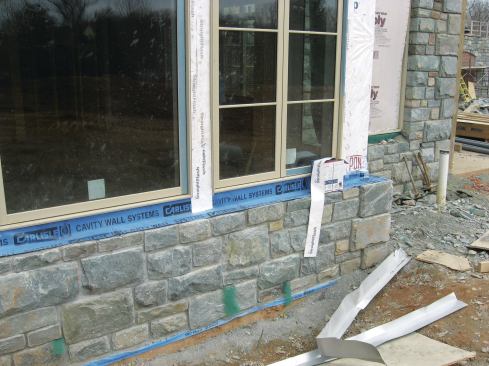
Through-wall flashing needs to run longer than the jamb flashing on each side of the window, so water won’t find its way back into the opening. To ensure that water can escape, weep holes should be placed at each end dam and at every third brick to provide ample drainage. Weeps are commonly created by open head joints, or by fitting head joints with cotton rope purpose-made plastic devices (although tubes tend to clog or become insect nests), or drainable mesh (visible at the bottom of the wall in photo 7).
On this house we also reworked the window wrap and casing, and added an aluminum head flashing. By pushing most of the water through the masonry and protecting against wind-blown and incidental moisture, we were able to stop the persistent leak.
Below Openings
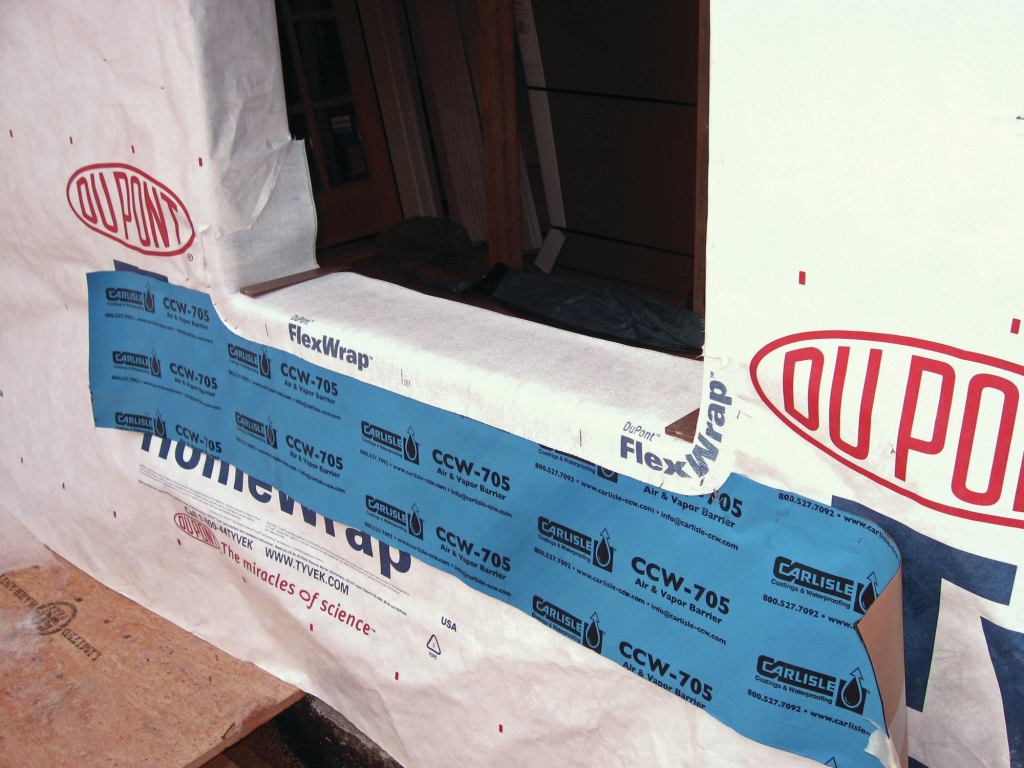
We are careful to flash around windows, using high-quality butyl-rubber flashing and properly integrating it with the housewrap and window flashing. (For examples of details using a variety of different flashing materials, see “Flashing and Trimming a Window,” Aug/12.)
A key feature of a good window flashing is a drainable sill pan, which gathers the water leaking around a window unit and directs it to the outside. We find that a lot of masons, if left to their own devices, will let the sill pan drain into the air space behind the brick, leaving the through-wall flashing at the base of the wall to do all the work. However, we feel that best-practice should include a through-wall flashing right below each window that is integrated with the sill pan. Any water leaking from any window needs a clear path out of the wall as quickly as possible.
It’s important to run the through-wall flashing long enough so that the jamb flashing, as well as the sill pan, lap over it. This includes the jamb flashing between windows. (Make sure to lap correctly; reverse shingling is the bane of every flashing job.) And as with every through-wall flashing, each end must be turned up to create an end dam so that water is channeled out of the wall. Otherwise, it is likely to dribble back into the masonry and find its way inside.
Doug Horgan is vice president, best practices, at BOWA, a design/build remodeling company based in McLean and Middleburg, Va.


