Whether running up an exterior wall or emerging through the roof, the last few feet of chimneys are completely exposed to the wrath of Mother Nature. These positions mean that chimneys are regularly subjected to intense heat, windblown rain, freezing temperatures, and other environmental insults.
The fact that most chimneys sail through decades of such abuse with little or no damage is truly a testimony to the durability of masonry. The one possible chink in the chimney’s armor is the cap (or “wash,” as it’s called in my part of the country).
Why Caps Fail
There are four reasons chimney caps fail: First, the cap is the most exposed area of the chimney and the only horizontal surface. It’s therefore more likely to absorb and collect water than any other part of the chimney (assuming the roof flashing was properly installed).
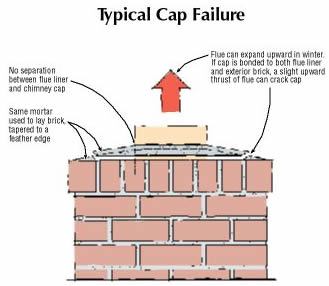
Second, masons usually make the cap out of the same mortar used to lay the brick. That mixture is too wet for the cap, which is often 2 or 3 inches thick as it rises toward the flue. As a result, shrinkage cracks often develop before the mortar cures.
Third, masons often taper the mortar to a feather edge along the perimeter of the chimney. Over the long haul, that edge is too fragile for the harsh environment into which it’s placed, and it invariably wears away, leaving a flat surface that collects water.
Fourth, masons rarely isolate the cap from the flue liner. Like all building materials, brick, mortar, and flue liners expand and contract in response to temperature changes. In the winter, when the furnace is running and the family is most likely to build and maintain a fire, the flue can expand upward. The cap is exposed to freezing cold and bonded to the exterior brick. If the cap is also bonded to the flue liner, a slight upward thrust of the flue can crack the cap.
All four of these problems allow water to enter the cap. Over the years, the cap deteriorates and a downward cycle develops: With each winter, more water enters the top of the chimney and causes more damage to the cap. Eventually, water flows into the chimney and makes its way into the house — sometimes in large quantities.
A Sound but Unattractive Solution
Recognizing the shortcomings of the common mortar cap, many masonry industry experts advocate a reinforced concrete cap about 4 inches thick, isolated from the flue. This design solves the last three problems just described and leaves a tough concrete slab rather than a thin layer of mortar exposed to the elements. If this kind of cap is made with care, it should readily shed rainwater and provide many decades of trouble-free service.
This design makes perfect sense from a structural point of view. The only problem is that a concrete slab on top of a chimney is — putting it charitably — unattractive.
Chimneys can be beautiful structures and are often a major focal point for the home’s exterior. The way they’re proportioned and detailed can be extremely important for aesthetic reasons. A concrete cap visible from the ground or from a window, therefore, is often aesthetically unacceptable. This is especially true on an older house or one designed along traditional lines.
Best of Both Worlds
To satisfy aesthetic needs and yet build a sound, durable cap, I’ve come up with the technique described and illustrated in this article. This method eliminates the feathered edge and provides for a reinforced concrete cap that’s isolated from the flue or flues. The main difference between this design and the one advocated by industry literature is that it hides the edge of the concrete slab.
First, I make sure that the top of the final flue liner ends up at least 5 1/2 inches above the top of the final course of brick. Before laying the final course, I cut the brick along their length at a 45-degree angle. I’ve constructed a simple carriage out of wood that holds the brick at the proper angle.
After clamping the carriage to the sliding table on the wet saw, I can slice the brick at the desired angle safely and quickly. To create the illusion that the top row consists of full brick, I avoid cutting the corner brick all the way through. Instead, I stop short of the edge, then cut at an angle across the width of the brick. I then use a 4-inch angle grinder to clean out the small amount of material that the wet saw doesn’t get.
I return and install the cap a day or two after laying this top course of brick. I first wrap the flues in fiberglass insulation to keep the concrete from bonding to them. After taping the insulation to the flues, I fabricate a rebar grid that fits inside the brick and around the flues. When the grid is ready, I mix a stiff batch of concrete and begin packing it into place. After putting a couple of inches of concrete in place, I install the rebar grid and continue packing concrete over it.
I begin shaping the cap after reaching the top edge of the brick, molding it into the shape of a hip roof. I like to make the lines created by the intersecting planes as crisp and neat as possible, not just for aesthetic reasons: I want the surfaces as straight as possible so that rainwater runs quickly off.
For the same reason, I put plenty of pitch on the cap. The wash rises 3 1/2 inches from the top edge of the brick to the side of the flue, which leaves a couple of inches of flue projecting above the cap — just enough room for a metal flue cap to clamp onto later, if desired.
After building up and shaping the cap, I let it sit for 30 to 60 minutes. When the cap begins to stiffen, I mix a small batch of mortar that matches the brick mortar and carefully apply a thin coat to the cap to make it more water resistant and to ensure a color match.
I let the cap cure for a few days before returning to pick out the top inch or two of the insulation, then finish the job by filling the seam with a gray polyurethane sealant.
John Carrollis a mason builder and writer from Durham, N.C. This article was adapted with permission fromMasonry Constructionmagazine.


