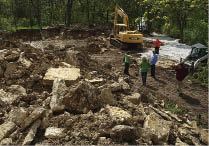
When life gives you lemons, the saying goes, make lemonade. If life were to give Robert Mogensen a sack of lemons, he’d probably make lemon meringue pie. Mogensen works in the family masonry business started by his dad, Mickey. Some years ago, he bought a nice lot in Waukesha, Wis. — a two-acre plot surrounded by town parks and conservation land, the last undeveloped free spot in the area. He planned to build himself a home there. But when he started to excavate, he hit rock 2 feet down. Lots of rock.
At first, he figured he’d have to bite the bullet: He put $15,000 into his budget for drilling and blasting. But as the excavator kept working, the stone started to peel back easily in nice flat slabs. Mickey, a 40-year veteran of the mason’s trade, knew a good thing when he saw it. He suggested using the material for stone veneer on the house. The final result is a building that blends into its surroundings — literally, because it’s made out of the bedrock it sits on. The edges of the rough, irregular rock-slab facing panels are trimmed with brick quoins and ledges.
For the most part, the house was built using the company’s standard details for a masonry-faced wood-frame structure, says Robert. The OSB sheathing was prepped with Enviro-Dri, an asphaltic membrane from Tremco Barriers. Sheathing seams were taped with mesh, and the asphalt-based emulsion was applied using a hot iron. Waterproofing in the field was applied with a roller. Other aspects of the job were less typical. The foundation was poured with a 4-inch shelf to support the stone. “We placed the larger stones using a Bobcat loader fitted with forks,” says Robert. “We would build a temporary shelf using scaffold planks flush with the stone ledge on the foundation. Then we would select a stone, carry it over flat on the forks, and place it on the temporary shelf, then slide the end of the forks out to the edge of the stone and tip the stone up vertically using the forks. Next the crew would walk or wiggle the stone into place on the ledge, install wall ties, pack the stone with mortar, and brace it in place.” After letting each course set overnight, the crew would repeat the process, until the job was done.
") As work progressed, Mogensen found additional ways to use the excavated rock on site — as a sub-base for his driveway, as fill for a low spot on the lot, and as landscaping material. Mickey Mogensen summed up his practical approach in a story in the Milwaukee Journal Sentinel, which focused on the project’s clever re-use of materials: “If you have this in the ground, you might as well use it.”
As work progressed, Mogensen found additional ways to use the excavated rock on site — as a sub-base for his driveway, as fill for a low spot on the lot, and as landscaping material. Mickey Mogensen summed up his practical approach in a story in the Milwaukee Journal Sentinel, which focused on the project’s clever re-use of materials: “If you have this in the ground, you might as well use it.”


