In an ideal world, foundations would be level and square, and all the anchor bolts would be in exactly the right places. Of course, nothing is ever that easy. Setting sill plates onto a less-than-perfect foundation can be a time-consuming process of measuring, squaring, and shimming.
A few years ago, I came up with a method that works better for me. Before the foundation is poured, I cut and assemble the sill plates. I do the framing layout on them, and I drill and install the anchor bolts in the plates exactly where I want them. Then, just after the concrete is poured, I set the plates in place, bolts and all. I do a little thumping and tweaking, and soon the plates are ready for framing.
Engineers’ Lament
I can already hear the structural engineers saying, quite correctly, that foundation bolts should be held in place and the concrete poured around them. Pushing bolts into partially cured concrete displaces the stone and coarse aggregate, leaving them sitting in a soup of cement, water, and fine sand, a mix weaker than the design strength of the rest of the concrete.
The method required on engineered structures in seismic or high-wind zones is to position the bolts before the pour, which is typically done with scrap lumber, wire, or a specialized product like Simpson’s AnchorMate connector.
Often, though, on less demanding sites, anchor bolts are placed into wet concrete. If this is done immediately, before the concrete begins to tighten up, the aggregate flows back around the bolts and little strength is lost.
Advantages of Wet-Set Sills
We’re all aware of the things that can go wrong with anchor bolts, no matter what method is used to set them. The most careful preplacement rarely survives the process of pouring and pulling the concrete through the forms — and handing a bucket of bolts and a tape measure to the average laborer is a recipe for disaster.
Bolts often end up under studs, joists, or posts; as a result they get cut off or the framing members get notched. Others end up in doorways and are cut off. If bolts are set too deep, the sills have to be chiseled out to install washers and nuts, a code violation. If the bolts are set too high, there might not be enough thread length to tighten them down completely. With my method, the bolts always end up at the proper height.
We’ve all experienced out-of-level foundations. Shimming sills level or packing mortar under them can add hours to the framing schedule. Wet-setting the sills eliminates this problem.
Bolt Layout
For simple frames, it’s enough just to start the layout and locate the bolts so that they don’t land in the same places as the joists or studs. On more complicated jobs, you need a detailed framing plan showing the location of every piece of wood in the first level of the structure.
I used to draw the plan on paper, then give the foundation contractor an anchor-bolt plan worked out to the inch. But I’d still have to fit the sills to the bolts and the framing to the sills, and hope that everything lined up. Now I do the initial framing plan directly on the sills, eliminating several steps. This saves time and minimizes errors.
Probably my biggest challenge used to be setting engineer-specified bolts for anchoring hold-downs. Making a mistake would require an expensive, time-consuming fix using epoxy and threaded rod.
On the project shown here, a simple two-story garage, the plans required hold-downs in shear walls at every corner. With the layout done ahead of time, the anchor bolts were perfectly aligned for the hold-downs to attach to the wall framing.
Prepping the Sills
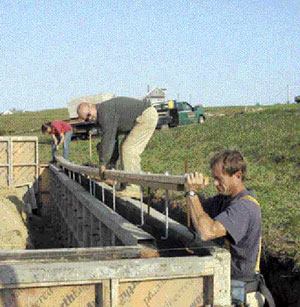
To begin, I cut the sills and assemble them in the lengths of the framed floors or walls. I’m careful to use straight stock, because there isn’t any way to brace the sills straight in the forms.
In our area, we use double sills; the bottom one is pressure-treated, the upper one standard framing lumber. If there will be a conventional floor frame on the sills, the two layers can be permanently spiked together; if the upper sills are wall bottom plates (as on the slab foundation in the photos), I just tack them so that I can later remove the upper sill and build the walls lying flat.
Next, I establish a common layout for the building in both directions, which keeps the joists, studs, and rafters in line from sill to ridge. As I mark the layout on the sills, I can often shift other framing elements slightly to reduce waste and avoid odd-sized bays. For example, all the double studs for the shear walls in this garage incorporated one stud on the common layout.
I locate and mark any critical hardware, such as shear-wall hold-downs, so that no framing ends up in the way of these connectors. It’s best to have the actual hardware on hand, or at least exact specifications, so the bolts can be set at the right distance from the members they attach to. I also locate any bolts specifically called for by code, such as those within 12 inches of beam pockets or corners.
If the top sills are also wall bottom plates, I lay out the framing for the entire wall, including studs, cripples, openings, posts, shear-wall studs, and any other framing members. Then I locate the anchor bolts where they meet code and make sense. For example, the building code or an engineer’s spec might call for anchor bolts 32 inches on-center, but at a doorway it’s clearly better to place the bolts just beyond the king studs on either side.
When I’m satisfied with the layout, I drill the holes and install the bolts in the sills. I label, organize, and store the completed sills, then wait for concrete.


