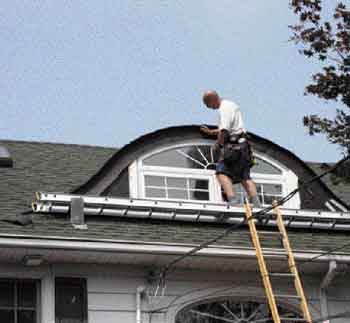
Over the years, the eyebrow dormer on my client’s 1926 colonial had seen its share of bad Long Island weather. Though the trim was structurally sound, the paint finish was in sad shape. To protect the window from deterioration and minimize future maintenance, I suggested to the owner that we clad the weathered trim boards with 1/2-inch Kleer PVC trim (866/553-3770, www.kleerlumber.com). While PVC can be easily machined and sanded, just like wood, it’s a lot more durable; best of all, I knew I could heat-bend it to fit the graceful curves of the dormer.
Initially, I thought I would be able to measure the dormer’s radius and use math to lay out, cut, and shape the material on the ground. But after taking a few measurements from different areas of the eyebrow, I realized that the carpenter who had originally built the dormer had freehanded some of the trim; there was no way I could mathematically plot my curves. Complicating matters further, the width of the trim varied from 6 1/2 to 8 inches wide.
Template
Since I didn’t want to spend hours sitting on the roof scribing the trim in place, I made a felt-paper template that I could carry down to a workspace in the driveway, a technique I’ve used to make copper roof flashings. With an accurate template, I could replicate the trim on the ground.
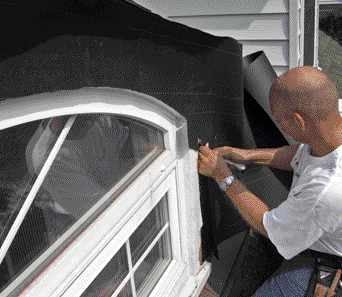
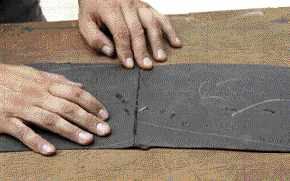
Using two pieces of 30-pound felt and a utility knife, the autho…
To build the template, I stapled up sections of 30-pound asphalt felt paper so that they covered all the dormer trim without sagging or wrinkling. Then I used a sharp utility knife to cut out the borders of the trim.
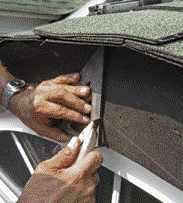
In warm weather, 30-pound felt paper is pliable enough to fold, so cutting the roof outline accurately was just a matter of working the paper up under the roof edge and slicing along the top edge of the trim. The paper is stiff enough to provide a reliable template that won’t stretch or distort when spread out on the worktable.
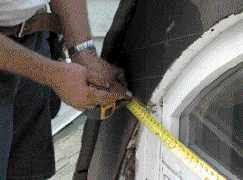
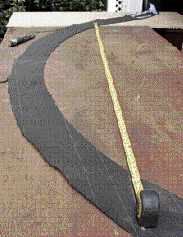
To help keep the template sections properly oriented, I cut a plumb line through both pieces of paper at the top middle of the template. I also snapped a reference line across the entire dormer while the felt paper was still in position, then made a couple of marks along this line on either side of the window and accurately measured the distance between them. Starting with the plumb cut and with this measurement for reference, I reassembled my template on the ground in the same position it was in on the dormer.
Bent, Not Cut
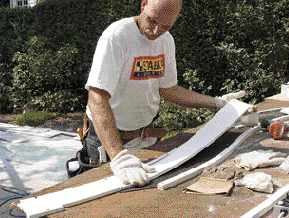
Because I was working with a 4-foot-by-8-foot sheet of PVC trim, I could have overlaid the template on my trim stock, marked the outline, and cut out the pieces with a jigsaw. But I wanted a clean look that didn’t require a lot of sanding, so I decided to heat-form the trim instead.
I’ve used Heatcon’s heat-forming kit (800/556-1990, www.heatcon.com) to bend PVC and other types of plastic trim into shape on a number of different projects (see “Bending Trex,” 7/06). The technique is actually pretty simple: A pair of temperature-controlled heating blankets are used to warm up lengths of plastic trim so that they become pliable enough to be molded into shape. The proper molding temperature varies according to the material being used, but runs somewhere between 250°F and 300°F. To prevent over- or undercooking the material, the kit comes with an infrared thermometer.
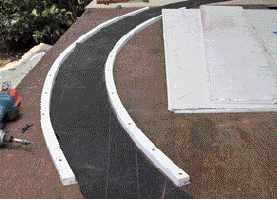
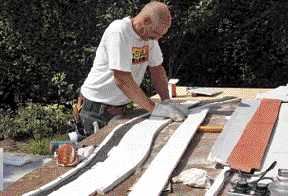

To make a form for the trim, 1-inch-wide PVC rippings are screwe…
On this project, I fastened sawn strips of PVC to my worktable — using the template as a guide — to form the inner and outer profiles of the dormer trim. These strips, which were about an inch wide, were flexible enough to bend smoothly around the template without being heated. To allow the new trim to completely cover the old trim and create a reveal, I held the inner strip an extra 5/8 inch away from the template along the bottom edge.
To deal with the changing width of the original handmade trim, I formed the new trim in two overlapping layers. The lower piece follows the curve of the window, while the upper piece is shaped to the roofline.
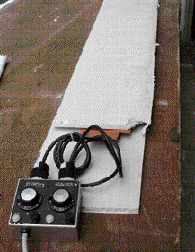
After screwing the forms down and ripping lengths of trim to width from a 4×8 sheet of 1/2-inch PVC, I fired up my two 6-inch-wide by 6-foot-long Heatcon heat blankets. To help minimize heat loss and speed up the heating process, I sandwiched the heating blankets and trim between scrap pieces of drywall. Once fully heated to around 295°F, the PVC trim was easily shaped to the outline of the forms.
Because the length of the workpieces was limited by the blankets’ 6-foot length, I fabricated each layer from three pieces of trim. Fitting the pieces together on the ground with my template as a guide made final installation up on the roof a lot easier.
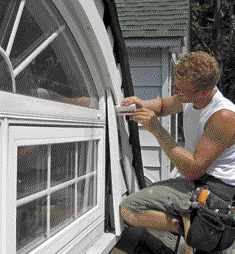
I screwed the dormer trim in place with 2-inch stainless-steel trim screws and used Bond&Fill Structural two-part PVC filler (877/822-7745, www.bondfill.com) to fill the holes and butt joint.
We also created “clapboards” out of the same 1/2-inch PVC stock to replace the siding we’d removed from the dormer, then scribed-to-fit two short lengths of vertical window casing. Although PVC trim can be finished to match existing trim work, in this case we left it unpainted.
Photos by Mike Sloggatt


