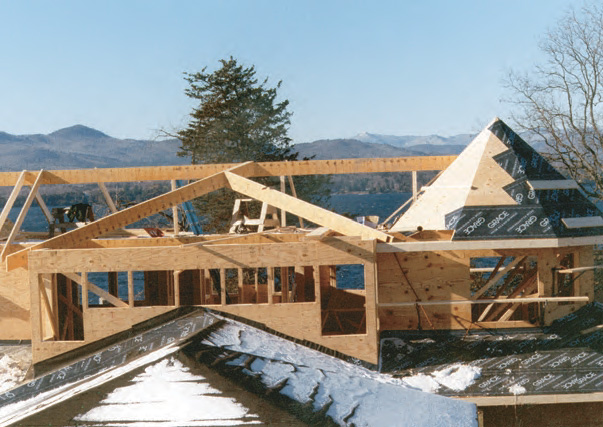
On a recent new house with some 26 different roof planes, our crew got lots of practice joining unequally pitched roofs. By the end of the job, we had settled on an accurate, efficient method for figuring the cuts on irregular hip and valley rafters. In this article, I’ll focus on a section of the roof where a lower bumpout with a 4 3/4:12 pitch met the higher 6 1/2:12 main roof. We framed this section of the roof with a major (or supporting) valley rafter — a doubled LVL that extends all the way to the structural ridge and supports the minor valley, which intersects it lower down.
Find the Angle in Plan
Locating where a hip or valley bears on an exterior wall is pretty straightforward on roofs with equal pitches — it’s always located right over the outside corner, coming off at a 45-degree angle when viewed in plan. But on hips and valleys between roofs with unequal pitches, this can be a bit trickier. Most plans will call for the soffit to be the same depth all the way around. To make this happen when the intersecting roofs are of different pitches (as in our example valleys), the valley will come off the corner not at 45 degrees in plan, but at some irregular angle and skewed off-center toward the side of the shallower-pitched roof. This means having to determine the angle in plan.
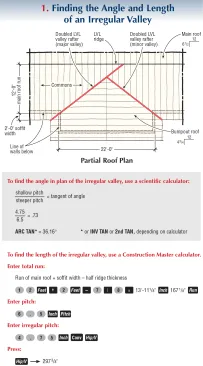
There are many ways to find the angle in plan of an unequal-pitched hip or valley, but the one that works best for me uses a trig-function calculator (see illustration 1). If you have two roof pitches given in inches, simply divide the shallower pitch by the steeper one and take the arc tangent (inverse tangent on the calculator). This gives you the angle in plan between the valley and a common rafter in the shallower-pitched roof. (If you divide the steeper pitch by the shallow pitch, you get the angle between a common and the valley on the steeper side.) I make a note of this angle, 36.16 degrees: It’s the setting for my circular saw table when making the plumb cheek cut at the top of the valley rafter, and I also use it when figuring out the bevel on top of the valley.
Doubled-Up Hip and Valley Members
I usually double up 2x12s or LVL for the hip and valley rafters. The primary reason, even if it’s not necessary for strength, is that hip and valley length and the birdsmouth height measurements are always taken at the center of the rafter. If you are using a single-piece hip or valley rafter, it’s difficult to lay out a length or height at the center when you have to draw on the face of a board. By using two pieces, one face of each piece will be at the centerline, where the layout dimensions are taken. Also, from a practical standpoint, this makes it much easier to rip the top bevel by following the corner of the board.
Calculating the Length of the Irregular Valley Rafter
Before making any cuts, I calculate the lengths of the valley rafters. For this work, I use the Construction Master calculator, which allows you to enter the common rafter run (half the building span), then convert it to a hip or valley run by hitting the “Hip/V” key. The trick is to use the correct number for the run. For the major valley, this means using the total run of the main roof, 12 feet. I add in the soffit width (2 feet) and also subtract half the thickness (7/8 inch) of the ridge beam, a 1 3/4-inch-thick LVL. For an irregular valley, you have to enter both a “pitch” — the slope on the side of the valley you take the run from — and an “irregular pitch” — the roof slope on the other side of the valley. Then, hitting the Hip/V key gives you the length of the irregular hip or valley.
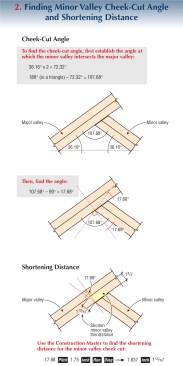
The process is similar for finding the length of the minor valley, except that I enter the run of the bumpout roof, 11 feet, in the Construction Master. This means the bumpout’s roof slope is now the “pitch,” while the steeper main roof is the “irregular pitch.” Again, the soffit is added in, but it’s easier to subtract half the thickness of the supporting valley just before making the cut. (See illustration 2 for a simple way to find this shortening distance as well as the cheek-cut angle for the minor valley.)
Finding the Plumb Angle & Birdsmouth Layout
Now it’s time to lay out the plumb cuts at the ridge and birdsmouth (see illustration 3). For this, I reach for my trig calculator again. First I have to figure the true run of the valley rafter (as opposed to the main roof run). To do this, I divide the main roof run (167 1/8 inches) by the sine of the angle in plan (sine of 36.16 degrees = .59), yielding 283 1/4 inches. Then I solve for the cosine of the angle where the valley meets the top plate by dividing the run of the valley by its length. The angle turns out to be 17.73 degrees — the plumb-cut angle.
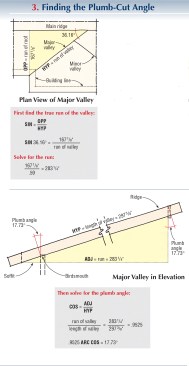
The seat-cut angle is simply the complement of this plumb angle, 72.27 degrees.
Now I can make the plumb cut at the top of the valley, setting my saw shoe at a 36-degree angle, as calculated above. To actually locate the birdsmouth, I use the same process as for finding the length of the valley, except this time I subtract out the overhang to get the length to the outside of the top plate. This gives me the distance from the ridge cut to the plumb cut on the birdsmouth.
The height of the birdsmouth is the same as on all the common rafters, although the length of the seat cut will be longer. Remember that this layout is made at the centerline of the doubled rafter and that the birdsmouth plumb cut is also angled at 36.16 degrees to match the angle of the top plumb cut.
When making the birdsmouth cuts, I clamp the two rafter members together temporarily. I don’t nail them off yet, though, because it’s easier to rip the top bevels working on one piece at a time.
Plumb Cuts at the Tail
The lower end of the valley rafter also gets angled to receive the fascia at the inside corner. Again, using a doubled member makes this easy. One piece gets a plumb cut at 36.16 degrees, while the other piece gets the complementary angle (53.84 degrees). At this point the rafter is almost ready to go up. All that remains is to bevel the top of the valley so the sheathing planes in correctly. This is more accurate and actually simpler than dropping the valley.
Finding the Top Bevel Angles
Both the minor valley rafter and the lower portion of the major valley rafter need two bevel angles, to plane into the pitches of the steeper and shallower intersecting roofs. But the section of the major valley that extends past the intersection with the minor valley has only a single bevel angle, to match the slope of the main roof (see illustration 4, below).
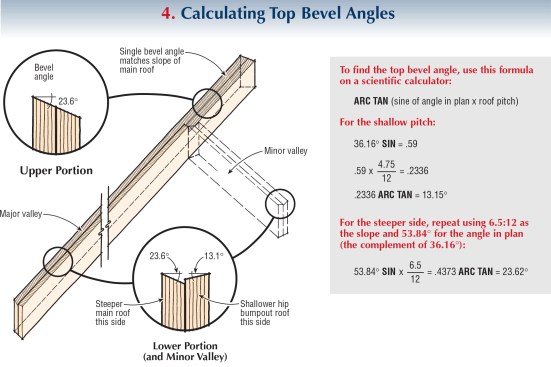
I find it’s easiest to figure the top rip angle using a trig-function calculator. For any hip between two roofs, the top-rip angle will be given by the formula:
arc tan (sine of the angle in plan of valley x pitch of roof)
This calculation must be done twice — once using the shallower pitch, with a plan angle of 36.16 degrees, and again using the steeper pitch and a plan angle of 53.84 degrees (the complement). In each case, the angle I derive with these formulas is the angle at which I set my saw table. I rip this angle with my saw table on the face of the board, with the blade following the corner along the edge. At the point where the minor valley intersects, the bevel angle on the shallow-side member reverses to match the steeper angle of the main roof.
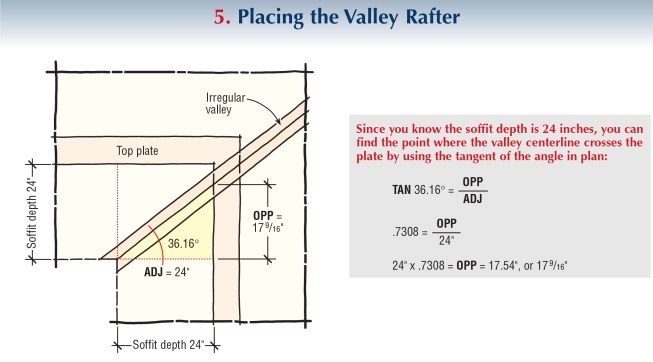
Placing the Rafter
It’s helpful to know exactly where the irregular valley crosses the top plate, since it’s not at the corner. Often, I’ll use the angle in plan of the valley and find this working off the scaled plans. You can also figure it with some simple trig, as shown in illustration 5, above.
Illustrations by Tim Healey.


