by David Grubb
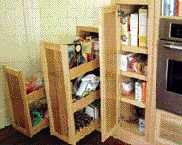
After removing the plaster from a kitchen wall during a recent remodeling job, we found a huge unused space under the stairs. Except for a pile of large, curly, hand-plane shavings left by the carpenter who’d built the stairs a century earlier, it was empty. Since we had just turned the kitchen’s old walk-in pantry into a bathroom — and had determined that there wasn’t room for a new one — the clients were thrilled when we suggested converting the newly discovered niche into pantry-like storage.
Now, in the remodeled kitchen, three successively taller cabinets step up to fill the available space. Although the tallest cabinet — which has a hinged door — is quite shallow, the shorter, pullout units are about 30 inches deep. Cabinetmaker WoodShanti Cooperative built the pullouts as individual drawer boxes, mounted each on a pair of Blum Tandem hidden slides, and then tied them together by screwing them to doorlike fronts.
David Grubbis a remodeler in Berkeley, Calif.
Hidden Header Detail
by Robert Svendsen Earlier this year, we ran into a problem while building a shed dormer on a second-story renovation project: Matching the existing roof pitch put the bottom of the wall plate at 6 feet 6 inches above the floor. Because the plans showed two pairs of double-hung windows in the dormer wall, we needed to header off the wide openings in such a way that would allow us to set the windows as high as possible in the wall. Our solution was to frame our headers above — rather than below — the plate. We were using 2×10 rafters, so we built the headers conventionally out of 2×12 stock beveled along the top edge to match the dormer’s roof pitch. Since the rafter bays would be dense-packed with cellulose, we didn’t need to worry about a soffit ventilation detail. We hung the rafters from the header with framing angles, then cut and toenailed birdsmouth rafter ‘extensions’ to the exterior of the header to support the fascia trim.
is a carpenter in Whiting, Vt.
Sturdy Deck Protection
I was visiting one of Harrell Remodeling’s construction sites in Portola Valley, Calif., when I noticed an intriguing method for protecting a wooden walkway. The only way into the home was down a set of redwood stairs and across a long redwood deck. To prevent these surfaces from being damaged, the crew had laid down scrap 1/2-inch plywood and OSB.
Here’s the interesting part: Instead of taping the joints with duct tape — which works well enough indoors — they had joined the pieces with metal framing plates and wafer-head screws. (The screws were short enough not to go through and hit the deck.) Since the pieces were solidly connected, it took only a small number of judiciously spaced drywall screws to hold them safely in place on the stairs, deck, and front edges of treads. — David Frane
Firmer Footing
I couldn’t help but feel bad for this junior carpenter, acting as cut man for four framers up on the deck. They’d shout dimensions down, and by the time he got a 2×10 up on the horses and cut to length, he had two more guys ready for their next sticks. The problem was obvious. He was losing his footing — and valuable time — in the loose Gulf Coast sand, just walking the 10 or 15 feet it took to stage and hand off the material. I found the solution on a job site down the street: a simple walkway of plywood. It’s just common sense, but worth remembering the next time you have to move around for more than a few minutes on shifting sand. — Don Jackson


