[Ed. note: This article was updated Sept 2021 by removing a reference to an outdated NYSERDA link. Note too that standards and requirements of the latest (2021) version of the IECC National Model Energy Code have changed from the 2012 version referenced in this article.]
Air-sealing a home is fraught with difficulty. We’ve learned we need to do it: If done well, it has a positive impact on occupant comfort, building energy efficiency, and indoor air quality. The big questions always come down to how much (how tight) and where building professionals should focus their efforts.
If you’re building to Passive House standards, perhaps the answers are clear. How much? A lot; you need to get total air leakage down to 0.6 air changes per hour at 50 pascals of negative pressure. Where? Everywhere, beginning at framing.
Framing a Passive House resembles wrapping holiday presents. You are applying lots of peel-and-stick flashing to sheathing joints (including those in the OSB you’ve added to the underside of the roof trusses to complete the air barrier on the lid), and lapping and taping the subslab poly to walls. To get to the air-change limits required for a Passive House, you seal everything possible, and you have worked out the cost-effectiveness by selling to a clientele that values — and will pay for — a very energy-efficient and healthy house. Extreme tightness is part of that package.
Or you may not be building to Passive House standards, but have just positioned yourself in a market to sell energy-efficient homes with good indoor air quality, and have gone to great lengths to see to it these homes perform without mishap — no window condensation, no clammy interiors, certainly no rot or moldy closets and bathrooms or peeling paint or drywall pops or ceiling cracks or any number of the other unfortunate consequences of elevated indoor humidity. Matt Risinger of Austin, Texas, takes this approach, and he’s clear on how much air-sealing he needs to do: His goal is to get his homes to about 1 ACH50. He’s also clear on where he needs to focus his air-sealing efforts, but it can change. That’s because all of the homes Risinger builds are designed by architects, and he doesn’t always have as much control over the building envelope as he might like. He has worked out air-sealing details using a combination of caulk, spray foam, and Owens-Corning’s EnergyComplete system — a latex-based sprayable sealant — that has allowed him to reach around 1.5 to 2 ACH50. He needs that level because the architect may come along and spec aluminum-and-glass doors on pivot hinges or some other equally awesome but leaky assembly that makes the whole thing 4 or 5 ACH50. That doesn’t always happen, and most of the time Risinger is able to deliver an exceptionally tight, energy-efficient package. But it happens enough that he is always trying to push the envelope (no pun intended) on air-sealing. His latest approach relies on continuous exterior insulation in concert with Tremco sealants (tremcosealants.com) to seal plate lines and penetrations, and SIGA tapes (sigatapes.com) to seal sheathing joints.
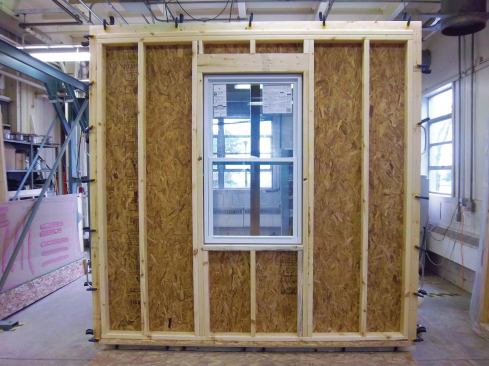
1) a framed wall with a window
For a majority of builders, however, the focus is not on air-sealing or energy-efficiency or indoor air quality. It’s not that they are resistant to these features, it’s just these are not the features they perceive as ones that sell homes. I’ll go on the record and support that perception. I just don’t think a lot of homeowners care. Even if they care in principle (and more and more certainly do), they are not always responding to those features when they decide to enter into a contract on a new home. What they respond to are fine interior finishes, elegant materials, and dramatic settings. That’s why, in fact, the architect put in those way-cool, pivot-hinge doors. Aesthetics count more.
Except for one thing: You have to meet code, and more and more state energy codes are forcing even reluctant builders to pay attention to air-sealing. Under the 2012 International Energy Conservation Code (IECC), blower-door testing is no longer an option; it is mandatory, along with a “visual inspection.” The air-sealing requirements have also gotten much stricter: In climate zones 1 and 2 (hot-humid places), a house needs to reach a 5 ACH50 threshold, down from 7 ACH50. In all other climate zones (3 to 8), homes need to reach 3 ACH50. Granted, 3 ACH50 is still a far cry from 0.6 ACH50, but it’s a huge leap from 7 ACH50, particularly for builders that have not necessarily been positioning themselves in the business of selling energy efficiency. It also hits a number (3 ACH50) that a lot of building science suggests is the right one.
So far, only five states have adopted the 2012 IECC or an equivalent energy code: It’s law in Maryland and Illinois, and becomes effective in California, Washington, and Massachusetts in 2014. At least 16 additional states will adopt the 2012 IECC or an equivalent by the end of 2015. So for the moment, many builders can continue to avoid this issue, but the handwriting is on the wall: Eventually everyone in home building will have to confront these new air-sealing provisions.
Sealing at the Sheathing
The easiest way to accomplish a complete and durable air barrier is to seal at the sheathing layer. This only works for new construction or gut rehabs because you need access to the sheathing without insulation. Once the insulation and drywall are up, all bets are off. The sheer number of holes, including electrical and plumbing penetrations, plus the interconnectivity of framing cavities, makes air-sealing after drywall incredibly demanding. Ask the weatherization and home performance contractors. As Bob Kahabka, owner of Northern Comfort Diagnostics in Elmira, N.Y., explains, the biggest leaks often involve intercavity communication. Consider as an example a leak that originates at the band joist on the windward side of a building. It sends air through the second-story floor and out the recessed lights in the kitchen. You seal the recessed lights, and now that air travels up through an interior wall and out electrical outlets or from behind the second-floor baseboard. You may chase down all these leaks, and now that same air is moving with even greater force through the top plates into the attic. Seal the top plates in the attic and the air finds a plumbing chase … you get the idea. Chasing down air leaks in an existing home is a demanding practice.
Weatherization folks who know their stuff are famous for solving such problems with dense-pack insulation in interior walls or interior floors. (Yes, this is “insulation” that has nothing to do with insulating; the dense pack is used only to shut down the air pathway, and it’s often more cost-effective than chasing down all the individual air outlets.) It’s precisely these complex air pathways in existing homes that prompted the New York State Empower program’s “Advanced Air-Sealing Protocol,” which Kahabka helped write and which he uses to train installers in the Empower program. The protocol relies on zonal pressure diagnostics, as well as blower-door assisted thermal imaging and diagnostic smoke, to pinpoint significant leaks and identify areas where air moves through the insulation when the house is pressurized. Had Kahabka only been able to seal that rim joist where the leak originated, all the contortions to shut down intercavity communication would be unnecessary. For a home-performance contractor, of course, that isn’t typically an option. But the experience illustrates how stopping the leaks before insulation and drywall is the best way to go for new construction and gut rehabs.
There are a number of ways to air-seal at the sheathing layer, and the easiest methods establish the air barrier at the inside face of the exterior sheathing, with the ceiling drywall as the air barrier on the lid. Among the options are the following:
- Owens-Corning’s EnergyComplete is a two-part, latex-based sealant. When the two parts mix in the applicator, a polymerization reaction causes the sealant to foam (there is no blowing agent). This forms a compressible foam seal that can fill a crack, create a fillet, or be applied on a framing surface to create a gasket for drywall. Being able to create a gasket has the distinct advantage of allowing you to do the air-sealing all at once, before drywall is installed, even for leaks at the top plates of interior walls, duct boots, and recessed lights that seal to the drywall.
- Knauf EcoSeal is an acrylic-based sealant. There is no foaming; it is more like a sprayable caulk that will seal a crack or create a fillet. But if you’re trying to create a gasket, you need to apply the overlying drywall before the bead cures.
- The so-called “flash-and-batt” approach can be used. This method takes advantage of the air-sealing capacity of spray-foam insulation, but uses it sparingly, applying just an inch or so to interior framing cavities for air-sealing, and then installing batts (works with blown cellulose or fiberglass, too) to provide cavity insulation. While the flash-and-batt approach is cheaper than full-depth spray foam, it suffers from the same limitation: It only seals the cavities, and there are a limited number of leaks that occur in framing cavities. Spray-foam insulation typically cannot be applied with the precision needed to seal all the other gaps and cracks where leakage occurs.
Air-Sealing on a Budget
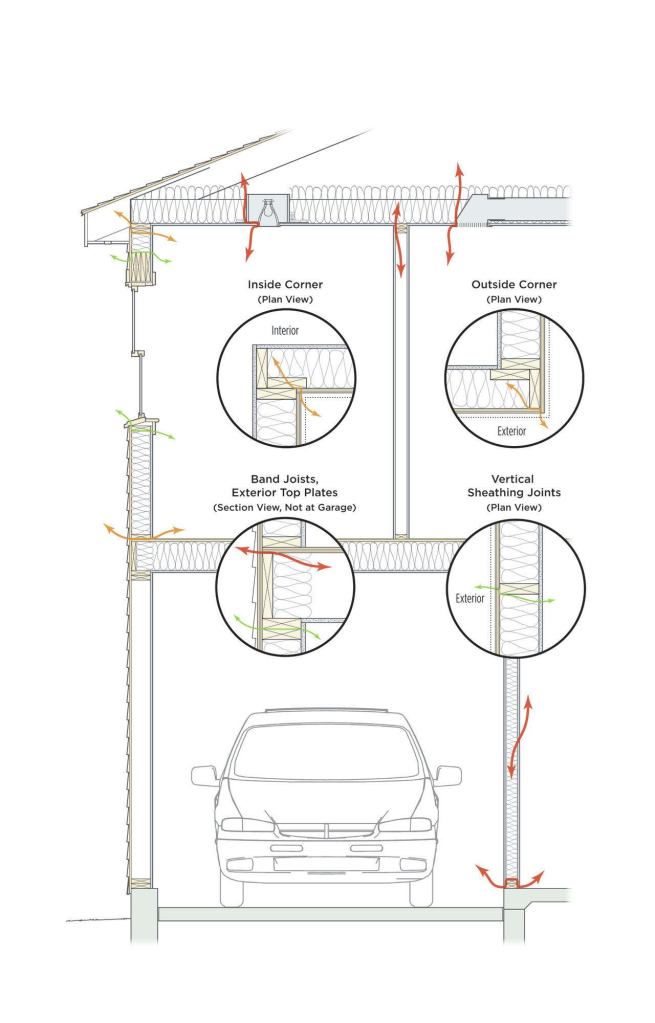
When air-sealing at the sheathing layer, you have fewer leaks to seal than you have in an existing building. Still, there are a lot: Add up all the plate lines, framing corners, sheathing panel joints, window and door openings, recessed lights and duct boots, rough-in electrical and plumbing penetrations, plus myriad other penetrations, and you have a lot of leaks.
Faced with the question “With nearly a mile of joints on a typical house that connect the inside to the outside, which ones are the most important to air-seal?”, Dave Wolf, senior research and development project leader of Owens-Corning Science and Technology, set out to prioritize the leaks in a house by ranking which ones have the biggest impact on reducing the blower-door number. Acknowledging that many builders who will be trying to meet the new energy code will have a limited budget for air-sealing, Wolf’s goal was to identify the leaks that would give a builder the most “bang for his air-sealing buck.” He approached this on two fronts: in a research lab and in a test house.
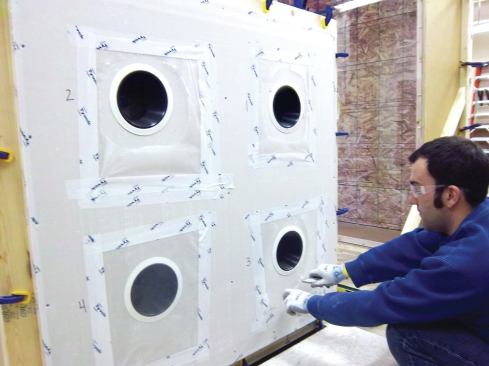
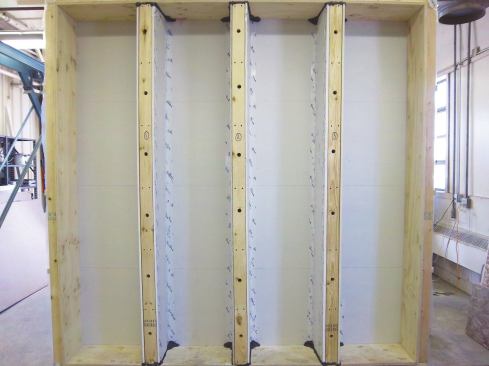
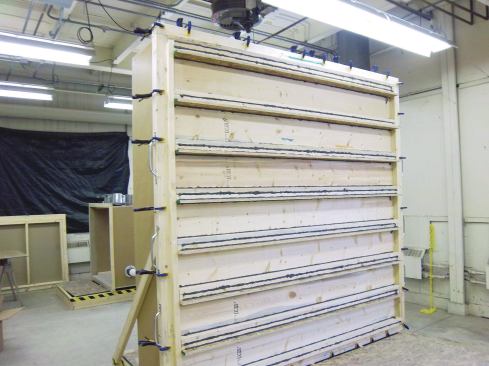
In the research lab at Owens-Corning, Wolf’s team built an 8-foot by 8-foot pressure chamber. It’s essentially a big box, with one 8×8 face open that the researchers filled with an 8×8 “plug” before depressurizing the chamber to 50 pascals. Each plug was composed of a different kind of building assembly. Four of these can be seen in the photos on page 40; 17 different ones were used in all. The idea was to create a lot of variability in each type of leak through a building assembly. Using a soft clay with which the research team could systematically seal and unseal the joints, Wolfe recorded the effect on CFM50, and gradually collected enough data to develop coefficients (in CFM50 per foot of leak or CFM50 per unit for duct boots, recessed light, switch and outlet boxes, and the like) for each type of leak.
Next, Wolf’s team moved to a test house that stood on the grounds of the Owens-Corning research facility. The house was gutted, bringing it to the appropriate phase of construction just before insulation when all the framing joints and penetrations into the attic could be sealed. The work here was a little more painstaking, as it had to be done in concert with continuous blower-door testing, but it followed the same general procedure: Seal and unseal the joints, and record the effect on the blower-door readings. By plotting the reduction in CFM50 against installation cost for each type of leak (with cost inferred from the amount of material needed plus the effort to seal a joint), Wolf’s team ranked air leaks in order of importance. The results are shown in the chart below.
These results may be useful for reaching an air-sealing target in new construction. The target for most will be the code requirement, given in ACH50, that reportedly “normalizes” a blower-door reading (which is expressed in CFM50) for house volume. While there is much controversy about how valid this is (building scientists argue that leakage is a function of area, not volume), ACH50 is, nevertheless, how the code is written.
ACH50 = (CFM50 x 60) ÷ house volume. Or, CFM50 = (ACH50 x house volume) ÷ 60. So, for example, if you were aiming for 3 ACH50 in a 2,000-square-foot house with 8-foot ceilings (volume = 16,000 cubic feet), you’d be aiming for a blower-door number of 800 CFM50 or lower.
The results suggest taking a systematic approach, sealing in order of leak importance and using a blower door to check progress, as you zero in on the code requirement.
Wolf cautions that the results are only a guide. They apply specifically to a small (1,624 square-foot) two-story on a slab. It is likely they hold for a lot of other houses, too, but builders should evaluate their own buildings. Bear in mind that the results are ranked specifically for reducing the blower-door number, and do not necessarily address comfort and indoor air quality, which may require more action. Also, the results leave out some leakage areas that could be quite significant in reducing the blower-door number. Rough-in mechanical penetrations (pipes, wires, and ductwork) through interior wall plates do not appear in the results. Nor do ceiling soffits, fireplace walls, and tub and shower units, which could present huge leaks if these units get installed before drywall without first insulating and installing an air barrier behind them. These leaks do appear in the visual inspection criteria (Table R402.4.1.1) of the 2012 IECC, so you’ll be obligated to address them in any case.
Air-Sealing Resources
Thermal Bypass Checklist Guide (search at energystar.gov) focuses on requirements for building an Energy Star home, including dos and don’ts for sealing common building-envelope air leaks.
Building Science Corporation (buildingscience.com) offers tons of free building-science resources. Joe Lstiburek’s article “Just Right and Airtight” is an important read that focuses on essential air-sealing principles.
The Energy Vanguard blog (energyvanguard.com) by Allison Bailes translates difficult building-science topics into plain language for all. For folks working on existing homes, the posting “The 3 Rules of Air-Sealing” provides clear guidance on retrofit air-sealing.
The Musings of an Energy Nerd blog by GreenBuildingAdvisor.com‘s Martin Holladay provides practical information relating to all things green-building. The posting “One Air Barrier or Two?” should be evaluated when considering the information I have presented in this article.
Other must-reads from our own pages include:
“Air-Sealing for Hot Climates,” by Matt Risinger, JLC, 11/12
“Air-Sealing Tips and Tricks,” by Terry Nordbye, JLC, 1/12
“Blower Door Testing,” by David Keefe, JLC, 1/10
“Practical Details for Energy Efficiency,” by Paul Bourke, JLC, 2/01


