Two inches of insulation at the slab edge and under the slab shaved 8,000 Btu/hour off the heating load of this Atlanta slab on grade.
I’m an architect based in Atlanta. My wife, Jodi, and I moved to this area from Tampa, Fla., during the last recession (Jodi is also an architect and my business partner).
On the way to re-establishing our practice here, I developed a competency in building science and HVAC design. Recently, we also obtained our builder’s license. Currently, our business model is based on a design-build approach, with a focus on what we call “high-performance” homes. Jodi runs the business and is the main architect and project manager, while I focus on building science, mechanical systems, and construction best practices and quality assurance on site.
For us, the term “high performance” is a way to connect with the priorities and values of our clients. They don’t typically say “I want a LEED-certified house” or “I want a Passive House.” Instead, they ask for a house that is comfortable and durable. But our prescription for that result involves creating an above-code building envelope that protects the home’s structure from deterioration, by keeping the structure inside the building’s various control layers for heat gain and loss, moisture penetration, and air infiltration.
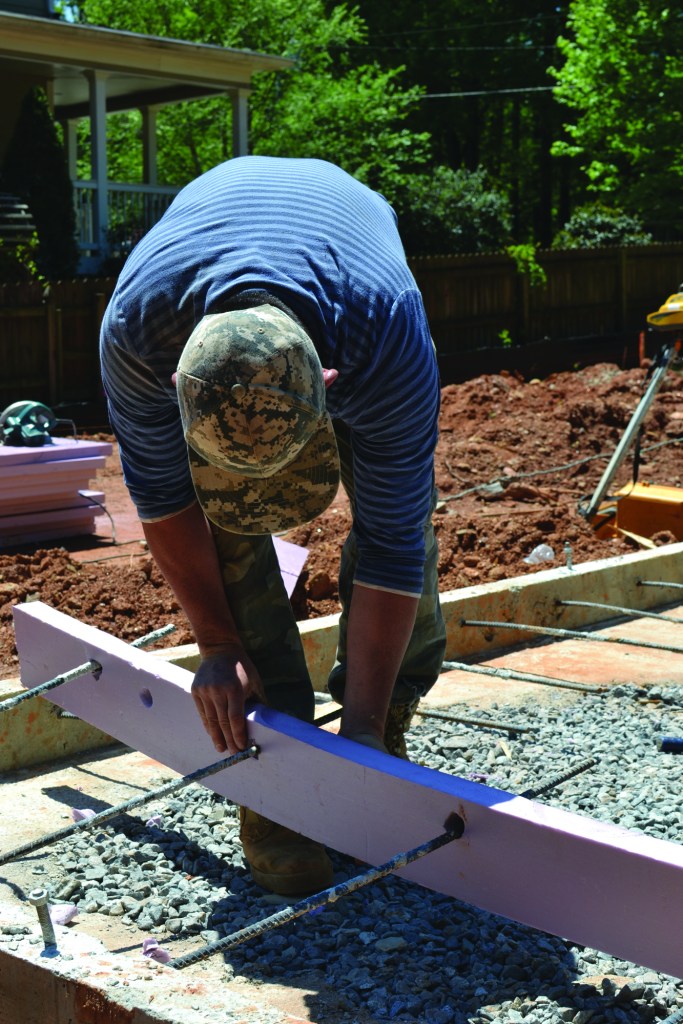
The example I’m showing here, a project we call the “High-Performance Bungalow,” follows that principle by including 2 inches of XPS foam insulation beneath the slab, and 1 inch of XPS on the outboard side of the wall and roof sheathing.
We built this house in northern Georgia. Interestingly, there’s a widespread, mistaken belief that a house in our climate doesn’t need much insulation—certainly not under the slab. That belief is supported by the attitude among some builders that building code requirements, which represent the bare minimum, are already too strict.
That view is based on some misinformation about the climate in our area. Just to give you an idea: When Jodi and I returned from our Christmas vacation in Florida in 2016, it got down to 9°F at our home in Atlanta. Our design temperature for Manual J HVAC calculations here is in the range of 23°F to 26°F, depending on your choice of local weather station. Atlanta has between 3,000 and 3,500 heating degree days (HDD) each year. By comparison, Burlington, Vt., has between 7,200 and 7,400 HDD each year, with a design temperature of about -4°F, while Miami, Fla., has only about 200 HDD and has a winter design temperature of about 52°F.
Geographically, northern Georgia is not midway from Miami to Burlington. But in terms of climate, we’re just about in the middle. Our climate here is not much different from that in Baltimore. Except for extreme cold and desert conditions, we see every condition that is found anywhere in the U.S. We have more heating days here than cooling days, and we spend more money on heating than on cooling. So for a net-zero house like this one, insulation against the cold is just as important as insulation against the heat.
Maintaining Continuity
To us, insulation around a house is comparable to a winter coat. You put it on the outside. And in the case of a house, the coat is like a “onesie”—ideally, it should be absolutely continuous. The fewer the interruptions (in the form of gaps, cracks, or holes), the warmer and cozier the home and homeowner are going to be inside that coat, and the longer the home is going to last, by being shielded from the elements.
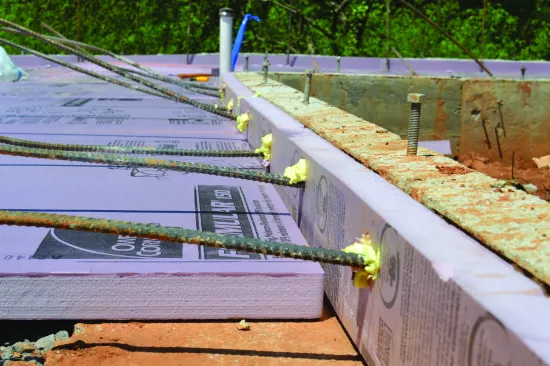
For the “High-Performance Bungalow,” we isolated the reinforced concrete slab from the earth and from the footing with 2 inches of XPS foam. We turned the foam up at the edge of the slab to break the slab thermally from the footing and the outdoors.
In our climate, the ground isn’t cold enough to freeze. Year-round ground temperatures range between 55°F and 65°F. So the heat loss through the slab is never as extreme as it can be through the walls in winter. On the other hand, in a 2,400-square-foot home, the area of contact between the slab and the ground is large, so the total heat loss can add up.
Without the sub-slab insulation, I calculated the heat loss through the slab on the design day in winter at 11,000 Btu/hour.
With the 2 inches of insulation, that number dropped to 3,000 Btu/hour. That’s definitely worth the expense—especially when you consider that the entire heating load of the house on the design day is only 19,250 Btu/hour. (The cooling load is close: 15,000 Btu/hour.)
The foam has its greatest benefit at the slab edge, where conditions are most extreme. In winter, with the home heated to 70°F, the soil under the slab near the center of the floor is at about 55°F to 60°F—a temperature difference of only 10°F or 15°F. At the slab edge, close to the cold outdoor air, the temperature difference can be 44°F to 47°F.
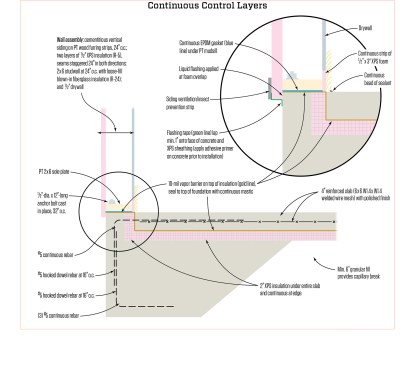
Click here for enlarged version
So why bother insulating under the center of the slab? Well for one thing, the polished slab surface is the finished floor in this house. Keeping it even a few degrees warmer underfoot is a significant comfort issue. Also, keeping insulation continuous can be a surprisingly significant factor in limiting total heat loss. But in any case, there was little difference in material cost, while eliminating part of the insulation would have complicated the process, adding labor cost.
Vapor Control
As I mentioned, one of our design rules is to maintain continuity of the control layers around the entire house, including floors, walls, and roofs. That rule applies not just to the insulation (the thermal control layer), but also to the control layers for vapor, bulk water, and air infiltration.
The vapor control layer under the slab is a sheet of 10-mil polyethylene, with seams taped. It’s important to locate this poly above the insulation, directly under the slab. Otherwise, you’re likely to trap moisture between the vapor barrier and the slab, where it can degrade the insulation.
We taped the seams of this vapor barrier carefully and were also careful not to puncture it during construction. But making the sub-slab poly perfectly continuous isn’t highly critical. There’s no air pressure at this location to bring moisture through a pinhole leak, so a few punctures are not a big deal.
On the other hand, the insulation under the slab makes a significant contribution to moisture control. By putting the insulation between the slab and the cool thermal mass of the ground, we essentially keep the slab at the same temperature as the indoor air. That way, we stop the slab from being a cold condensation point for interior moisture in winter, and we also stop it from being a source of inward vapor drive in summer.
The insulation and the poly vapor control layer also contribute to the durability of the slab. By keeping the temperature and moisture content of the slab within a narrow range, we prevent the cycle of expansion and contraction or of condensation and evaporation that can, over many decades, cause deterioration.
The edge insulation around the slab perimeter is particularly important, because it isolates the concrete thermally from the wide swings of exterior temperature. That way, the slab doesn’t experience differences in expansion and contraction that would stress the material.
Energy conservation, in other words, is not the only value served by this design: We are also achieving comfort and durability benefits that are aspects of the “high performance” label.
Space Conditioning
As built, the floor, wall, and roof envelopes have proven to control both heat flow and moisture flow as we intended. Total heating and cooling load for this approximately 2,400-square-foot home, under design conditions, were about equal: 19,250 Btu/hour
of heating on the coldest day of the year, and 15,000 Btu/hour of cooling on the hottest day of the year.
That’s an appropriate load for a mini-split heat pump to handle. As for humidity, we installed a heat-pump water heater in the encapsulated attic space that serves as the mechanicals room. Those appliances help dehumidify ambient air as they heat water. We have a filtered intake for fresh air (not an ERV), and we rely on continuously-operating bath vents and owner-controlled kitchen vents for exhaust. We have instruments in the house to monitor temperature and humidity, and so far, the house over its first year of occupancy is performing just the way we had hoped it would.
But that’s just the beginning of the HVAC side of this story. In spite of the very low loads in the house, just to make things interesting, our client requested a zoned system. She wanted to be able to independently control the temperature in different rooms—particularly in the bedroom.
In the old days, zoning was commonplace: Different parts of a typical house had widely varying, large loads, and typical equipment was sized to provide the many tons of cooling required to meet those loads.
It’s a different situation for a bedroom that needs only 2,200 Btu/hour for heating and 3,000 Btu/hour for cooling—and that’s on the design day. In mild weather, that room’s requirements are even lower.
In any high-performance home, we’re looking at mini-splits with variable refrigerant flow (VRF) technology, because they can dial themselves down to 3,300 Btu/hour, and some of them below that. In those units, the fan runs continuously, but the compressor adjusts the refrigerant flow depending on the air temperature flowing through, and it keeps the air within a degree or less of the set point.
You can zone those mini-splits by installing multiple heads in different rooms. And some appliances have indoor heads that can serve multiple rooms via ducted connections. But none of the models currently on the market have a central air handler that can be zoned by room.
But we were able to find a technology that consists of one air handler for the entire house, with five zones on it. The air handler has an attachment on it with five ports, and each port has a damper. Paired with a mini-split, the system opens and closes the dampers as the five zones call for heating or cooling. It’s not perfect, because the compressor speed of the mini-split isn’t matched precisely to the air handler’s fan speeds. But so far, everything is working and our customer is happy.


