Three years ago, I built a detached garage with an apartment above. Of course, “garage” is a euphemism for “shop.” With a limited budget, I wasn’t planning to hire other contractors and I wanted ways to save both labor and money, starting with the foundation. Living in Connecticut, I’ve long been jealous of builders in the South, where the shallow frostline allows for building on slabs with thickened edges. Here, I was looking at excavating the perimeter down to at least 42 inches below grade, pouring a footing, laying a concrete block wall to above grade, then evenly compacting the backfill before even thinking about the slab. That’s a lot of work and material, and a lot of excavation spoils to dispose of. There had to be a better way.
An Easier Alternative Foundation
Section R403.3 of the 2009 IRC provides details for a “frost-protected shallow footing.” Instead of digging down below the frostline, you insulate below the edge of the slab and out from the building a certain distance with rigid foam. The distance depends on your climate. The foam captures the interior heat from the building and the earth’s geothermal heat, preventing the ground from freezing below the footing. The catch was that the IRC’s method applies only to heated buildings, and my garage/shop would not be constantly heated. However, the details in the IRC come from ASCE Standard 32-01, which also details how a frost-protected shallow footing can be used under an unheated structure. I showed the standard to my local building official, and he green-lighted the detail right away. In short, I had to insulate under the slab (which I planned to do anyway) and the footings and 4 feet beyond the perimeter of the building with 2-inch rigid foam. The foam needed to be laid over a 6-inch-deep layer of crushed stone for drainage, then covered with at least 10 inches of soil.
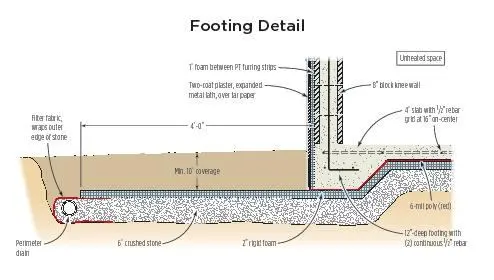
The details in the IRC come from ASCE Standard 32-01, which also details how a frost-protected shallow footing can be used under an unheated structure. In short, I had to insulate under the slab (which I planned to do anyway) and the footings and 4 feet beyond the perimeter of the building with 2-inch rigid foam. The foam needed to be laid over a 6-inch-deep layer of crushed stone for drainage, then covered with at least 10 inches of soil.
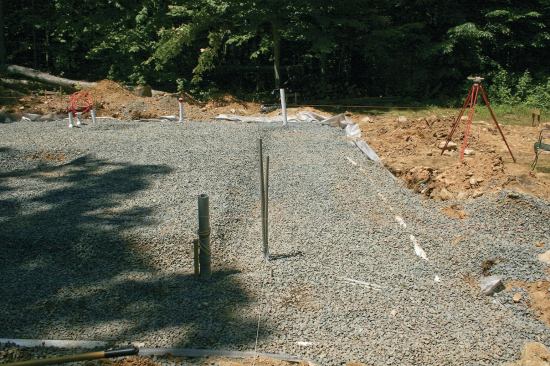
With a backhoe, I stripped the topsoil and excavated 18 inches below the projected finish grade from where the inside of the thickened slab would be to about 6 feet beyond the outside of the building. This excavation sloped to the sides for drainage, and about 1/8 inch per foot toward the front of the garage so the slab would drain toward the doors. At the perimeter, the slab would be 12 inches thick and 12 inches wide, then angle up to the standard 4-inch depth. I left 8 inches of the original soil undisturbed inside the garage to support the main slab, then trenched for and installed the underslab plumbing and conduit. I also dug holes for a 16-inch-deep masonry chimney footing, and for three 12-inch-deep footings to support point loads from a center beam. The area of the footings is based on the 2,880-psf bearing capacity of the foam.
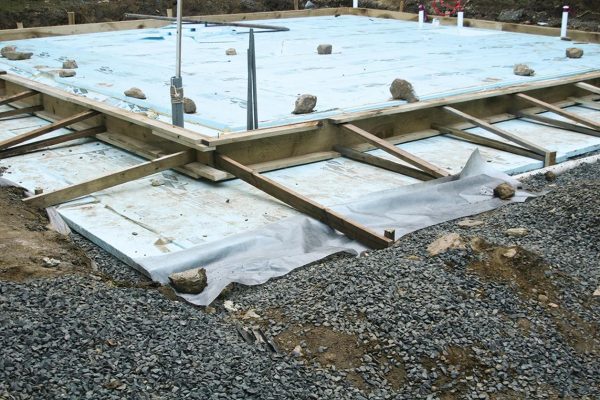
Once the utilities passed inspection, I backfilled and compacted all the disturbed areas, then spread a 6-inch-thick layer of 3/4-inch crushed stone everywhere, which I also compacted. While spreading the stone, I was careful to maintain the slopes I’d built into the excavation, checking the elevation every 10 feet. Filter fabric wraps the outer edge of the stone and a perimeter drain of 4-inch perforated-pipe, which leads to daylight. I laid the foam over the gravel, guided by strings and batter boards. The foam underlies everything, including the footings for the point loads. To keep it from blowing in the wind, I weighed the foam down with rocks, lumber, and whatever else was at hand.


Andy Engel
Once the utilities passed inspection, I backfilled and compacted…
Standard Concrete Work
The forms were a piece of cake. I could have used 2x12s, but green 5/4?x?12 rough-sawn poplar from a local sawmill was cheaper. I ripped 5/4?x?4 whalers from the wider stock, and braced the forms back to stakes. The forms were level side-to-side, but sloped 1/8 inch per foot forward. After spreading a layer of 6-mil poly over the foam inside the garage and stapling it to the inside of the forms, I laid out the required rebar and called for an inspection.
The concrete work was no different than any other slab I’ve ever done — a sleepless night followed by a hard day’s work. I used 3,500-psi concrete with fiber. Because it was a hot day, I ordered the concrete with retarder so there’d be more time to finish it. I covered the finished slab with poly, kept it wet for a couple of weeks, and finally saw-cut it into quarters.
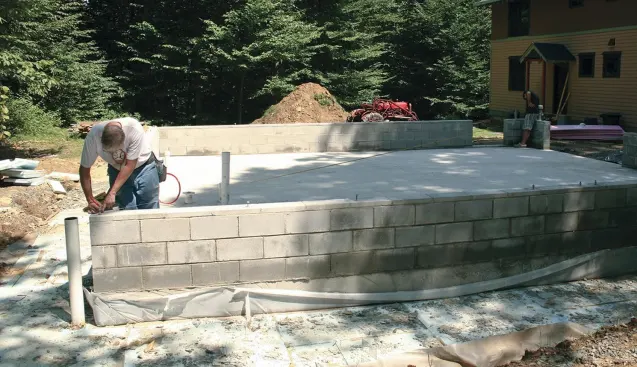
The framed garage walls are supported on an 8-inch block knee wall. I shimmed the first course level by using 4-inch solid block near the front and 2-inch block in the middle, and by varying the thickness of the mortar joint as the taper narrowed toward the back. The outside of the block is flush with the slab. Every 16 inches, I fastened 1-inch-thick pressure-treated furring strips to the block and filled in between with 1-inch foam, which extends down to the foundation foam. I covered the furring strips and foam with tar paper and expanded metal lath, then finished up with a two-coat portland cement plaster. The final step was backfilling. The garage has survived three New England winters with no masonry cracks, and it’s as plumb and level as the day it was built.


