
Paint problems with wood sidings are nothing new. But complaints have increased in recent years in homes retrofitted with blown insulation. The problems have occurred with numerous types of sidewall insulation: cellulose, fiberglass, tripolymer foam, and others.
Similar problems have turned up in new houses where wood siding is installed over rigid-foam sheathing. Not only is the paint peeling in some of these homes, but the siding itself is cupping, warping, splitting, and in some cases, falling off the walls.
Bear in mind that there are, of course, thousands of older, re-insulated homes with no problems at all, as well as thousands of new houses with insulating sheathing and no problems. So why do some houses have serious problems, while others seem fine? As it turns out, all of these problems (and the nonproblems) are related.
What We Saw
I became directly involved in the issue while investigating weatherized houses in Cleveland, Ohio, with researchers at the Housing Resource Center. We examined 150 problem houses identified through a survey conducted by public radio. After numerous site visits and some detailed wall investigations—where siding, sheathing, and insulation were removed—we found four types of problems and one group of houses with no problems.
The five categories we identified were:
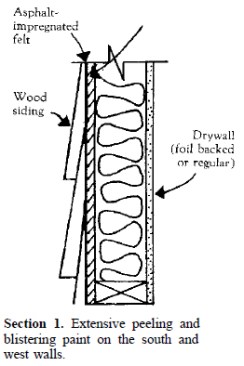
1. Houses with extensive peeling and blistering paint on the south and west exteriors. These houses also had some mold and mildew on the other exterior faces. The houses were typically 15 to 30 years old, and had no siding problems until they were insulated one or two years ago. It did not matter whether the insulation was blown cellulose or blown fiberglass. The typical wall construction was wood siding over asphalt-inpregnated building paper and asphalt-impregnated fiberboard. On the interior, some houses had foil-backed drywall, while others had regular drywall. (See Wall Section 1.)
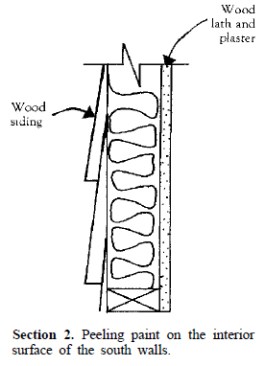
2. Houses with extensive peeling paint on the interior surface of the south walls. These houses were 50 to 60 years old and the problems occurred within one to two years of blowing the sidewall full of insulation. Typical wall construction was wood siding directly on studs, covered by an interior finish of wood lath and plaster. (Wall Section 2.)
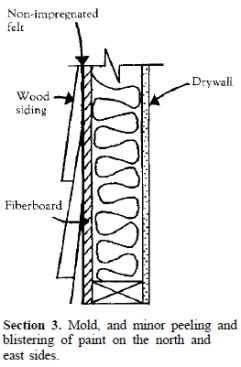
3. Houses with minor peeling, blistering, mold, and mildew on the north- and east-facing siding. These houses were 20 to 40 years old and had no siding problems until one to two years after insulating. The walls were wood siding over non-impregnated felt building paper over 1/2-inch fiberboard (some asphalt-impregnated, some nonimpregnated). The interior was standard unbacked drywall. (Wall Section 3.)
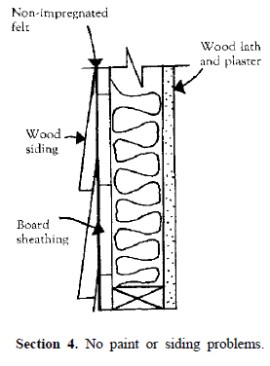
4. Houses that had no siding or paint problems on any side before or after insulating the sidewalls. These houses were 30 to 50 years old and had wood siding over non-impregnated building paper over rough-sawn board sheathing. Lath and plaster finished the inside. (Wall Section 4.)
5. New houses, one or two years old, with peeling and blistering paint and cupping and splitting siding, primarily on the south and west. Construction was wood siding directly over foil-faced isocyanurate or extrudedpolystyrene sheathing. The insulating sheathing was nailed to 2×4 or 2×6 studs, which were covered on the interior with 4- or 6-mil poly under 1/2-inch drywall. The stud cavities were insulated with fiberglass. Between the siding and rigid insulation, some houses had impregnated building paper and some Tyvek, although most had no paper. (Wall Section 5.)

In every case we examined, we found moisture or signs of moisture between the laps of the horizontal siding and/or between the siding and the sheathing Also, in all cases the cavity insulation and cavities were dry, regardless of the insulation type.
In Category 1, the moisture problems were the worst. The nails in the sheathing and siding were often seriously rusted, and the exterior surface of the fiberboard and the back of the siding were often saturated, mildewed, or rotting. The portion of the nails inside the studs, however, was fine, as were the interior surfaces of the fiberboard sheathing.

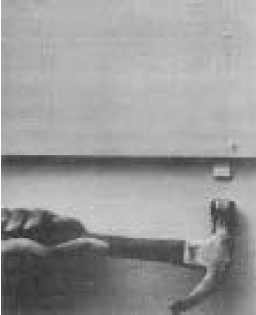
Although the paint was peeling and the siding was soggy on the west face of a Category 1 house, the author found the studs and cellulose insulation bone-dry.
In Category 2, there was no sheathing and only a little, intermittent moisture between the laps in the siding.
In Category 3, the symptoms were similar to those in Category 1, but to a much lesser degree.
In Category 4, the one with no problems, only traces of moisture were found in the laps. The rough-sawn sheathing had no visible moisture.
In Category 5, the moisture was concentrated between the siding and the insulating sheathing. The exterior face of the siding was generally dry, but the back was either wet or had signs it had been wet. The wall cavities and fiberglass insulation were dry.
Why It Happened
How can we explain these five categories? It was clear that insulation and moisture were involved in each case. But did the moisture come from inside the building or outside? And why did the moisture become a problem only after insulation was added?
Except in Category 5 (where the moisture obviously came from outside), we couldn’t tell how much of the moisture came from inside versus outside the house. But we did know that, contrary to popular belief, at least some of the moisture came from outside. (Consequently, following the conventional advice about eliminating interior moisture sources alone will not cure the problem.)
The exterior moisture source was rain. Rain gets between the siding laps with the help of the wind and capillary suction where the clapboards lap. Once between the laps, the moisture heads inward toward the sheathing or outward toward the paint, depending on the driving forces.
Moisture that is trapped behind the siding is driven into the siding at night because the siding is the coldest component in the wall. At night, the siding also picks up moisture from the air because of its raised relative humidity.
During the day, solar radiation will dry the siding in two ways. It will evaporate some moisture to the exterior. But it will drive most of the moisture out through the back of the siding into the wall (by raising the temperature of the siding and, hence, its vapor pressure).
When the source of moisture is the home’s interior, the moisture gets into the wall cavity by air leakage and diffusion. Once inside the wall, moisture will condense on any surface that’s below the dew point—even if it’s highly permeable, like Tyvek. How much moisture accumulates depends largely on how fast the moisture re-evaporates from that surface. In general, the colder the temperature of a surface, the more moisture will collect there because evaporation will be slower.
Since adding insulation to a wall cavity reduces the temperature of the exterior side of the wall, it increases condensation there. More important, it reduces the “drying potential” of the outside of the wall both by making it colder and by reducing airflow in the wall. Consequently, insulated walls are prone to collect more water in and around the sheathing, building paper, and siding.
Case One. In Category 1, prior to insulating, moisture had always found its way into the walls from both internal and external sources. Regardless of the source, the moisture accumulated toward the exterior of the wall—but dried to the outside before problems occurred.
After insulation was added, however, the drying potential was reduced enough to cause paint problems. These were worst on the south and west because of the effects of solar radiation. Although the sun dried the outside surface of the siding, it also drove moisture back into the asphalt-impregnated sheathing, where it was stored. At night, when the vapor drive reversed, moisture condensed in voids behind the paint—and broke the paint film the next day when the sun heated the surface. The sun helped make the voids in the first place by repeatedly stretching and shrinking the wood and paint.
Case Two. The story is essentially the same in Category 2, except that when the sun drove the moisture inward from the back of the siding, there was no impregnated paper or fiberboard to slow down and retain it. So the moisture went right through the wall unobstructed, and caused paint problems on the interior.
Case Three. In Category 3, the critical difference was the non-impregnated building paper and sheathing. Because these materials are fairly permeable, the moisture on the south and west was driven deep enough into the wall that the exterior remained free of paint problems. However, the lack of sun on the north—and to some extent on the east—allowed enough moisture to accumulate to cause minor mildew and paint problems.
Case Four. In Category 4, the roughsawn wood sheathing kept the houses out of trouble, because of its permeability and ability to store moisture. The water readily migrated into the wall under the influence of solar radiation and was safely stored in the sheathing, away from the back of the siding.
Not enough moisture accumulated to cause problems within the wall system. Furthermore, when the vapor gradient changed during the night, the moisture moved outward again. In each cycle back and forth, some of the water dissipated to the exterior, eventually drying out the wall. This same dynamic applies to Category 3.
Case Five. In the buildings with impermeable foam sheathing, the source of moisture had to be the exterior—rain and capillary effects. Since the water could not penetrate the wall, it wetted the back of the siding. When the sun heated up the outer surface and tried to drive the moisture inward, uneven drying led to cupping and other problems. Also, the insulating effect of the wall cooled the exterior, thereby reducing its drying potential.
And the Answer Is…
Since wall insulation is here to stay, to avoid problems we need to take into account its effect on drying potential, and compensate for it. One of the most effective approaches is to rearrange the wall components to promote drying by evaporation, air circulation, drainage, and capillary breaks (so moisture is not drawn in and held by capillary forces).
In new construction, you can do this by installing wood siding over furring strips. This is essential over impermeable sheathing, but can dramatically increase paint and siding life over standard sheathing as well.

Use furring strips when installing wood siding over foam sheathing. An air space behind the siding is essential over impermeable sheathing, but can dramatically increase paint and siding life over standard sheathing as well.
In retrofits, install plastic wedges to separate the laps of siding after blown insulation is installed. The separation promotes drainage of condensed water and drying by air circulation, and creates a capillary break. The wedges should go at each stud to create a continuous gap. To date we’ve had no insect problems with these wedges, which had been a concern. Maybe the drier siding is less attractive to these creatures.
When insulation is blown into existing wall cavities, paint problems can be avoided by driving plastic wedges between the siding laps at each stud. The separation promotes drainage and drying, and prevents capillary suction of water into the lap area.
A traditional solution to the problem is to double nail the siding with roundheaded nails (see illustration below). The protrusions of the round heads do the same job as the wedges.
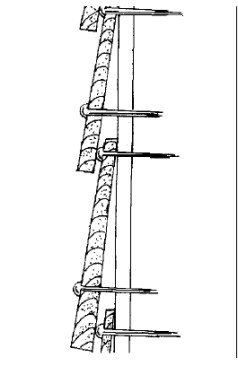
Double nailing with round-headed nails is a traditional solution to letting the siding breathe.
A modern solution that does not work is to install small vents through the siding and sheathing. These help the rain get in and household air to leak out, increasing problems rather than reducing them.
Another common recommendation— back-priming—will not help unless combined with an air space. And if you have an airspace, it’s probably not necessary.
Using a vapor-permeable latex paint on the exterior can also help reduce peeling. But no paint is sufficiently permeable, flexible, and durable to resist the stresses discussed in this article.
In summary, the major problem caused by retrofit insulation and insulating sheathing is a reduced drying potential. It turns out not to matter whether the moisture source is interior or exterior. The treatment is the same: Increase the drying potential of the siding by increased drainage, air circulation, and capillary breaks in the siding.


