I’ve installed and repaired a lot of siding in the Des Moines, Iowa, area over the last 30 years — enough that I now specialize in troubleshooting and consulting on exterior renovations. When a builder or homeowner calls me about a water intrusion problem, I usually find that shoddy workmanship or poor detailing led to a materials failure. However, in the case of the nine-month-old house shown on these pages, the source of the problem was less obvious.
The original builder had responded to homeowner complaints about dampness and water stains around a window — a double unit centered in a facade clad with manufactured-stone veneer — by reflashing it. But his repair only seemed to make the problem worse, so he asked me to help find the source of the leakage and suggest a way to fix it. When I inspected the house, the room where the window was located smelled musty, there were obvious rust and water stains on the window itself, and the carpet was wet. The moisture content in the drywall at the bottom of the wall was 70 percent, according to my moisture meter.
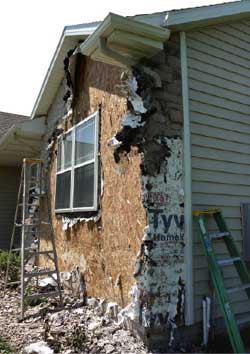
On the exterior, the manufactured-stone cladding looked undamaged, but I strongly suspected that the problem wasn’t just a leaky window. Because new flashing hadn’t helped and there weren’t any other obvious explanations for the leaks, my recommendation was to remove the stone cladding and start all over again.
After most of the stone veneer and mortar base coat had been removed and the OSB sheathing exposed, moisture readings confirmed my suspicions: Water was getting behind the cladding and migrating into the wall system — not just around the double window, but everywhere.
Although the problem was clearly worst around the window, there were elevated moisture levels at the corners of the facade and above the window, as well as in the stone veneer remaining on the wall. Below the window and at the base of the wall, moisture content readings in the wall sheathing exceeded 90 percent.
To look inside the wall cavity, we removed the window and opened up the wall from the outside in several places. We found that the bottom plate was saturated, with a lot of condensation on the plastic vapor barrier. Insulation pulled from the cavity under the window was wet on both its top and bottom edges, and water was clearly wicking up the studs. The smell of mildew was potent.
Installation Details
Like brick, manufactured-stone veneer is a reservoir cladding, meaning that it absorbs and holds water. But it isn’t installed over an air space, as brick is. Instead, the lightweight cement-based product is installed in a mortar setting bed applied over a stucco-like mortar base coat. There is no drainage space to allow saturated material to dry out.
With traditional stucco, the base coat is applied over a double layer of asphalt-saturated building paper. As the paper absorbs moisture in the mortar, it swells. When the mortar cures and the assembly dries, the paper shrinks and wrinkles, creating drainage pathways behind the stucco. To allow water to drain out of this type of assembly, weeps are installed wherever there is a bottom termination, such as above a window or at the base of a wall.
Because manufactured-stone veneer can hold even more moisture than stucco, similar measures should be used underneath it, particularly in wet climates. Unfortunately, there really aren’t any uniform industry guidelines or building code requirements for its installation. While stone manufacturers specify some sort of weather-resistive barrier (WRB), they are often vague about the details and defer to local building-code requirements; most don’t even mention the need for weeps.
In fact, the builder of this house followed the veneer manufacturer’s installation instructions, installing a layer of Tyvek housewrap beneath a layer of 15-pound felt paper, a WRB clearly inadequate for the climate in our part of Iowa. Without any way for water to drain out, the wall was bound to leak sooner or later.
The Fix
For this project, we adopted details developed by Owens-Corning for its manufactured-stone veneer, a product called Cultured Stone (see “Best Practices for Flashing Details” at culturedstone.com click on Technical Info). But we upgraded the WRB to include a layer of DuPont Tyvek StuccoWrap (800/448-9835, www2.dupont.com) covered by two layers of Fortifiber Super Jumbo Tex 60-minute building paper (800/773-4777, fortifiber.com), a vapor-permeable asphalt-saturated kraft paper.
Substrate and Flashing Details
Since most of the leakage occurred around the window opening, we were careful to detail the WRB and flashing properly when we reinstalled the window in the wall. We used DuPont FlexWrap, a flexible flashing tape, to create a sill pan at the bottom of the opening. Then we reset the window in a bed of sealant at the nailing flange, finished wrapping the wall with StuccoWrap, and sealed the window nailing flanges to the wrap with StraightFlash self-adhering flashing tape.
We also used flashing tape to seal the top of the window to the sheathing, and to seal the joint where the veneer intersects with the home’s horizontal vinyl siding — a tricky area to detail properly, and one that had showed signs of water intrusion.
It’s important that the flashings used with manufactured-stone veneer are wide enough to divert water out and over the stone. The head flashing over this window was custom-fabricated from 24-gauge G90 galvanized sheet metal with a painted finish (800/231-8127, berridge .com). We pulled back the StuccoWrap, applied a bedding sealant, and fastened the drip cap in place.
Before pulling the StuccoWrap back down, we attached a #36 weep screed over the drip cap. This screed is made from 26-gauge galvanized steel to meet FHA and code requirements for stucco installation (2006 IBC 2512.1.2). It has a 3 1/2-inch-wide flange and 1/2-inch-diameter holes in the kickout at the base, which help disperse water flowing down the drainage plane.
At the jambs and bottom of the window, we fastened stucco J-mold.
Next we stapled up two layers of 60-minute building paper. At the base of the wall, we lapped the paper over #7 weep screed, which is similar to #36 screed except with a full V-profile at the ground. Then we installed the galvanized metal lath.
After the masons applied the mortar base coat and finished reinstalling the stone veneer, we came back and detailed the joints between the window frame and the metal J-mold. To prevent three-point adhesion, we first filled the joint with backer rod, then applied #900 Solar Seal adhesive sealant (800/654-1042, npcsealants.com), a solvent-based product that cures even when the mortar is still damp.
In the end, we didn’t have to replace any of the interior drywall; by the time the exterior repair was completed, it had dried out adequately. Also, damage to the framing and sheathing turned out to be minimal. So, in a sense, the homeowners were lucky: In another couple of years, there would have been compost in the walls.
Still, the callback cost the builder $13,500 — a lot more than if the installation had been correctly detailed in the first place.
Builder Mark Parlee specializes in exterior renovations and water-management details in Urbandale, Iowa.


