When the topic of an aging-in-place remodel comes up, some people imagine grab bars, ramps, wide doorways, and not much else. Of course, those may be needed, but they’re not the whole story.
If you want to succeed with this type of project, you need to think deeply about how every product and design element will help or hinder someone with mobility needs and how the home can adapt as those needs change. You should also be willing to consider the use of products that aren’t common in standard homes, such as wall-hung fixtures.
When done right, however, upgrading a space to support aging-in-place goals—also called remodeling for accessibility—is worth the effort. It will make the home more appealing to people of all ages, even those with no physical limitations.
A good example is the recent bathroom remodel I completed on a home I own in East Brunswick, N.J. Built in 1982, the semi-contemporary, two-story structure has three baths—a second-floor bath for the primary bedroom, as well as first- and second-floor hall baths—which, by 2022, were looking more than a bit dated. Moving walls to expand the room sizes was not an option, so the challenge was to create more usable space within the existing footprints.
I’ve traveled quite a bit in Asia and Europe, where modern architecture is the norm. As a result, I’ve seen many examples of how that style can support accessibility goals while offering a clean, appealing look. A lot of baths in those parts of the world have walk-in showers and large-format gray tiles, as well as wall-hung fixtures and vanities. The spaces are small but feel bigger than they are.
The upgraded baths described in this article follow that style. They’re bright and modern and include features that make them easier for everyone to use and will make the house more appealing to potential buyers.
Ernest Mueller
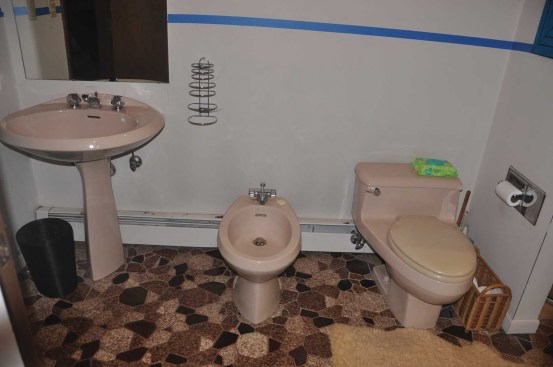
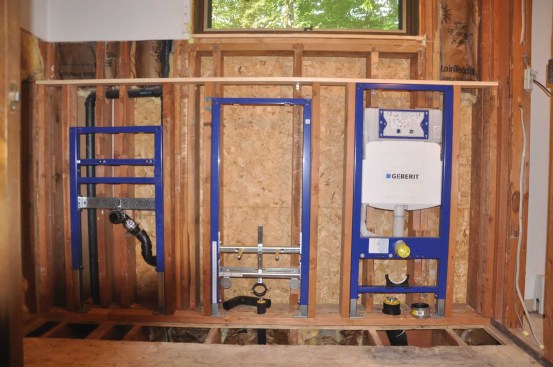
Before. After 40 years, the home’s bathrooms were dated. The author wanted a modern look, while also making the spaces more accessible and roomy. The challenge was how to do this within the existing room sizes.
Design and Planning
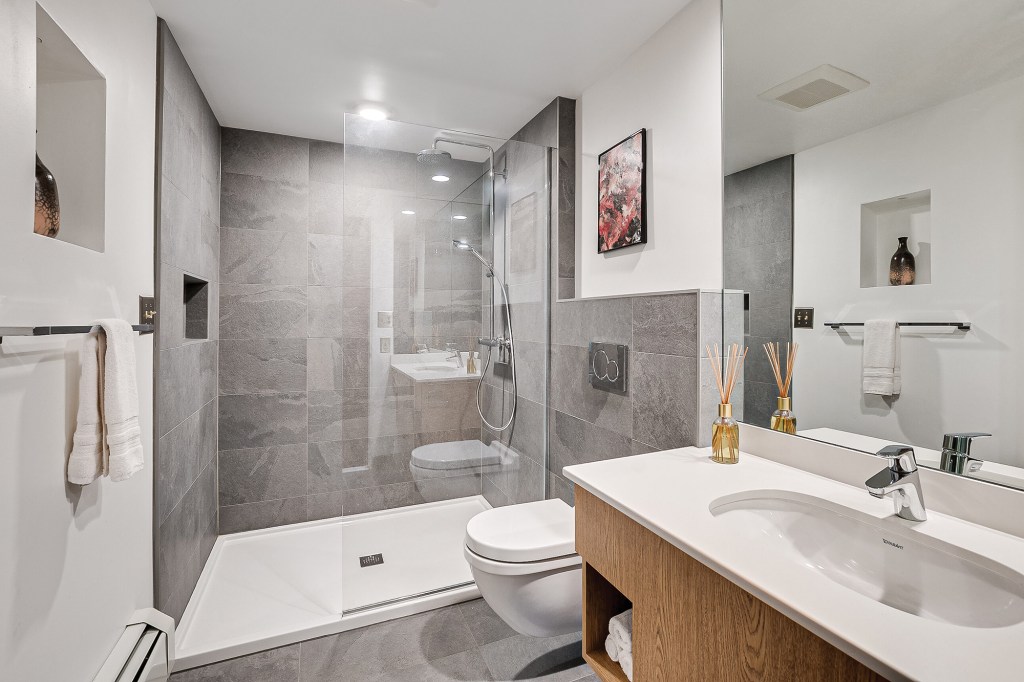
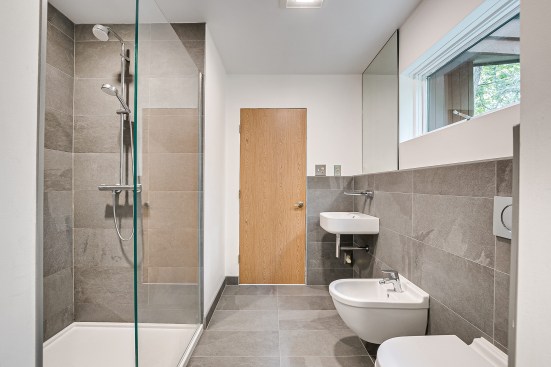
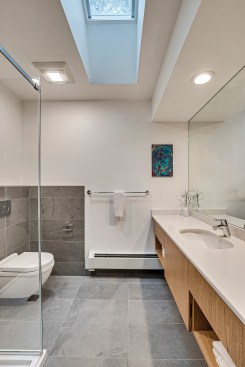
The photos show the results. A comparison of the “before” photo (left) with the slideshow (below) demonstrates the transformation of the upstairs primary bath from an outdated bath to a more usable and pleasant space. I’ve also included a few photos of the downstairs baths, including the lead photo (see top of page), which shows how one first-floor bath was enlarged and fitted with a fixed-glass splash panel. This panel can be removed and a shower curtain added, in case wheelchair accessibility is needed in the future.
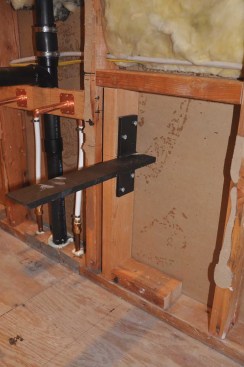
Good planning helped ensure the success of these upgrades. I’m an electrical and mechanical engineer by training, so I spend a lot of time planning project details. I sketched piping layouts and made comprehensive material lists before starting work, then reviewed them to make sure I was accounting for everything.
Ola Kwiatkowska
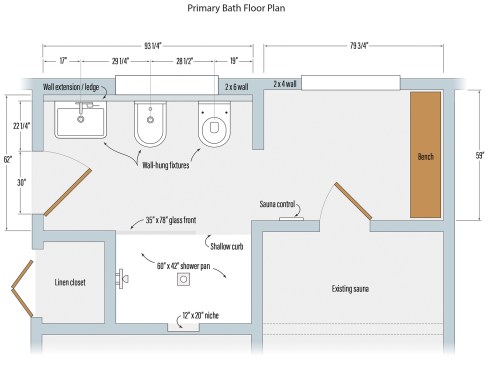
Upgrade. The renovation was confined to the “wet” area of a larger space that includes a full sauna and, opposite the linen closet but not shown, a sink and Roman tub, none of which was changed in the remodel.
The materials for this project included ABS for vent, drain, and waste piping, PEX for water distribution and hydronic baseboard heating, copper manifolds, brass fittings and valves, and water-hammer arresters. I asked all my suppliers for estimated delivery dates and created a project schedule based on those dates.
Thorough planning takes time and effort, but I believe it shortens the project time line. In this case, there were few unwelcome surprises because I knew what to expect at each step.
Rom Chaudemanche
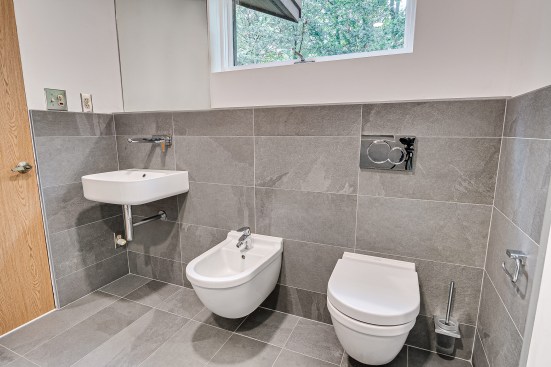
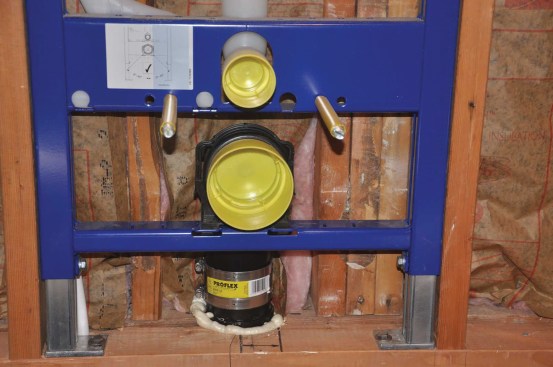
The author replaced the existing fixtures with wall-hung models,…
Demo and Plumbing
Demolition was straightforward. I removed fixtures, baseboards, door and window trim, a closet in the second-floor hall bath, and floor and wall tiles. I removed drywall only in the areas where the framing had to be exposed for plumbing or electrical work, such as in the shower areas and behind the wall-hung fixtures (vanities, sinks, toilets, and a bidet).
Those wall-hung fixtures are a defining feature of the remodeled baths. Although these fixtures aren’t standard in the U.S., they’re readily available from several companies, including big names like Duravit, Kohler, and Toto. While the final installed costs will be higher than for entry-level fixtures from Home Depot or Lowe’s, they shouldn’t be much higher than for premium floor-mount models.
Installation isn’t difficult; this was the first time I had installed wall-hung fixtures, and it went smoothly. Manufacturers offer clear installation instructions that need only be followed; if you’ve successfully assembled something from Ikea, you’ll get the hang of it quickly. There are also some helpful YouTube videos from installers.
The rest of the plumbing was fairly standard. I replaced the original copper supply piping to the bathrooms with PEX-b. I used crimp rings for PEX-to-PEX connections and compression fittings to connect the PEX to the existing copper supply piping where needed.
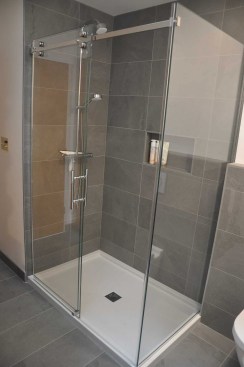
Most remodels require compromises, and one place I had to compromise here was with the shower bases. I wanted zero-curb showers, but that would have meant reframing the floor below, which would have added too much cost and time. So I opted for an acrylic shower base with a shallow curb from MTI (mtibaths.com). It came with a foam backing that allowed me to set it on the plywood subfloor without the need for a bedding compound.
The curb height is 2 inches above the finished tile floor and just 1 inch on the inside. The curb is 2 1/4 inches wide at the top. The low-profile design makes entry and exit easy enough.
I used surface-mounted shower armatures with wall bars for the fixed and adjustable hand-held showerheads. The shower is thermostatically controlled to eliminate worry about hot or cold bursts and, in practice, it has maintained desired temperatures well. Showerheads are low-flow, 1.5- to 2-gpm models.
Rom Chaudemanche
Large-format floor tiles reduce the number of grout lines, helpi…
Surface Finishes
Since I removed drywall only where necessary, there wasn’t much of it to be installed. I did replace the trim at doors and windows with finished drywall returns for a cleaner look. I primed the new drywall with Sherwin-Williams ProMar 200 zero-VOC white latex primer and then applied two coats of Valspar Ovation Plus ultra white, eggshell, zero-VOC antimicrobial paint. (see slideshow above)
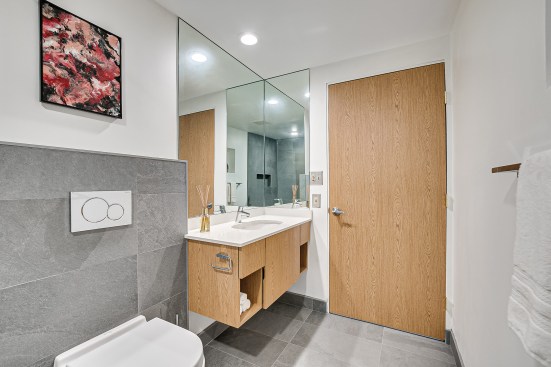
Large-format tiles are the showstopper in modern bathrooms. Part of designing for accessibility is realizing that how a space feels is as important as its actual measurements, and that if it feels bigger, it will be more pleasurable to use. Large-format tiles create an illusion of more space and, because they have fewer and narrower grout lines, are easier to clean.
I chose 12-by-24-inch porcelain stoneware tiles, in slide grey, from Ceramica Gazzini (ceramicagazzini.it). They look and feel like stone, are rectified, and can be installed with narrow grout joints.
Reducing the possibility of falls in a wet bathroom is important, and especially so on an accessibility remodel. These tiles have an R11 surface rating, which denotes a textured surface that enhances their slip resistance. I purchased them from the U.S. importer Avalon Flooring, in Manalapan Township, N.J.
With narrow grout lines, installation quality and joint alignment are of utmost importance, so you need a good tile setter. Avalon subcontracted the job to Pfaff Construction in Long Branch, N.J., which did a perfect job on the tile installation and alignment.
The floor perimeter is finished with 4-inch-high tiles cut from the 12-inch stock. Door sills are white marble and color-match the fixtures and shower base.
Final Touches
The wall-hung vanities in the first- and second-floor hall baths create space underneath and were set onto two or three 1/4-inch-thick steel wall brackets from IronSupports.com.
Rom Chaudemanche
The narrow depth of the vanity in the second downstairs bath is just 20 inches, which made it possible to replace the 30-inch door with a wider, 34-inch model, in case wheelchair access is needed in the future.
The Silestone vanity tops were custom-made with a Duravit undermount sink. A standard vanity backsplash is 3/4 inch thick by 4 inches high, but I specified a height of 3 inches and a thickness of 1/2 inch. The backsplashes had to be custom-milled from standard stock and cost extra, but the result looks much better.
I sent drawings for shower glass enclosures to potential suppliers for three alternatives: full enclosure with a hinged door, full enclosure with a sliding door, and a splash panel with no door. I selected splash panels for the master bath and the wheelchair-accessible first-floor bath. They are easier to get in and out of and, for wheelchair access, the panel could be replaced with a curtain. The 78-inch-tall tempered low-iron clear glass is coated for easy cleaning.
For space heating, I replaced the two existing baseboard heaters with 3,100 Btu/h total rating with a single Haydon 1000 Supr-Heat with an output of 2,830 Btu/h. I used PEX-a (red) with an oxygen barrier, and SharkBite fittings for connections. The baseboards in the two other bathrooms were also replaced with shorter Haydon high-output units. All are installed above the 4-inch perimeter tile for easy floor cleaning.
I replaced the original exhaust fans with Panasonic Whisper DC fans, two of which have LED lights on a separate switch. The existing metal ducts needed some adaptation to make the connection, which meant removing and replacing some drywall.
As for electrical, I replaced the recessed cans in the shower with surface-mounted LEDs from Progress Lighting that are rated for wet areas. The other can lights were retrofitted with Halo RL56 inserts with seals against the ceiling.
GFCI outlets were added below sinks and vanities for nightlights. Some wall switches had to be relocated for the wider doors and the wider primary-bath shower, and a switch above that shower’s entry curb was sealed with a silicon bubble cover.
Final Outcomes
The new baths are easy to keep clean, thanks to the large tiles with narrow grout joints, wall-hung fixtures and vanities, and doorless showers. The overall look and feel is that of a modern spa.
I am extremely pleased with the high-quality products, suppliers, and installers. The custom-made cabinet and vanities were expertly installed. The inside of the room doors is covered with matching oak laminate.
Although this was my first time installing wall-hung fixtures, my experience was positive. Their advantages, including height adjustability and ease of cleaning, should make them standard for modern bathrooms, especially those designed for accessibility.


