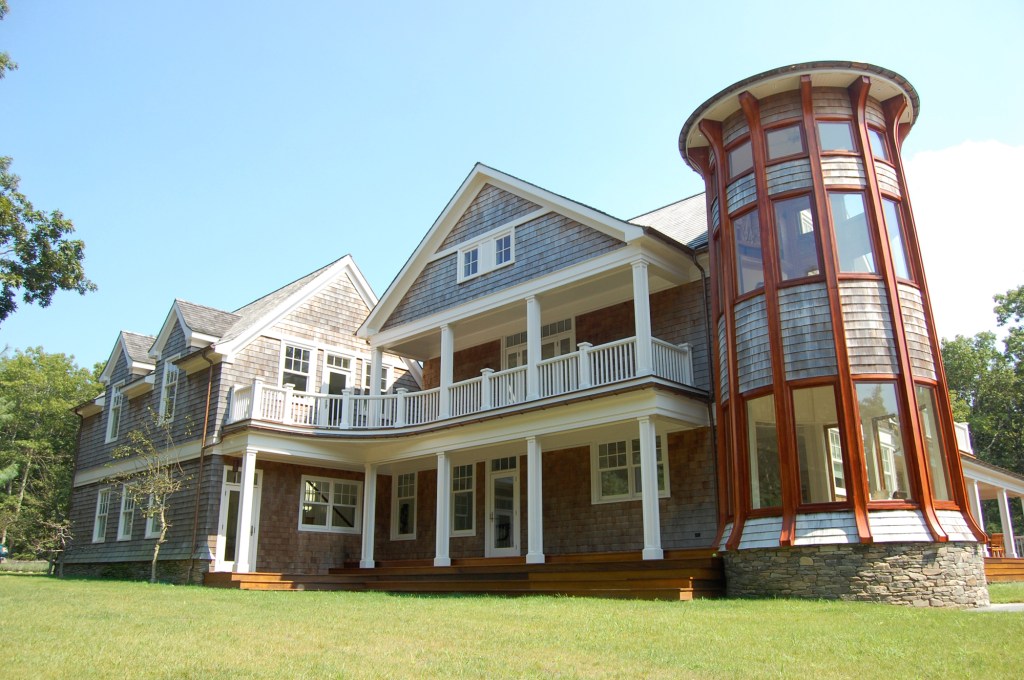
One of the more interesting trim jobs I’ve done was on a two-story tower attached to a Shingle-style beach house on the eastern end of Long Island, N.Y. I came on the job after the tower had been framed. It wasn’t a perfect cylinder, like a grain silo, but had a conical shape. The frame had 12 glulam columns laid out in a spoke pattern and tilted inward at roughly 3 degrees. Between the columns were curved wall panels interspersed with trapezoid windows that were wider at the base than at the head.
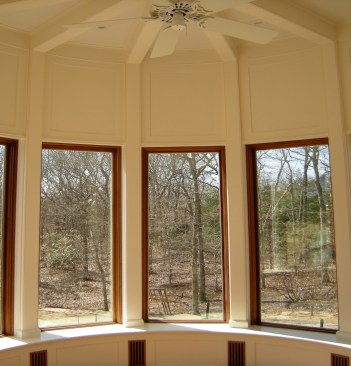
The first-floor breakfast room was trimmed with curved paint-grade paneling. The plywood fit into a rabbet formed between the laminations in the stiles and rails.
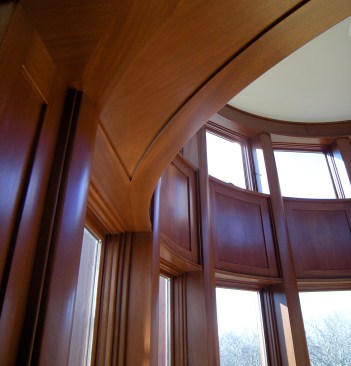
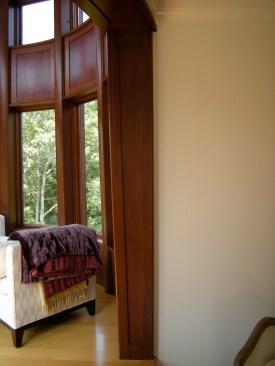
The first floor was a circular breakfast room connected to the kitchen, and I trimmed it out in curved painted panels and mahogany HVAC grills. The room on the second floor was an extension of the master bedroom and was trimmed out with solid mahogany column covers and mahogany stiles and rails with flitch-matched veneered panels. In this article, I’ll focus on the method I used to make the curved stile-and-rail paneling, which I developed with Jed Dixon, a master stair builder and frequent presenter at JLC Live. Drinking coffee and sketching at his kitchen table, we applied our shared experiences of dealing with curved millwork to design an efficient fabrication system.
Because the walls tilted slightly inward, the author had to measure the room diameter at different "levels": at the floor; at the sill and head heights for the main windows; at the sill and head heights for the transom windows; and finally at the very top of the paneling where it joined the base of the domed ceiling.
Layout
The first step for any large-scale curved trim work is to make a full-size plan and section drawing. Jed and I drew the plans on CAD to work out the geometry and printed a few full-size templates. I cut 1/4-inch plywood sheets to fit each floor and screwed them to the subfloor. I found my center point and drew the position of each glulam column. Then I measured the diameter from post to post and drew all the radii using a trammel point. (The best trammel points I have used are General 523 adjustable ones, which allow you to make the beam that fits between the trammels as stout as you need to; you can also switch out one of the steel points for a pencil.)
Because the tower walls tilted inward, I had to measure the room diameter at each “level”—that is, at the floor; at the sill height and head height for the main windows; at the sill height and head height for the transom windows; and at the very top of the paneling where it joined the base of the domed ceiling. At each of these levels, the diameter grows increasing smaller, but because the change is gradual, we did not have to change the radius of all top and bottom rails for each panel section. The larger, upper finish panels are actually trapezoid in elevation, like the windows. But the smaller panels below the windows were left square. Over 18 inches, the difference in the panel width is less than 1/16 inch.
I transferred each diameter to my plywood templates (we had one template for each floor). My finished plan was a series of smaller diameters, with copious notes written on the plywood about all observed site details. I brought the templates back to my shop and screwed them to the floor. During each step of construction, I could refer to these full-scale drawings to retrieve any measurements I needed. The templates also served as a helpful build pattern.
Fabrication
With flat trim work, you can often jump right in, but with curved millwork, you need to take time to make accurate patterns first. I use 3/8-inch MDF for my pattern stock. I cut the MDF with a shop-made trammel jig attached to a router fitted with a 1/4-inch straight cutter. A CNC machine, if you have access to one, is even faster and more precise. There are companies that will make up a series of templates in a matter of minutes. Once you have all the correct patterns, then you can lay up the blanks, flush-trim them, and make any molding detail with a ball-bearing guide on the shaper.
All the curved sills were cut 1/16 inch fat, flush-trimmed, and profile-molded on the shaper with a ball-bearing guide.
Column covers. The 12 column covers were made from three pieces of solid mahogany and a back plate (see again photo). The front piece was milled before assembly with a custom-made knife for a Williams & Hussey molder. The sides and back plate were ripped at 15 degrees. This allowed each window sill to be cut at 90 degrees on site and fitted to each bay.
Curved rails. There are two difficult problems to overcome in making a curved stile and rail panel system: making a curved rail with a rabbet and making a curved panel.
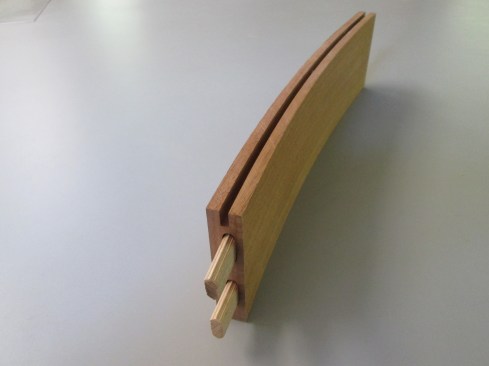
Each curved rail is formed from five laminations. The center lamination is ripped slightly narrower than the others to create a rabbet to receive 1/4-inch plywood.
The fabrication of a curved rail with a rabbet that will accept the panel is the first hurdle. I make curved rails with a bent lamination of five pieces of solid wood. The strips are 4 inches wide and 1/4 inch thick. I rip the laminations oversized on a table saw and run them through a planer.
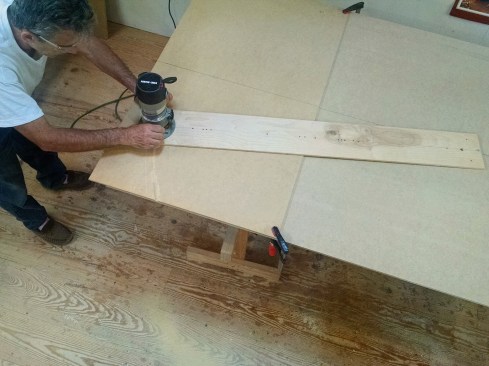
To create a curved form, the author uses a trammel jig for his router to cut MDF at the radius of each rail.
To form the rails, I use 3/4-inch MDF to make clamping forms to match the finish radius, screwing multiple laminations together into a stack. The best way is to use both an inside and an outside radius, squeezing the rail between the two forms. This allows you to use fewer clamps and get even pressure. But a single outside radius form with multiple clamps works, too.
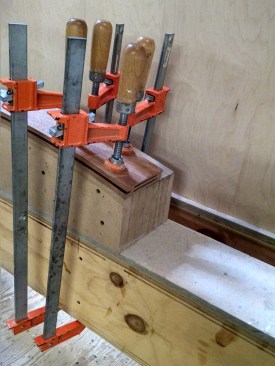
The laminations can be bent around an MDF form and clamped into place …
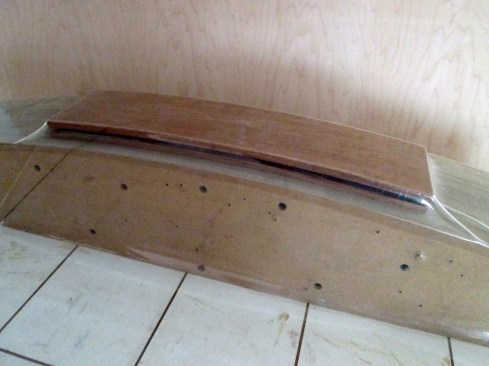
… The best way to create a smooth curve is to glue up the lamination in a vacuum press.
Another method is to use a vacuum bag to press the blanks. Vacuum pressure is absolutely even and produces a truly fair curve. (Clamps can leave slight undulations in the rail that can sometimes be visible in flat light.)
A bent lamination’s radius is retained by the glue line; overnight cure is critical. There are rigid-set glues (like resorcinol) available that are traditionally favored by boat builders for curved laminations, but Titebond 3 will work fine for a large radius. Because the glue is slightly flexible, there will be some “spring back”—about 3/8 inch on each end for the radii on this project. When it’s critical to hit an exact radius, do a test run and adjust your mold as necessary.
The center strip in the lamination is exactly the thickness of the 1/4-inch birch plywood—a bit thinner than the back and front strips. After overnight clamping, this center lamination in the curved rail creates a perfect panel rabbet. I think everyone reading this can appreciate how difficult and painstakingly slow it would be to manually cut a rabbet into a curved rail instead of forming it.
Stiles and rails. When the radii are longer than 50 inches, the edges of the stiles can be milled with square edges. Each end cut on the rails needs a slight bevel cut (less than 90 degrees). Do a test cut.
To fasten the rails to the stiles, the joint can be made with a double biscuit or a Festool Domino. Kreg system pocket screws will also work. I think the Domino creates the strongest joint.
Panels. I would never use 1/4-inch plywood for ordinary flat panels; it is too thin and has too much flex for quality work. But for a curved panel, 1/4-inch ply works great. Most of the 1/4-inch hardwood veneered plywood I’ve seen has three plies that bend easily into a 50-inch or larger radius when the face grain is oriented vertically. Bending the panel and working it into the curved rabbet creates a drum effect that keeps it rigid. The panel is taut and feels as rigid as 1/2-inch or thicker plywood. This solves the second major problem referred to earlier—having to make up curved panels.
All panels are cut from flat stock. For paint-grade work, standard hardwood-veneered ply would work, but to get the finished look required for this job, I custom-veneered the panels with flitch-matched mahogany.
Note: There was no panel molding on the tower project. For a project that requires paint-grade panel molding, some type of flex product would be the quickest option. I use Duraflex moldings from ResinArt East (resinart.com).
Curved paneling makes for a unique detail in a custom house. And even if the budget doesn’t allow for full-wall paneling, these methods can easily be adapted for any curved trim, such as a curved wainscot or baseboard.


