Q. I was asked to look at a job where the homeowners have issues with loud, creaking floors. The floor system appears to be 3/4-inch-thick subflooring on 9 1/2-inch-deep wood I-joists 16 inches on-center. As far as I can tell, the subfloor was not glued to the I-joists and shifts when the joists deflect, causing the noise. The joist bays are filled with batt insulation, which slightly helps to muffle the noise between the floors. Would adding resilient channel and a new drywall ceiling below the floor system substantially reduce the noise, or will it be necessary to pull up the carpet and subflooring, then glue the panels to he joists to stop the problem?
A. Bonnie Schnitta, owner of SoundSense, an acoustic consulting firm in East Hampton, N.Y., responds: It’s always preferable to stop a problem at the source if possible, so in this case the ideal approach would be to pull up the carpet and padding and screw the subfloor securely to the joists. (This may not be practical if the carpet can’t be easily reused.) If you do go this route, it’s an opportune time to inspect the subfloor for any “acoustic leakage” points – such as seams between sheets of plywood and gaps around pipe penetrations, both of which can be quickly plugged with an elastomeric acoustical sealant. While a dense silicone caulk could also be used, the treatment will be more effective and last longer if you use a sealant with a rated elasticity, such as Sashco Big Stretch (sashcosealants.com). Larger acoustic leakage points, like the typical gap at the perimeter of the floor, should be patched using a flexible barrier material, such as a mass-loaded vinyl; look for a product with an STC rating of 30 or greater for best results. In addition to getting rid of the creaking, these steps will effectively air-seal the floor-ceiling assembly, greatly reducing airborne noise through it. But remember, even a 1-inch hole can render your efforts ineffective.
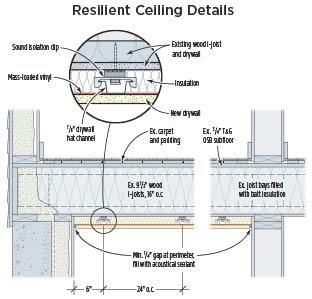
If you and the owners decide it’s not feasible to address the problem from the top, then mitigating the noise from below is the only option. Installing a new resilient ceiling below the existing ceiling would definitely help reduce both airborne and structure-borne noise, but I wouldn’t recommend using standard resilient channel. While resilient channel is inexpensive, it can be ineffective for a number of reasons: It’s very thin and is easily bent or damaged during shipping and installation. It also relies on a rigid rather than a resilient connection – namely, screws – and its low profile increases the chances that the screws used to install the new drywall may penetrate the original ceiling and framing, thus short-circuiting the channel. Finally, we’ve seen a high post-construction failure rate with resilient channel.
Though they are more expensive, resilient sound-isolation clips – some of which are designed to work with hat channel – are more effective. They have a neoprene base that helps to decouple the ceiling from the framing, reducing both airborne and structure-borne noise. Resilient clips require a little more depth than channel, but the extra room also improves performance while reducing the likelihood of short-circuiting. Drywall is the preferred finish; it’s quite dense, which reduces airborne sound in the middle to higher frequencies. Due to its stiffness in place, however, drywall doesn’t perform as well in the lower frequencies. This is critical: Although creaking floors may be perceived as mid-to-high-frequency noise, in actuality there may be considerable low-frequency content as well, because of the flexing of the floor assembly as a whole. To reduce low-frequency airborne noise, we recommend incorporating a flexible barrier like one-pound (or greater) mass-loaded vinyl installed directly onto the 7„8-inch hat channel under the drywall.
You are correct in your perception that the batt insulation in the cavity absorbs some of the sound. It’s important to include a layer of insulation in the resilient ceiling assembly between the two drywall ceilings; otherwise, a standing-wave resonance may occur due to the trapped air, which will render the assembly ineffective at certain frequencies. Note that this insulation should not be densely packed or it will short-circuit the assembly.
Also, just as for the subfloor above, you need to avoid acoustic leakage in the new ceiling. Keep penetrations to a minimum and seal them airtight with acoustical sealant. If recessed speakers or can lights are required, seal the flanges with acoustical sealant and build acoustic enclosures around them. If the fixture requires some airflow, add baffles to the enclosure to create an indirect air path, which will impede sound travel. Finally, don’t tape the drywall directly to the surrounding walls. Instead, leave a gap around the entire ceiling assembly and fill it with backer rod (if needed) and acoustical sealant.
It’s likely that the room’s partitions are rigidly framed to the underside of the joists, so even after the resilient ceiling is built, there may be a little structure-borne flanking noise traveling through the joists, down the walls, and into the room. Make sure you establish the expectation with the customer that some level of the original noise may still be slightly audible at the end of the job. Before starting on the ceiling, figure out how much noise is coming through the walls by first listening with your ear pressed to the wall, then comparing with what you hear with your head pulled away from the wall. If it turns out that a lot of the noise is coming down through the walls, you may want to reconsider working from the floor side, since remediation of the walls is likely to be quite involved.


