Cutting and shaping tile properly can be one of the most challenging — yet rewarding — parts of any tiling project. Choosing the wrong tool for the job or using the right tool improperly can be both costly (in time and materials) and dangerous. As a tile installer with decades of experience, I will show you the tools I rely on to create the most professional-looking jobs. If you install tile only occasionally, you may not need all of the tools I discuss here. But if you are working every day on high-end tile installations, these tools will allow you to increase your productivity and your profits.
Michael Byrne
SQUARE THE BLADE Set the head of a combination square on the s…
The Essential Wet Saw
A wet saw is a crucial tool for most ceramic and all stone tile installations, but features, performance, and durability can vary greatly among tools. I have four wet saws. The granddaddy of the group is over 65 years old, and I use it primarily for freehand cutting. I use a different one for large installations that require mostly straight cuts. The remaining two saws have a variety of features that make them very versatile, so I use them on my custom work.
A quality wet saw is expensive, but properly maintained, it can last for years. Proper maintenance includes cleaning the entire saw and flushing the water pump thoroughly after each day’s use; oiling the sliding or rolling parts; and storing, transporting, setting up, and breaking down the tool with care. When operating a wet saw, keep an eye on the coolant water and replace it frequently. Once the water becomes thick with fine particles, it turns into an abrasive fluid that can reduce the pump’s life significantly.
Before every major project, I check the wet saw to make sure it’s set up properly. With all the handling the tool gets — like bouncing around in my truck on the way to and from a job — it’s easy for things to get out of alignment. A quick check ensures that the tool is cutting perfectly.
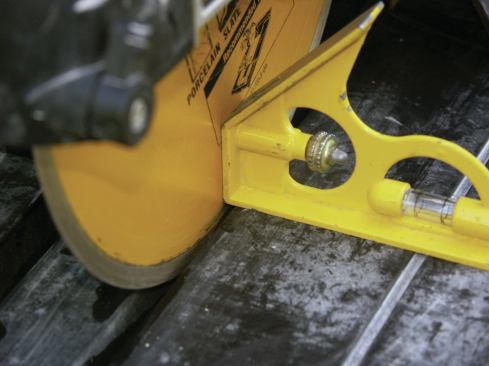
SQUARE THE BLADE
Set the head of a combination square on the saw table and adjust the blade so that it is perfectly plumb to the table. Because this saw has a tilt-angle feature, I check the 45-degree setting. This tool also has a 221/2-degree setting, but I seldom check it because I rarely need to make cuts at that angle.
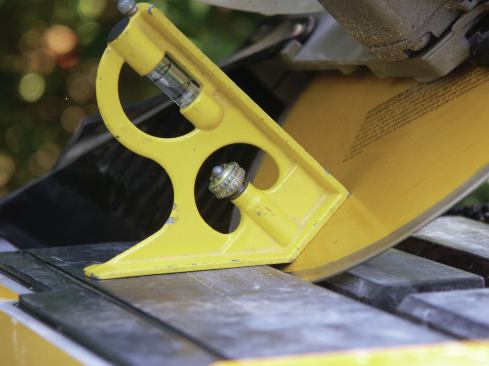
CHECK BLADE TRACKING AND FENCE
Using the combination square, make sure the blade is parallel to the sliding table. Check at the beginning as well as the end of the table’s travel. Then adjust the saw’s fence so that it is square to the table and blade.
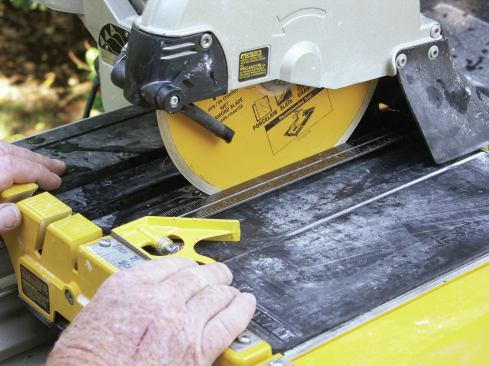
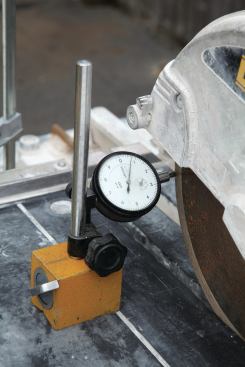
IS THE BLADE OK?
This tool, called a dial indicator, can measure very small amounts (in thousandths of an inch) of side-to-side movement in the blade as it rotates. I attach the tool to the saw’s sliding table and then clamp the table itself to keep it completely stationary. Then I turn the blade slowly by hand while reading the face of the gauge. The pointer on the dial shows exactly where and how much the blade is moving. The blade will cut smoothly if side-to-side movement is less than five thousandths of an inch (.005 inch). Any movement greater than that and you risk breaking tiles. The blade can also distort if its rim overheats, which can happen when a regular blade is used to cut porcelain tile. Expansion slots on a porcelain wet-saw blade allow the blade’s rim to expand without distorting the blade. If you don’t have a dial indicator and tiles are splitting as the blade nears the end of the cut, unscrew the nut and washer to see if there is any grit on the spindle or clamping washers that could throw the blade out of plane. If the components are clean, the blade probably needs to be replaced.

Michael Byrne
AVOIDING A BROKEN KERF A common problem when cutting tiles is …
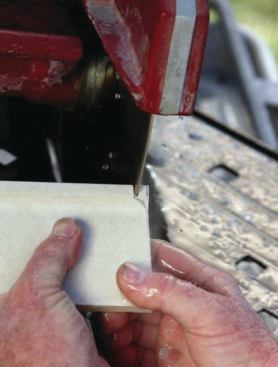
Cutting With a Wet Saw
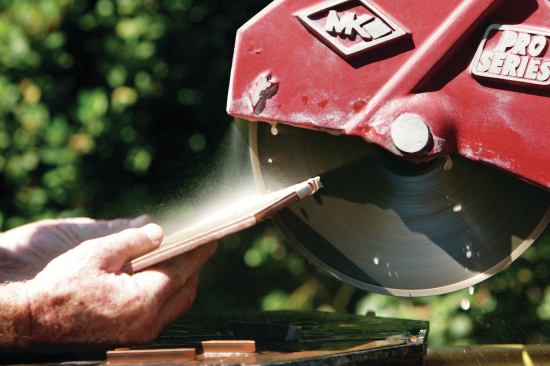
Once your saw is all set up and tweaked properly, you’re ready to turn it on to check the flow of coolant water. First, make sure the pump is in good working condition and powerful enough to shoot a continuous stream of clean water on the blade. Better saws have two spouts — one for each side of the blade. Remember, if a wet-cutting blade is used without water or without enough water, the blade can be ruined in seconds. If the blade is continually bathed with water, the saw is ready for cutting.
When I need to cut a series of tiles the same size, I use an adjustable fence to ensure that each cut is identical, which is especially important if the cuts will be exposed once they are installed.
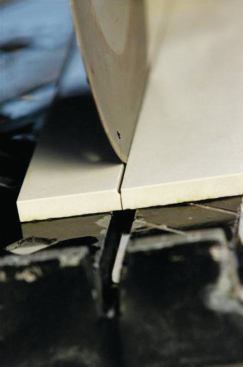
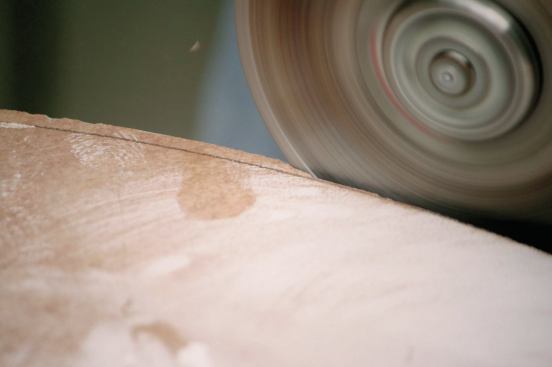
AVOIDING A BROKEN KERF
A common problem when cutting tiles is a broken kerf, which occurs when the tile breaks apart before the blade finishes a cut. This leaves a bump on one or both sides of the cut at the end of the kerf. This lip may not be a problem on a floor installation, but on wall installations where spacers are typically used, it can cause misalignment of the tiles. To maintain a completely smooth kerf, slow down the rate of feed as the blade exits the cut, and hold both sides of the tile firmly against the cutting table.
MODIFYING THE SAW FOR CUTTING GLASS TILE
Special wet-saw blades are available for cutting glass, but chatter from the saw table can still break the tiles. So can excessive heat where the blade meets the glass. Also, the wide kerf slots on the table don’t offer adequate support, which can result in chipped edges along the cut.
To minimize these problems, I bolt a square piece of 1/2-inch plywood — large enough to fully support the glass tiles — to the table. Then I submerge a second coolant pump in the catch basin. I wrap this added hose with stainless-steel wire, which stiffens it, but is flexible enough for me to direct the flow of water precisely onto the edge of the blade. Finally, with the coolant water flowing, I make a shallow cut in the plywood. The resulting narrow kerf provides maximum support for the tile, with significantly less chipping and fewer broken tiles.
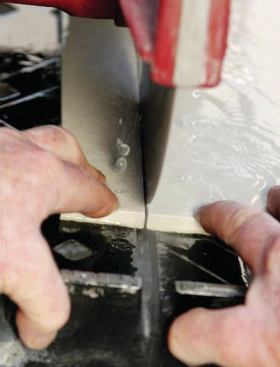
FREEHAND CUTTING WITH A WET SAW
Though not recommended by saw manufacturers (to limit their liability), freehand cutting can extend the flexibility and usefulness of a wet saw. Doing it safely depends on the installer’s steady hands resting firmly on the cutting table. Use both the edges and the sides of the blade for this type of cutting, and move the tile slightly side-to-side as you push it slowly into the blade. This movement widens the kerf and helps prevent the blade from pinching the tile and ripping it out of your hands, or — even worse — fracturing the rim of the blade and sending shrapnel flying into your face. Always use extreme caution, and always wear a full-face shield for any type of tile cutting.
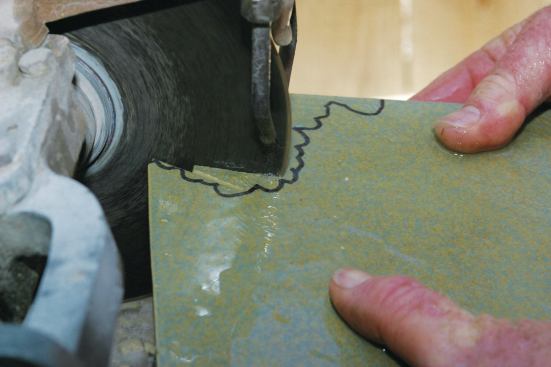
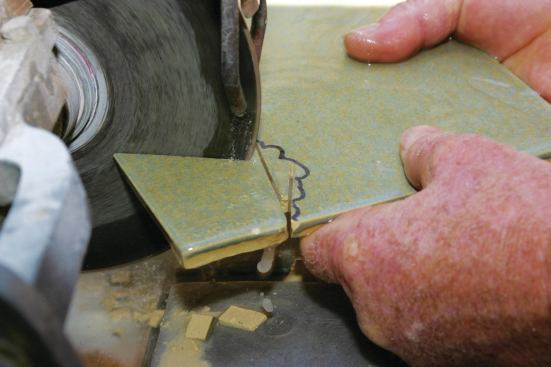
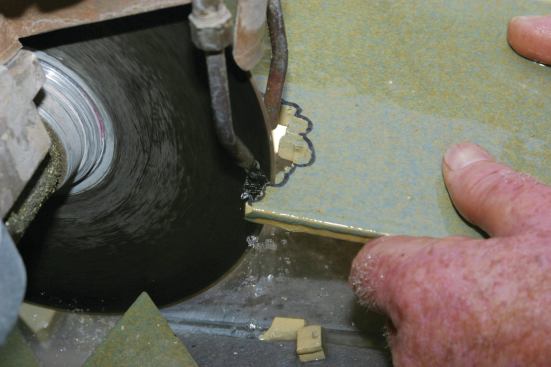
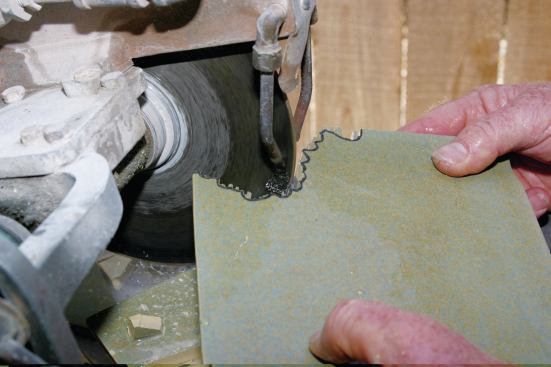
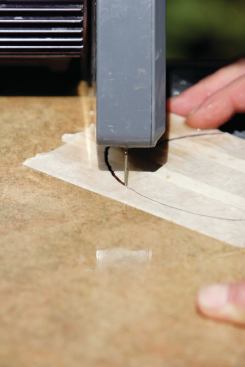
IRREGULAR CURVED CUTS
I make any irregular tile cuts freehand. The first step is to make a series of straight cuts toward the mark. Next, I make additional shorter cuts, gradually getting closer to the mark. Finally, when the cuts are about 1/8 inch away from the mark, I use the side of the blade to finish the cut. With all freehand cuts, I keep the plane of the tile aimed at the arbor so that the shoulder of the cut is square to the surface of the tile. If held lower, the cut edge tapers out, and the tile probably won’t fit where it’s supposed to go.
Keep in mind that the wet saw in these freehand cutting photos is over 65 years old and cannot straight cut tiles larger than 6 inches. Although it is not suitable for working with today’s larger-size tiles, I still use it a lot for intricate freehand cutting. You can cut just about any shape you want with a wet saw simply by following the steps outlined above.
I should point out that freehand cutting causes irregular blade wear, and once a blade is used for this technique, it should not be used to make straight cuts. Generally, I use a blade for straight cutting until roughly a third of its cutting rim remains. I then use the remainder of the blade for freehand work. When the blade is no longer effective for freehand cutting, I still don’t toss it; I extend its life by using what’s left of the diamond rim to sharpen carbide-tipped drill bits.
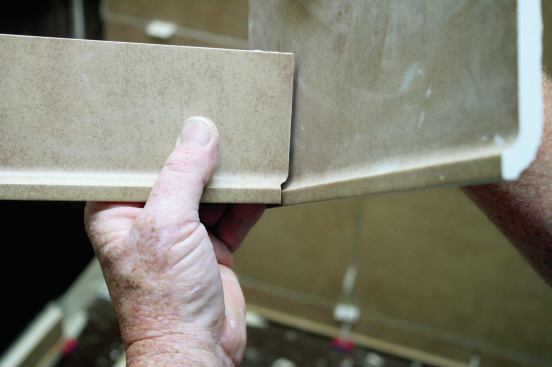
COPED TILE CORNERS
When joining cove or trim tiles for an inside corner, most installers simply miter the adjoining tiles. But just as with wood joints, a coped corner can be neater and more attractive. To create a coped corner, I make the profile cut using the freehand technique.
RING SAWS
There are several ring saws on the market that offer an alternative to freehand cutting. The same diamonds found on regular wet-saw blades are bonded to a hardened circular steel band or rod that cuts in the same way as a carpenter’s band saw. Like the blades on other types of diamond saws, the ring saw’s blade must be bathed in water, but rather than being sprayed with spouts or nozzles, it passes through a bath of water located below the cutting table. Some ring saws can cut porcelain tile and granite, but in my opinion, they are not well-suited for production cutting of these materials. I use a ring saw when I need to make a large number of irregular cuts in relatively soft materials, but for most irregular cutting, I prefer to use a conventional wet saw.


Michael Byrne
CIRCULAR SAW WITH A DIAMOND BLADE When it comes to making diago…
Cutting Tile With Other Tools
While the wet saws carry most of the tile-cutting burden, I use other power tools for cutting and shaping tile: a coolant-through-spindle wet angle grinder; a diamond hole saw mounted in a slow-speed drill; a high-speed angle grinder with a dry-cutting diamond blade; and a small circular saw fitted with a dry-cutting diamond blade. The wet grinder is fitted with a typical polishing disc and has an adjustable water-supply tube that attaches to a standard garden hose or hose bib.
CIRCULAR SAW WITH A DIAMOND BLADE
When it comes to making diagonal cuts in large tiles, my wet saws often fall short. Larger-capacity wet saws are available, but they can cost $5,000 or more, and their massive size requires two people for transport and setup. Instead I clamp a straightedge to my work table and cut the tile with a small circular saw fitted with a diamond blade. This setup is a very low-cost alternative that’s easy to transport and carry. I use the same saw to cut through grout joints when I’m replacing individual tiles, and to make tile rip-outs easier. The smooth action of the blade is not nearly as destructive to neighboring tiles as a hammer and chisel.
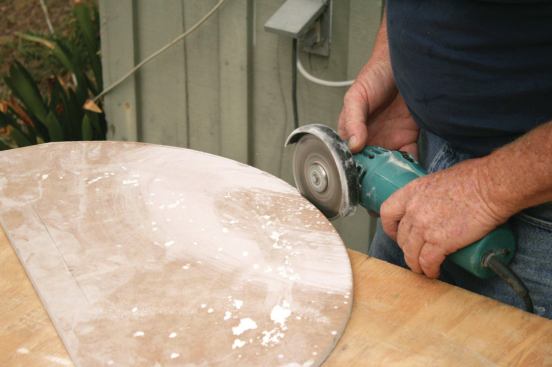
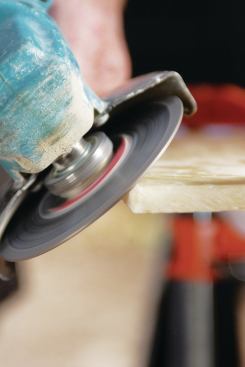
ANGLE GRINDER WITH A DIAMOND BLADE
Some shapes are just too impractical to cut on a conventional wet saw or a small circular saw. For very large cuts — such as the curve made on the 24-inch porcelain tile shown here — I use an angle grinder with a dry-cutting diamond blade. This is also what I use to cut through tiles and grout when I am ripping out an old installation. (I can use the grinder for cutting galvanized lath, rebar, and other materials, too, simply by switching to a wheel for cutting metal.)
When using the grinder to cut a tile — especially if the cut will show — I use a four-step process. First, I rough out the desired shape until the blade is 1/8 inch to 1/4 inch from the cut line. Next I cut away excess material until the blade is about 1/32 inch from the line. Then I cut exactly to the line. For the last step I use a tile rubbing stone or a belt sander to smooth the cut and make a small finishing bevel.
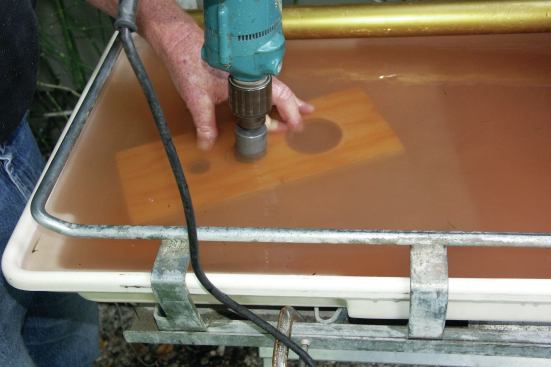
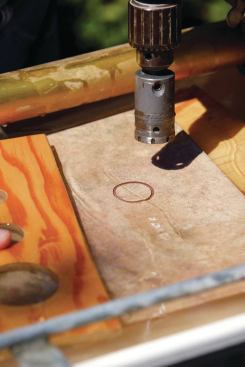
CUTTING HOLES IN TILE
Hole saws are traditionally the best tools for cutting standard-size holes in any material, and there are many diamond-edge hole saws on the market for cutting holes in tile. The problem with the ones I’ve used is that the carbide-tip pilot bit is absolutely useless — especially when I’m trying to get a clean hole in porcelain tile. So I remove the pilot bit completely. To prevent the hole-saw bit from wandering, I make a guide from a piece of scrap plywood with holes matched to the size of the diamond bit.
Some diamond-core bits are advertised as dry-cutting — but even a dry bit can also be used with water. Bathing the tile and bit in water can extend the life of most bits 300% or more. To simplify wet cutting, I use a wet saw’s catch basin.
First, to avoid damaging the basin, I place a piece of scrap 3/4-inch plywood in the bottom. Then I mark the holes’ location on the face of the tile with an indelible pen. Next, I place the tile on the plywood shield and line up the plywood guide, making sure that the whole setup is under water. While pressing firmly down against the guide, I ease the bit into the face of the tile.
One complication is that the plywood guide inhibits the free flow of clean water. Therefore, I remove the plywood guide as soon as the bit creates a continuous circular kerf in the tile. This kerf will guide the bit the rest of the way through the tile.
ANOTHER WAY TO CUT HOLES IN TILE
As an alternative to wet-cutting holes — particularly useful when cutting holes in tiles that are already installed — I use a variable-speed router-type tool made by RotoZip (rotozip.com), fitted with the company’s companion dry-cutting diamond hole saw (25). Rather than use a guide, I rely on a technique popular with stone fabricators. First I mark the position of the hole, then I introduce the bit into the face of the tile while holding the tool at an angle. As the bit eats into the tile, I gradually tilt the tool upward until the axis of the bit is square to the face of the tile. Now I can ease the bit through the body of the tile.
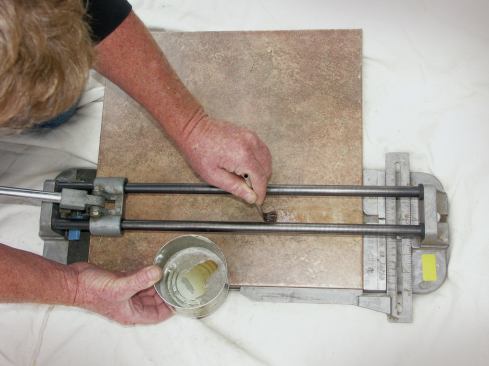
SCORE-AND-SNAP CUTTER
Power tools are not always necessary, especially when making straight cuts in porcelain tiles. Because this dense tile is difficult to cut with a traditional score-and-snap cutter, many installers switch to a wet saw. But cutting porcelain can be slow even with a specialty blade mounted on the wet saw. Plus, the material has to be completely dry before it can be installed. The extra time that this entails can really eat into an installer’s profit.
With the right technique, the lowly snap cutter can produce clean cuts in porcelain tile with little or no breakage. Before scoring the tile, brush the scoring path with kerosene or very light oil, then score and snap. The oil lubricates the scoring wheel for a consistent and even score, so all that’s left is to wipe off the residual kerosene or oil.
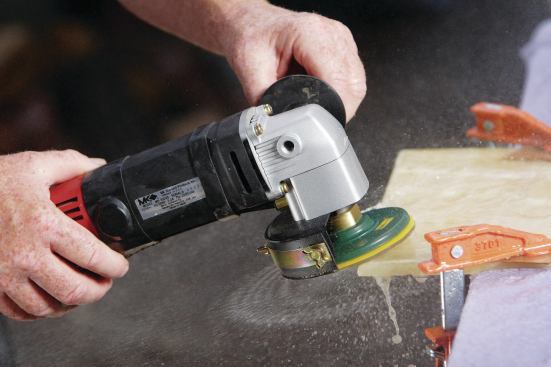
SHAPING THE EDGES OF TILE
Frequently, ceramic and stone tiles with bull-nosed edges aren’t available, so I have to make my own. I begin by making multiple passes with a dry-cutting grinder to rough out the desired shape. Then, using progressively finer grit discs, I use a wet-grinder — which shoots coolant directly through the spindle — to sand and polish the edge to its finished shape.
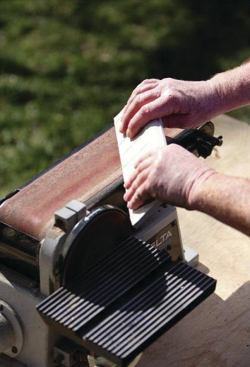
A BELT SANDER FOR SHAPING EDGES
One of the biggest time-savers in my tool kit is a bench-top belt sander fitted with a coarse-grit belt. I use this tool to finish any visible cut edges that won’t be concealed with overhanging trim. Smoothing tile edges can be done by hand with a rubbing stone, but that takes time and energy. A belt sander can do the work in a matter of seconds.
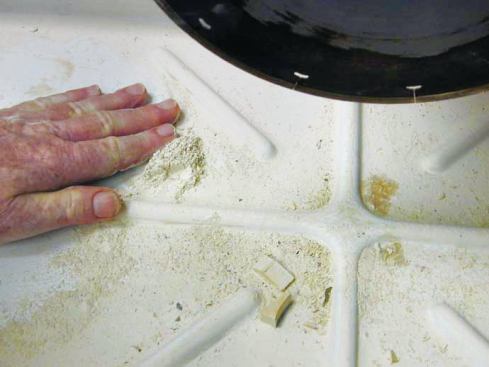
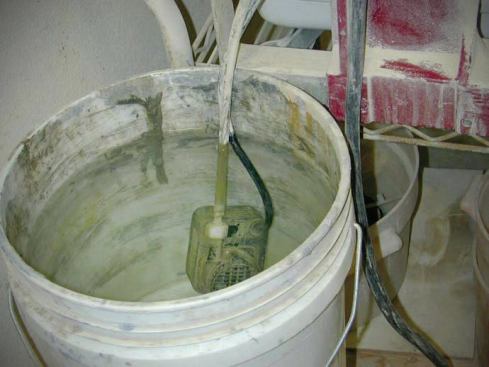
Cleanup
BEFORE YOU PACK UP YOUR SAW
Cutting tile with a wet saw generates a lot of fine particles that get circulated by the coolant pump along with the water. If these particles build up over time, they can shorten the life of the pump, so the catch basin should be cleaned regularly. Run the pump in a bucket of clean water to rinse it out after each use.


