When I started working in the trades some 10 years or so ago, my first job was with a flooring contractor. I’m now a general remodeling contractor, and when any of my projects call for new wood floors, I typically do the work myself.
Customers frequently ask me to install wood flooring over concrete slabs, both in basements and on slabs-on-grade. I prefer, when possible, to glue the flooring down to avoid the “hollow” feeling that a floating floor has.
Changing Industry Standards
Conventional wisdom in the flooring industry has long been that solid wood flooring should not be installed below grade and — except for parquet — should not be glued to concrete. The rules are different, though, for engineered wood flooring, which is dimensionally more stable than solid wood because of its cross-laminated construction. If the substrate is dry enough, gluing engineered flooring to concrete is usually permissible — even below grade.
In recent years, manufacturers have developed adhesives and moisture barriers that retard the flow of moisture to the point where it’s now possible to successfully glue wood flooring to substrates that once would have been too damp. Last year, the Wood Flooring Manufacturers Association — NOFMA — changed its position and began to allow NOFMA-certified solid wood flooring to be glued to concrete that is on or above grade.
It’s important to read and follow the installation instructions, because not every flooring product is NOFMA-certified, not every slab is dry enough, and not every flooring manufacturer recommends gluing its product to concrete.
How dry is dry enough? The job shown here is from a house in Northern California where I replaced carpeting with solid bamboo flooring over a slab-on-grade. Solid bamboo flooring — which is made from narrow strips of wood glued together — is more stable than most solid wood flooring, but I still needed to find out if the slab was dry enough for a glue-down installation. There are a number of ways to test concrete for moisture (see “Testing for Moisture in Concrete Slabs,” 6/07); I prefer the calcium chloride test because it doesn’t require an expensive concrete moisture meter.
The calcium chloride test measures the moisture vapor emission rate (MVER) of the concrete, or the number of pounds of moisture vapor emitted per 1,000 square feet in 24 hours. The industry standard — which is referred to in most flooring warranties — is that flooring should not be glued to a slab unless the MVER is less than 3 pounds. Our slab tested out at less than 3 pounds — dry enough to proceed with the installation.
Choosing the Right Adhesive
The type of flooring and the condition of the slab determine which adhesive I use. Also, if the slab isn’t dry enough, I’ll have to use a moisture barrier. I typically avoid adhesives that contain water, because evaporation can cause the flooring to cup. I prefer moisture-cured urethanes, which contain no water but set and cure in the presence of ambient humidity.
Adhesives are formulated for either dry-lay or wet-lay applications. With the dry-lay method, the adhesive is spread and allowed to flash (tack up) before the flooring is set in it. The wet-lay method is faster because flooring can be installed as soon as the adhesive is spread.
On this project I used Parabond 2010 (800/763-7272, www.parabond.com), a wet-lay moisture-cured urethane that grabs quickly, is compatible with bamboo, and does not require rolling, as some adhesives do. Bostik’s Best (888/592-8558, www.bostik-us.com) is an equally good product, though the manufacturer does recommend the added step of rolling.
Moisture barriers. When the MVER is higher than recommended for the flooring product, I have to seal the slab first. In such cases, I like using Taylor’s MS-Plus (866/818-7434, www.wftaylor.com), an adhesive that also functions as a moisture barrier. The first coat seals the concrete and needs only about four hours of drying time before the second coat can be applied, for adhering the flooring.
Other moisture barriers include Parabond’s UMB 3000 and Bostik’s MVP4, both of which have a longer curing time — about 16 hours — before the wood flooring can be installed with a compatible adhesive.
Technical support. Regardless of the product you use, always read and follow the manufacturer’s instructions. If you have questions, call the technical support line; I’ve found the reps often provide information that is not in the published specs. For instance, I recently installed flooring on a slab with an MVER that was marginally high. Technically, I needed a moisture barrier, but in speaking with the adhesive manufacturer’s rep (who could have sold me one), I learned that the adhesive alone would block enough moisture to handle the problem.
Prepping the Job
Before installing any type of wood flooring, it’s important to bring the material into the house to let it acclimatize. So I stacked the bamboo in another room and then removed the carpet, tack strip, and baseboard. Since adhesive won’t stick to a dirty slab, any paint, concrete sealer, or old adhesive that’s present must be scraped or ground away. Fortunately the slab shown here was clean, so I went to the next step — checking it for flatness with a long metal screed.
With a glue-down installation, there should be no more than 3/16-inch variation in flatness over 10 feet. Significant ridges and high spots can be removed by grinding — though in my opinion the dust is such a serious problem grinding is a last-ditch measure. Where there are low spots, I fill them with an approved floor leveling product like Bostik’s Webcrete 95. After the leveling material sets up, I undercut the door casings and jambs so flooring will fit underneath.
Careful layout. Before installing any flooring, I draw the room on a piece of paper, measure the width of the floor, and use a calculator to figure out how the boards will intersect walls, openings, and other transitions. Amateur installers often start with a full-width board at one wall, then end up with a narrow rip at the other; I’m always careful to lay things out so the first and last boards are about the same width. Walls are rarely straight, so I chalk the first row of flooring.
Racking and Staging
Once the layout is complete, I “rack” the floor — that is, precut and preassemble it before spreading any adhesive.
Staggered joints. Bamboo and engineered-wood flooring typically come in a single length, so creating a “random” stagger requires some thought. Because there should never be any cuts in the middle of a course, I cut only the starting and ending pieces, with the cut ends going against the walls.
For racking the floor, I first cut several strips of flooring in two to create the necessary random-length starting pieces. Then, with an assortment of starter boards on hand, I dry-fit the floor. The first row goes against the chalked layout line, spaced off the wall with shims. To avoid excessive walking to and from the cut station, I’ll lay multiple rows of flooring before finish-cutting the end pieces.
I often rack the entire room before gluing the first piece. This allows me to check the layout and cull any warped or miscolored segments. Irregular milling is common, so I look closely for pieces that do not lie flush.
Staging. After the floor is racked it’s time to “stage” the flooring. This means taking the pieces up in an orderly manner and stacking them in groups for installation. As I take the floor apart, I trace a line on the concrete every 2 feet or so — a comfortable working reach — so I’ll know how far to spread the adhesive as I lay the floor in sections.
Since the full-length pieces are identical, I don’t worry about mixing them up. But I take care to stack the starting and ending pieces in the order in which they went down so that there’s no confusion about which piece goes where when I’m laying the floor in wet adhesive.
Gluing
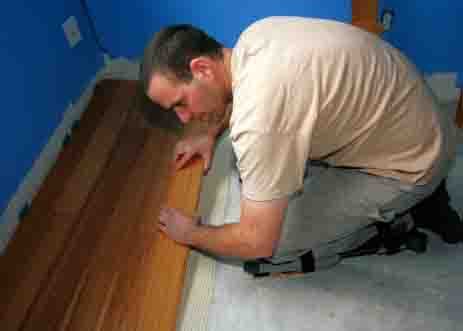
Using the notched trowel specified by the adhesive manufacturer, I spread glue out from the wall, working as far as the first 2-foot line, and bed the flooring in it. Because getting the first row straight and on layout is critical, I again shim along the wall to hold it in position. Each successive piece of flooring should butt tight to its neighbors.
It’s important to get total coverage on the back of the flooring, so periodically I lift a piece and turn it over to make sure I’m using enough adhesive.
Securing the joints. To prevent the pieces from moving until the adhesive sets — a common problem with glue-down flooring — I push the joints tight and snug several courses together with high-quality painter’s tape. I also tape the boards end-to-end to hold the butt joints tight.
After each 2-foot section of flooring is installed, I use a rag dampened with water or mineral spirits to remove any glue that finds its way to the surface. It’s best to do this while the glue is still wet.
I continue spreading adhesive, installing pieces of flooring, and taping joints together until I reach the opposite wall. Sometimes, to get the last row to slip under the door casing, I have to install it before the second-to-last row goes in.
Once all the flooring is in I do a final scan for glue residue, then remove the shims from around the flooring. In rare instances, the adhesive will cause the flooring to swell slightly; if it’s restrained by shims it could buckle. After the adhesive has fully cured — normally 16 to 24 hours — I remove all tape and any remaining glue residue. I finish the job by installing T-moldings at thresholds and reinstalling the baseboard.
Dave Northup is a contractor in Homer, Alaska.


