Success with ceramic tile as a finishing material always depends on the materials that support and surround it. Grout is a key ingredient, because grout determines whether or not the finished joint will perform as expected. Ceramic tile grout is both practical and decorative. Cured grout protects the fragile edges of tile and supports compressive loading, which is especially important for floor tiles. Also, when grout is properly installed, the tile can be easily cleaned and maintained, which contributes to the overall appearance of the installation. Once cured, Portland cement-based grout is immune to damage by water (even when fully immersed, as it would be in a swimming pool or fountain). But contrary to popular opinion, grout is not a waterproofing material that can eliminate the passage of water or moisture. Many types of grout are available to suit different kinds of tile as well as various performance conditions ranging from dry, light-duty wall tile to wet locations with heavy floor traffic. In this article, however, I will be talking about Portland cement-based and latex grouts. Epoxy grout differs radically and is best left to another article.
Preparation
Before grouting, the tile joints must be cleaned of all adhesive residue to a depth equal to two-thirds the thickness of the tile. Ideally, excess adhesive should be removed while it is still soft. If the adhesive has hardened, use a narrow tuck-pointing trowel, a utility knife, or a scraper to pare down any excess (see Figure 1).
Figure 1. Patches of excess adhesive buildup in the joints can cause splotches on the surface of colored grout. If the adhesive hardens before it can be removed, cut away any excess with a tuck-pointing trowel or scraper to a depth of two-thirds the tile thickness. This is particularly important when applying colored grouts, since variations in the joint depth can cause splotchy color at the surface. Temperature and humidity also affect grout. In hot climates, if supplemental cooling is not available, it may be necessary to apply the grout early in the day, before temperatures rise. At the other end of the thermometer, temperatures below 50°F will suspend hydration. In this case, you may need to provide supplemental heat till the grout has fully cured. Beware of unvented heaters. Carbon monoxide and other contaminants in the exhaust pose a health threat to tile workers, and may react with and degrade the grout as well. The types of tile and adhesive used also affect the grouting process. Non-vitreous tiles and regular adhesive mortars absorb moisture. For these applications, misting the tiles with a garden sprayer or washing the tiles with a damp sponge just before grouting can help improve the strength of the finished grout and speed up the grouting process. On the other hand, vitreous tiles and low-absorbing adhesives (like some cured mastics and latex or epoxy adhesives) do not require misting or sponging. When conditions call for misting or sponging, keep water from puddling in the joints. Even small droplets of excess water in the joints can weaken any grout and cause variations in the hue of colored grouts.
Tools.
Proper grouting demands at least one specialized tool — a rubber trowel that can compress grout into the joint without scratching or marring the face of the tiles (Figure 2).
Figure 2. A rubber trowel is essential for grout work, because it forces grout into joints without marring the tile surface. |
Margin and pointing trowels are useful for mixing, placing, or trimming fresh grout. Clean buckets are essential, as are soft cloths or towels for removing cement haze from the surface of the tiles. You’ll also need round-edged sponges, available at tile and masonry supply houses. A powerful shop vacuum is great for final cleaning, and don’t forget barricades to keep traffic off freshly grouted tile.
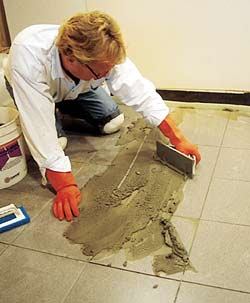
Applying Grout To ensure strong joints, the grout must fill the joints completely at a uniform density. Packing grout with a rubber trowel forces the solid particles to crowd together, which pushes excess moisture out of the joint. To do this, hold the grout trowel at a low angle to the face of the tile and press the grout into the joint from several different directions (Figure 6).
Figure 6. Force the grout into joints by holding the rubber trowel at a shallow angle as you sweep it over the tile from several directions (top). To scrape away the excess, hold the trowel on edge and stroke the surface on a diagonal to the joint direction (bottom). |
|
Backfill any voids immediately. The grout should be forced into all joints — not just pushed around the surface. As one area is filled, hold the face of the trowel at a 90-degree angle to the surface of the tile (with the edge diagonal to the direction of the joints) and scrape away as much of the excess as possible. Job-site conditions will determine how much grout can be spread before wet cleaning can begin. With impervious tiles and mild temperatures, it may be possible to spread hundreds of square feet; with porous tiles and high temperatures, start off with a small area. As a matter of common sense, schedule grout work so that there is absolutely no traffic on freshly grouted surfaces.
Expansion Joints
Not all joints should be filled with grout. Some joints serve as expansion joints, and they are filled with caulk or sealant so they can absorb normal, expected movement generated by all residential or light commercial structures. Expansion joints do not stop the movement; instead they allow movement to occur without causing damage to the tile work. Complete information on the minimum width, placement, and frequency of expansion joints can be found in Handbook for Ceramic Tile Installation (Method EJ-171), revised and published annually by the Tile Council of America. While grouting, it is virtually impossible to keep grout out of expansion joints. In fact, to maintain the maximum density in the grouted joints, an installer must get some grout in the expansion joints so that the grout in neighboring joints has something to push against. Once the fresh grout has been thoroughly cleaned and has taken its initial set, however, it can be easily sliced out of the expansion joints with a dull knife blade or the tip of a trowel (Figure 7).
Figure 7. After the grout has begun to harden, use a dull knife or the tip of a trowel to slice it out of expansion joints, which will later be filled with caulk. |
Remove any stray crumbs with a vacuum, then apply caulk or sealant to the expansion joints after the grout has reached an acceptable cure. This is usually within 72 hours, but you should consult with the caulk or sealant manufacturer. There is no harm in caulking after the grout has fully cured, but if you caulk too soon, you may create a chemical reaction that can stain the grout or the sealant.
Cleaning Fresh Grout Cleaning grout off the tile will be easier if you remove the excess with the edge of the grout trowel during application, as mentioned earlier. Once all the joints are filled, you’ll need a round-edged sponge, buckets of clean water, plenty of elbow grease, and lots of patience and attention to detail. Timing is just as important as technique and using the right tools. Wash the grout too soon and the sponge will remove too much grout material from the joints; wait too long and the sponge will gouge out grout as you attempt to smooth the grout crust capping each joint. Test the grout to see how easily it can be cleaned — this will spare you the pain of spreading more grout than can be properly cleaned. One secret to successful grout cleanup is to use the absolute minimum amount of water to get the job done. Begin cleaning by dipping a round-edged sponge in clean water, then wringing it out thoroughly. Be careful to avoid splashing the grout lines — water droplets can alter the hue of colored grout and can weaken any Portland cement grout. With a light circular motion, scrub away any grout residue crusted on the surface of the tiles (Figure 8).
Figure 8. Begin cleaning by wiping the tile with a clean, damp sponge, using a light circular motion, then make a final pass with the sponge using long, straight strokes (top). After the tile dries, remove any grout haze from the surface with a soft cloth or towel (bottom). |
|
Rinse the sponge before its pores become too clogged with grout particles, wringing as much grout from the sponge as possible, and shaking excess moisture back into the wash bucket. Work a 10-square-foot area at a time, repeatedly wiping and wringing until all grout and sand particles are removed. Next, rinse the sponge thoroughly and start cleaning the grout in the joints. The goal here is to “unify” the grout by shaping all joints to the same profile and width. The final shape of the grout lines depends on the shape of the edges of the tiles. Grout joints between tiles with a crisp, tight edge will be high and preferably on the flat side; grout joints between round-edged tiles will sit lower. All voids and gaps should have been filled while troweling the grout, but any that you find during cleaning should be packed with fresh grout. Work as delicately as you can with the grout trowel to keep from smearing grout over tiles you just finished cleaning, but be sure to pack the grout firmly into the gaps and voids. It’s easier to clean the tiles a second time than to come back later to replace a failed joint. When the joints are uniform and the tile surface is cleaned of visible residue, the tile is ready for one last wet cleaning. With a damp sponge, make long, straight passes, using a clean face of the sponge for each pass. Use gentle pressure on the sponge and keep it moving slow and straight. When one 10-square-foot area is complete, move on to the next area, and repeat the whole process until all of the tile is clean. The haze that appears after the tile dries can be removed quickly with a soft cloth or towel. As the grout begins to firm up, you can clean the expansion joints of any excess grout as well. After the tile is clean, strike the joint with a nail set or old drill bit to fully consolidate the joint (Figure 9).
Figure 9. Sanded-grout joints on floors or countertops will be easier to keep clean if you push the sand particles below the surface by striking the joint with a nail set or dull drill bit. This is especially important with sanded grout in wet areas, such as kitchen countertops, because it pushes the sand down, making the joints easier to keep clean. Clean latex grout the same way. Timing is important because it’s a little more difficult to remove latex grout if it sets up too long, but inexperienced installers typically make the opposite mistake and begin cleaning too soon. Judgment improves with experience, and it may make sense to grout and clean a small test area to get a feel for it. Irregular or porous tiles, such as Mexican pavers or hand-molded tiles with lots of pits in the surface, can be sealed at the factory with a grout release compound like paraffin to make cleaning easier. This is rarely done in residential installations, however, because the wax can only be removed by steam cleaning.
Damp Curing
To achieve the expected level of performance, all Portland cement products (concrete, setting bed mortar, adhesive mortar, and grout) must be properly cured. Damp-curing — which simply requires some means of keeping the grout wet as it hardens — ensures that enough moisture is available for the chemical process that turns the dry powder into hard stone. Cut off the supply of water and the hardening process stops. The simplest way to damp-cure is to lay Kraft paper over all of the grouted tile to keep the moisture from evaporating too rapidly. Don’t use poly, which will trap condensation on the surface of the tile. This will not aid hydration, but could discolor the grout. Leave the paper in place for at least a day, then remove it and mist the tile or wipe it lightly with a damp sponge. Depending on room temperature and humidity, you may need to repeat this process for several days to achieve a full cure. Damp-curing is rarely needed with latex grouts, but may be required in hot, arid climates. Narrow, shallow joints require less curing time than wider, deeper joints. In moderate climates, allow approximately 7 to 14 days for complete hydration. Using latex in Portland cement grout reduces the amount of labor required for damp curing because the latex encapsulates the moisture needed to complete hydration. The money saved on labor more than offsets the added material cost of using latex, although some damp curing may be required where ambient room temperatures are unusually high. The choice of which grout to use for a particular application depends on the width and location of the joints (floor, wall, or countertop), whether or not the tile is located in a wet area, and the amount and type of use the tile will receive.
Sanded or Unsanded?
The type of tile and the width of the joints between tiles determines whether to use sanded or unsanded grout. For joints up to 1/8 inch wide, unsanded grout is the best choice, especially if the tile has a soft glaze that can be easily scratched. As the joint dimension widens to between 1/8 and 1/2 inch, using ceramic-grade sanded grout strengthens the joint in much the same way as aggregate strengthens concrete. Sand also helps reduce the number of shrinkage cracks in the grout. For joints wider than 1/2 inch, grout made with coarser sand than that found in the ceramic grade is also available. Although not made by all manufacturers, this grout is often specified for hand-molded tiles like Mexican pavers which, because of their irregular dimensions, require wide joints. For dry light-duty interior applications (such as purely decorative wall tile), regular sanded or unsanded Portland cement grout will do and can be prepared simply by adding clean water to the grout powder.
Latex
For high-traffic or wet areas, latex grout makes for a more durable installation. Latex grouts are available in three basic forms. The first is made by adding liquid latex to regular sanded or unsanded grout. A second type, called polymer-modified grout, is manufactured with latex in dry form, and requires only the addition of water. A third type, called fortified polymer-modified grout, is manufactured with dry latex and is also mixed with a liquid latex. Because the chemical formulas vary from manufacturer to manufacturer, these high-performance latex grouts should always be prepared according to each manufacturer’s written instructions.
Epoxy
The same is true for epoxy grouts, which come in two types. Epoxy emulsion grouts are made by site-mixing a powder base of Portland cement and sand with an epoxy resin and a hardener. The resulting mix offers moderate resistance to certain chemicals (as specified by the individual manufacturers) and can be applied and cleaned off like regular or latex grouts. The other type of epoxy grout is called 100% solids epoxy grout, because there is no Portland cement in the mix — only silica sand, epoxy resin, and an epoxy hardener or catalyst. Application techniques for 100% solids epoxy grout are substantially different from Portland cement varieties. Depending on the manufacturer, 100% solids epoxy grout is available as a three- or two-component kit. Three-component types are composed of a resin, a catalyst, and silica sand. With two-part grout, the sand is premixed with one of the epoxy components, eliminating dust during site mixing. Again, follow the manufacturer’s selection, mixing, and application instructions for best results.
Handling and Storage
Epoxy grout components are usually sold in kit form and are tightly sealed in a covered plastic pail that doubles as the mixing container. These kits should be stored away from sunlight and extremes of heat or cold. The same applies to Portland cement grouts. Because the powdered components are shipped in paper sacks, they must also be protected from water, which can wreck dry grout by turning the powder into useless, hardened lumps. Even high levels of humidity, given enough time, can affect grout powder at the particle level. This may have no effect on grout that is mixed and applied immediately after exposure, but if the powder remains in storage, the resulting mixed grout will not perform as well, since the grout particles have been hydrated by the humidity. Hydrated grout mixes, spreads, sets up, and behaves like fresh grout, but when it cures, it has no strength and often turns back into powder. If you leave leftover grout powder with the building owner for future repairs, it should be stored in a sealed glass or plastic container.


