
Like most small remodelers, I usually subcontract large drywall jobs. But I can make decent time hanging drywall by myself and won’t hesitate to tackle smaller 12- to 15-board jobs. To test my mettle, I recently hung the drywall in an addition that required eight 8-foot sheets of drywall and 125 12-foot sheets (32 of which were fire-rated 5/8-inch-thick sheets weighing 110 pounds each). I didn’t make a ton of money, but I kept myself busy during a slow time.
Whether I’m hanging 10 boards or 100, there are two basic challenges. The first is figuring out how to make accurate measurements – especially overhead ones – efficiently by myself. The second is finding ways to manage large sheets as I cut them, lift them into position, and fasten them in place. For measuring, I use a couple of unconventional techniques along with tools other than the standard tape measure. For lifting and holding the panels, I use careful lifting mechanics and a few specialized tools.
Moving and Lifting Boards
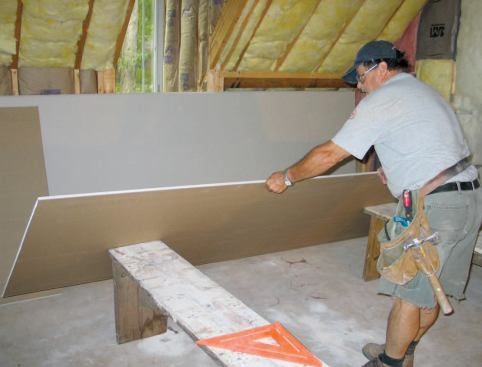
I’ve been working in the building trades for over 30 years, so I’ve learned to avoid lifting full sheets or large pieces directly off the floor whenever possible. On most jobs, a large proportion of the drywall has to be cut to length, which I do immediately, right on the stack where it’s been stocked. This makes the boards lighter, substantially reducing the amount of weight I end up moving and lifting over the course of a day.
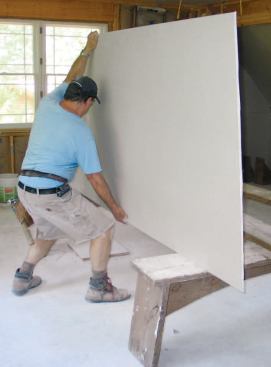
When I can’t work off the stack, I bring the sheets up to knee level with the help of a pair of purpose-built 18-inch-high by 6-foot-long benches. I position the benches perpendicular to the stack of drywall, setting them roughly 7 feet apart and about 4 feet away from the stack; that way I can just drag a sheet over and tilt it up onto the benches without having to bend over and lift it up off the floor.
Once the board is elevated, I can either work on it in the horizontal position or tilt it up vertically and continue with my lifting motion. Boards are much easier to lift when their bottom edge is 18 inches off the floor than when they are sitting directly on the floor.
To help move full sheets of drywall or large pieces after they’ve been cut to length, I use a Gorilla Gripper (805/523-1800, gorillagripper.com). This is a handle that clamps to the top edge of sheet goods like drywall or plywood, so you don’t have to grasp the panel with your hands. By allowing me to get my shoulder under the load, it minimizes wear and tear on my back.
Measuring
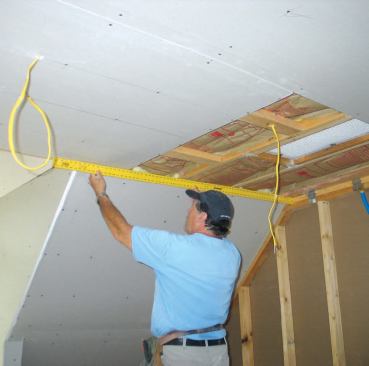
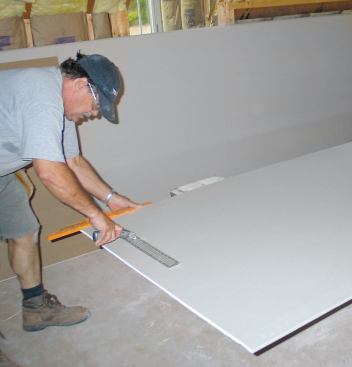
Although I always carry a tape measure, I don’t use it much when I’m measuring overhead. Instead, I use rigid straight-edge rulers – one measuring 72 inches long and another 48 inches long – to avoid the problem of a collapsing steel tape.
For ceiling measurements that are longer than 72 inches but less than 12 feet, for example, I’ll mark the ceiling joist at 70 inches, then measure from the opposite wall and add that dimension to 70. Since this is drywall and not trim carpentry, I undersize each board slightly when I cut it to size so that it will fit easily without additional trimming. For example, if the distance between two walls measures 116 inches, I’ll cut the board to 115 1/2 inches long. If I’m working in a bigger space and one end of the board is butting against another board, I’ll subtract 1/4 inch from the total measurement.
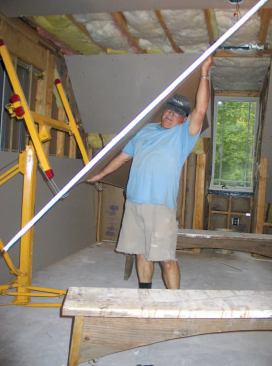
For longer measurements, I use a wood strip cut to exactly 144 inches (or the length of the longest full sheet of drywall that I happen to be working with). I can butt one end of the measuring stick against the wall framing and mark the other end on the last sheet of installed drywall, then measure from the mark back to the center of the nearest joist. This gives me the length that I need to cut off a full sheet of drywall so that the butt joint falls on the joist – but to allow a little play along the wall, I cut the sheet 1/4 inch short of the mark. I also use the wooden measuring stick as a story pole, to record the location of vents, electric boxes, and other openings in the ceiling and then lay them out on the drywall.
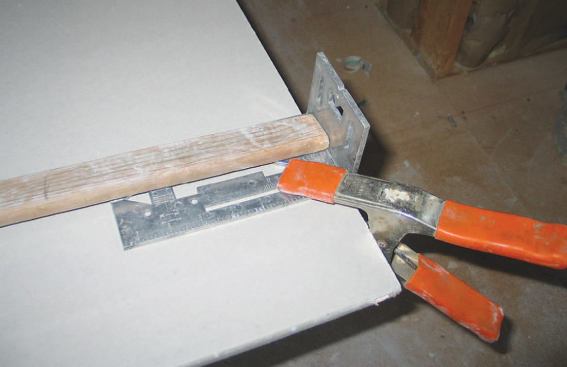
To transfer measurements to the panel, I clamp a stop block – in this case, a Gomito Universal Square hand tool (510/569-9961, duniquetools.com) – to the end of the panel and butt the measuring stick against it.


The author makes long parallel rips with the help of a Johnson R…
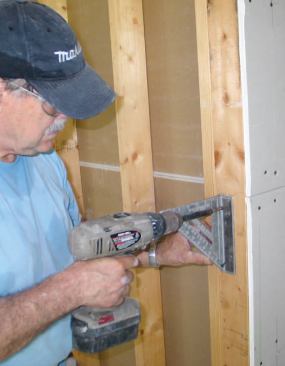
Marking and Cutting
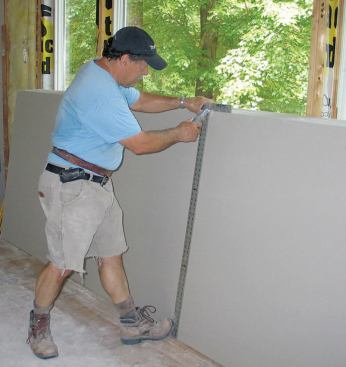
When I’m cutting drywall to length off the stack, I score the board (using my T-square as a guide), then slide it 3 or 4 feet out into the room before breaking it along the score line and completing the cut from the back of the board along the crease. For cuts parallel to the long edge, I use my Johnson RockRipper, a 24-inch scoring square (888/953-8357, johnsonlevel.com). With this tool, there’s no need to mark a line – you just insert your knife in the appropriate slot and slide the square and knife along the board.
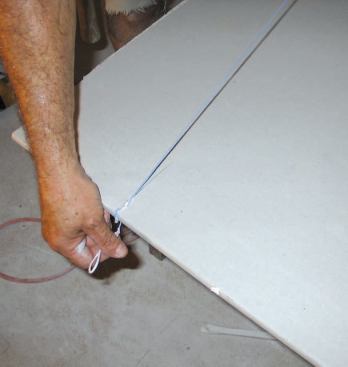
When I need to make an out-of-square cut, I can either use a straightedge to draw the line (for shorter cuts) or snap a chalk line (for longer cuts). Spring clamps are handy for keeping the straightedge in place. When I’m snapping a chalk line, I cut a short kerf in the board at the mark and use the slot as a line-holder.
Installing the Panels
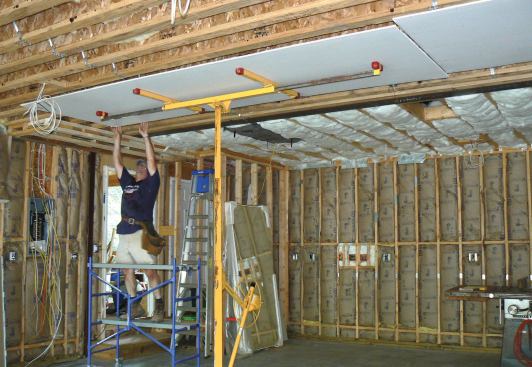
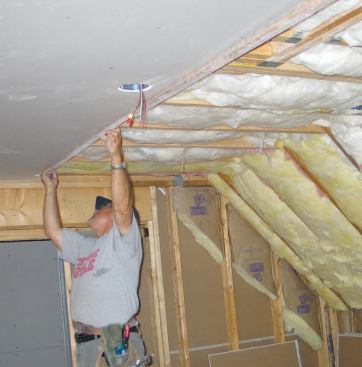
The hardest boards to install when you’re working alone are the ones on the ceiling and the upper horizontal course on the walls. To make the job easier, I own a Telpro Panel lift (800/448-0822, telproinc.com). Though there are now several imported Telpro knockoffs that can be had for less money, I’ve used my lift for over a decade and consider it the best drywall lift on the market.
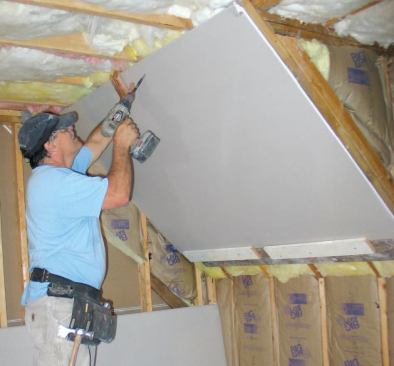
Ceilings. I always start with the ceilings. After working from my benches to make the necessary cuts for vents, electric boxes, and so forth, I set the lift a few feet away and block its wheels to keep it from rolling as I load it. Then I tilt the panel up so that I’m facing the rough face, lift it, and carry it over to the lift. Because I’m fairly short, I have to raise the leading edge of the panel several inches to get it over the hooks of the lift. I’ve found that it’s easiest to just tilt the board back at an angle to raise the panel edge, rather than lifting it straight up.
Once the panel is on the lift, I tilt the carriage back, roll the lift into place, and crank it up to the ceiling. From there, it’s a piece of cake to install the board. Walls. When I’m fastening wall panels, I start with the upper course. I use brackets instead of my panel lift to temporarily support the boards, which gives me a little more flexibility in aligning them. My first brackets were site-built affairs that I assembled from scrap plywood, and they lasted for years. Now, though, I use a pair of Swanson MAG Squares (815/469-9453, swansontoolco.com) that I’ve modified by drilling a few holes through their fences.
I set the brackets about 3/8 inch below lines I’ve marked on the studs 48 inches down from the ceiling, screwing them to the studs with two or three drywall screws. To install a panel, I just lean its top against the framing above the brackets, then slide its bottom up and over them. Once the brackets are supporting its weight, I can push the panel tight to the ceiling with one hand as I screw it in place with the other.
I also use these brackets when I have to put small pieces on the ceilings of closets and nooks, where the lift won’t fit. I screw the brackets to the wall framing about 1 1/2 inches below the ceiling, then slide the piece of drywall over the brackets. The brackets support one end of the panel while I screw in the other end.
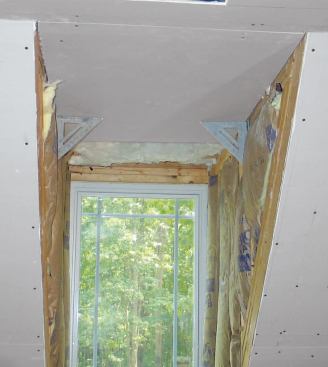
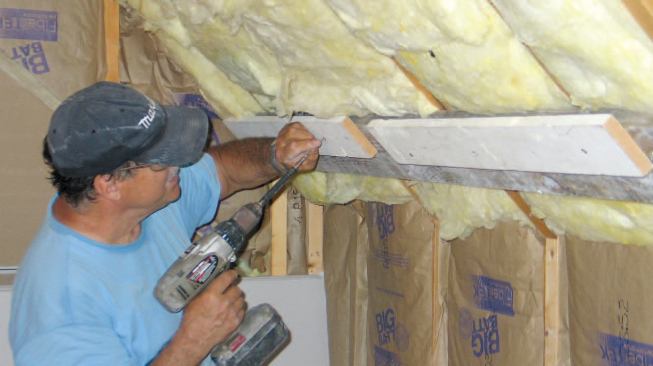
Inclined ceilings. When I’m installing sloped ceilings, the hooks that hold the panel on the panel lift are a nuisance because they project into the insulation. For those jobs I prefer to support the panels with simple site-built brackets, even when I’m working with a helper. And when I’m alone, these brackets take the strain out of aligning the boards at the ceiling-wall junction, which can be particularly hard to do when you have to push them against bulging insulation.
I use a ruler to mark a line 48 inches below the ceiling, then screw a 2×6 to the framing about 1/8 inch below this line. I fasten a couple of 1×4 scraps to the 2×6, with their top edges projecting about an inch beyond the edge of the 2×6, creating a channel to support the drywall. I lower the bottom edge of the panel into the channel first, then push the top up against the sloping ceiling and screw the panel in place.
On taller sections, where I need to install a second full panel below the first, I screw a 1×2 to the upper panel just above its lower edge. I fasten this strip with a single screw close to the center so that it can pivot. After setting the lower panel in the channel bracket at the bottom and pushing the top tight against the frame, I swing the 1×2 down, which locks the panel in place. The panel is well-supported, but it isn’t fastened at this point, so I can easily pry it up tight to the upper piece with a flat bar before screwing it off.
Cost
In my area, the price for installed drywall varies tremendously, depending on the size of the job, the degree of difficulty, and the standard of workmanship. The rock-bottom labor rate for production work in new houses is about $22 per sheet for hanging and finishing, while very high-end work on a difficult job can fetch as much as $52 per sheet. At $34 per sheet, my price for this job was right in the middle but probably didn’t adequately account for all the openings (more than 150) I had to measure and cut for outlets, vents, wires, and the like. Next time, I’ll pay more attention to the style of the electric boxes when I make my bid; these were designed for maximum volume and stepped out behind the sheetrock, so I couldn’t cut them out with a router, which definitely slowed me down.
John Carroll is a builder in Durham, N.C. All photos by Barbara Lehenbauer.


