I’ve been installing radiant floors around New York state for about ten years. From the very beginning, I heard horror stories about hardwood floors shrinking, heaving, cracking, and swelling — all blamed on radiant heating. I wondered how all these problems could be caused by exposing the wood to such low, even temperatures?
From the outset, I wanted to make radiant floor heat a viable option for anyone who wanted it, and I knew that many clients would choose hardwood as their finish floor surface. I was determined to solve the hardwood dilemma.
By following up on reports of wood flooring failures, I came to realize that many of the problems blamed on radiant heating would actually have occurred anyway — usually because of excessive job-site or household moisture. Where the radiant heating was a factor, in many cases simple modifications in the design and installation of the system could have prevented the problem.
Consequently, my “program” for success with hardwood flooring has two main points: careful control of job-site moisture levels and good hvac design. Following that advice, I’ve found that with the possible exception of wide plank floors, almost any type of hardwood floor — be it solid or laminated, nail-down, glue-down, or floating — can work with radiant floor heat, though some choices may perform better than others (see “Making Wood Floors Work with Radiant Heat”).
Good Hvac Design Is Key
A perfect hardwood installation will fail if the radiant floor is not properly designed. Two enemies of hardwood are excessive floor temperatures and heat that is not evenly distributed, so I design the system accordingly. Although I wouldn’t expect you to do your own hvac design, here are four guidelines to keep in mind when you talk to your radiant system designer about protecting the hardwood floors.
1. Use the lowest possible fluid design temperature (the temperature of the water or glycol solution in the heating tubes).
2. Modify the tubing or insulation design instead of cranking up the fluid temperature.
3. Use responsive controls to keep the heat as constant as possible.
4. Use supplemental heating when necessary.
Low Water Temperature
Radiant floors are designed to work at lower supply temperatures than hydronic baseboards or panel radiators. This is because floors warmer than about 85°F are uncomfortable underfoot. This is also the maximum temperature that a wood floor should be exposed to, according to the flooring industry. In fact, I’ve found that lower temperatures — around 80°F — are healthier for wood floors.
The fluid temperature required to produce that 80°F surface temperature will vary greatly, depending on floor construction and finishes and the type of radiant system used (see “Options For Warm Wood Floors”). A bare concrete radiant slab, for example, offers little thermal resistance; 100°F water in tubes spaced 12 inches on-center may do the job. But lay down 2×4 sleepers, a plywood subfloor, and hardwood strip flooring, and now you’ve added an insulation layer that the heat output of the tubing has to overcome.
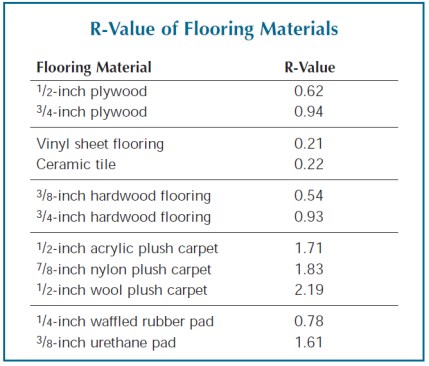
Finished flooring acts as an insulator on top of a radiant floor, and must be accounted for in the design of the system. Ceramic tile provides little resistance to heat flow, so it works well with the low fluid temperatures used in radiant heating. A conventional hardwood floor with 3/4-inch subfloor has an R-value near 2. If the homeowners plan to add a rug on top, it becomes trickier for the designer to meet the heating needs of the room without overheating the hardwood flooring.
The temptation is to crank up the supply temperature to compensate. When hardwood floors are involved, fluid temperatures typically range from 105°F to 125°F for Gyp-Crete type floors, and could be as high as 145°F for staple-up under-floor applications. It’s hard to make assumptions about design because of the variables, but if I’m having a problem reaching a comfortable surface temperature, I’ll add more insulation under the tubing, space the tubes closer together, increase the diameter of the tubing, or suggest a flooring with a lower R-value — anything except jack up the fluid temperatures.
Tube Spacing
Pipes spaced too far apart will create hot and cold streaks — a bad thing for a wood floor, which should expand and contract uniformly. A tubing design that works great in a warehouse with a bare concrete floor is probably not suitable for a living room. Many radiant floor designs are based on tubing layouts 12 inches on-center or more. For hardwood flooring, though, the spacing should be less, ideally 6 to 8 inches. The closer the spacing, the more even the heat will be, and the happier the wood flooring will be.
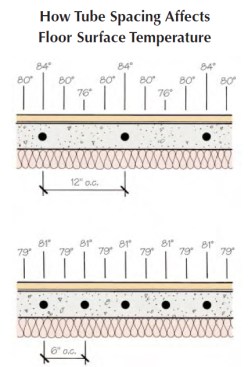
Each of the floors illustrated here has a 20 Btu/hr. output. Note that with 12-inch on-center tube spacing, the “striping” effect is much more pronounced. Six-inch spacing produces the same heat with a lower surface temperature and a more even heat distribution — both of which are advantageous for hardwood flooring.
In some cases it may be necessary to decrease the diameter of the tubing as the spacing grows closer. Be careful not to exceed the maximum length of each loop, which, depending on the pump size, could be as little as 100 feet for some types of 3/8-inch tubing. Closer tubing spacing means more individual loops. More loops mean more manifolds, which in turn means more advance planning.
High-Tech Controls
Controls for radiant floors have come a long way since the first systems were put in. The simplest control is the basic indoor wall thermostat. Setback thermostats, which are standard nowadays in conventional hvac systems, are of little value with radiant floor heat because of the slow response time of the floor. I encourage clients to find a temperature they’re happy with and leave the thermostat alone.
When wood floors enter the picture, I encourage the use of more advanced controls and components that help to gradually modulate the heat output of the floor in response to outdoor temperature. I often install an outdoor reset control, which varies the temperature of the water in the floor depending on the temperature outside. In great rooms with walls of windows, thermal gain can be a problem as the sun beats on the floor during the day, while at night the glass siphons the heat back out. Since wood floors don’t like sudden changes in temperature, to minimize these solar swings, we may install sensors in the slab or thin-slab that signal the heating system to shut down a zone until the sun stops “loading” the floor. Another option we might consider is one of the new “modulating” boilers, which regulate fluid temperature by adjusting the gas flow to the burner based on different heating demands.
I also encourage the extra expense of injection pumps, which provide more responsive control of fluid temperature than the more conventional four-way mixing valves. When used in combination with the outdoor reset control, injection pumps help keep the fluid at the lowest possible temperature to satisfy the heating load for the room. This minimizes problems with the wood floor.
Supplemental Radiators
A properly designed radiant floor will produce around 20 to 25 Btu/hr./sq.ft. If that’s not enough heat to satisfy the room, the common mistake is to jack up the floor temperature — again putting the hardwood at risk. A better solution is to supplement the floor with radiant panels in the walls or ceiling, or add some conventional hot-water baseboard or a cabinet unit to the room.
Another common mistake is not to allow for area rugs that the owner plans to put down on the floor. An 18×20-foot great room may have a wool rug and pad in the middle that covers more than half of the floor area. This is basically a big insulating blanket that has to be factored into the design.
Moisture Control Is Critical
Because radiant floor heating is often the scapegoat for any wood floor failure, I take a proactive position when it comes to job-site moisture. Perfectly acclimated hardwood flooring laid over a perfectly cured slab will still fail if the basement or ground below is constantly wet. If we see something going on that could impact the final floor — for instance, a basement slab going down with no vapor barrier or a crawlspace with no groundcover — we step in and try to educate the builder as to why he needs to take the extra steps. Usually builders and homeowners are happy to oblige — they don’t want problems with the hardwood floors any more than I do.
Another place I stick my nose in is making sure there is enough time in the schedule. For example, a radiant Gyp-Crete floor can’t be turned on for 4 to 5 days after it’s poured so that the Gyp-Crete develops proper strength before being subjected to rapid heat. It might then take another two to three weeks with the heat on for the floor to reach its final moisture content so the hardwood can be installed. That’s close to a month in the schedule that has to be accounted for. Since most of the homeowners we work with are prepared to spend more for a radiant heating system, it’s not hard to make them realize that rushing things to save a couple of bucks on their construction loan is not in their best interest.
Checking for Moisture
The usual product literature that tells you to “let the flooring adjust to the room for 72 hours before installation” is in a word — bull. It’s important to keep track of moisture levels in the products being installed, but it is far more important that the house reach its “normal” moisture level before any finished flooring is even brought on site. A perfectly dry floor will swell as it soaks up job-site moisture — from a wet slab or subfloor or even the air inside the house.
Moisture levels should be monitored in both the substrate and the flooring before installation. The moisture content in the substrate should be no more than 11-12%, and the flooring should be about 4% less, or 8% max. Be sure to test all bundles.
Moisture meters. Anyone involved with wood flooring — or any kind of woodwork, for that matter — should have a hand-held moisture meter. For around $300, you can get a meter that works on wood, concrete, and Gyp-Crete. Also, if you expect your moisture tests to stand up in court, in some states the meter must be capable of lab calibration. For a variety of moisture meters, check out the Professional Equipment catalog (800/334-9291).
Concrete slabs can start being checked for moisture content 30 days after placement, and Gyp-Crete after about a week. However, don’t make the fatal mistake of just assuming a slab is okay because of its age — use a meter.
The polyfilm test. If you don’t have a moisture meter, an easy way to check moisture in a slab is to tape 24-inch-square pieces of polyethylene at several points on the floor. After 24 hours, if any water is present or even if the concrete is darker under the plastic, then there is too much moisture in the slab. The test can be accelerated by placing a 60-watt light bulb 18 inches above the plastic. Keep performing the test until the moisture has dried up.
Acclimating the House
Once the radiant floor is ready to be turned on, we bring up the temperature to let it start drying the house. If the house also has central air-conditioning, we run that at the same time to further dehumidify and control the indoor temperature. If no a/c is available, large drying fans, available at rental yards, can be used.
Once the temperature and moisture levels stabilize, then the hardwood can be brought to the job site. If conditions are right where the flooring is stored and it is handled properly, there is no reason the hardwood can’t be acclimated off site, which may shave a few days off the schedule.
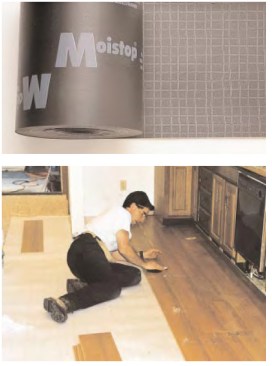
For hardwood strip flooring over radiant heating, always use a moisture barrier like Moistop (top), a fiber-reinforced composite of poly and Kraft paper popular with flooring contractors in the author’s area. Under floating hardwood floors, a pad like AstroBarrier (above) provides a foam cleavage layer and a poly moisture break.
Always Use a Moisture Barrier
The new urethane finishes common on today’s hardwood floors put a moisture barrier on top of the wood. The last thing you want is for the unfinished back to absorb moisture from the subfloor — a common cause of cupping.
Hardwood always used to be installed over resin paper or something similar. With a radiant floor this “cleavage membrane” serves another function — to stop moisture from migrating from the subfloor or Gyp-Crete into the flooring. A moisture barrier won’t help a chronically wet house, but it will buy a little time while a new house dries, and will buffer seasonal moisture changes.
The one moisture barrier not to use under a radiant floor is black asphalt-impregnated felt — that is unless you enjoy the smell of asphalt every time the heat comes on. A sheet of poly would probably do the job, but the installers we work with prefer a moisture-retarding membrane such as Henry’s Moistop. This product is 12 mils thick, and consist of a heavy-duty polypropylene woven fabric, coated on both sides with ultraviolet-resistant polypropylene.
If you’re installing a floating laminated wood floor, use a product like NOFP Barrier, which is an expanded polystyrene core bonded to a poly sheet. It comes in 4-foot-wide rolls.
Finally, Educate
If you’ve read this far, it’s probably clear to you that successful installation of a hardwood floor over radiant heat will involve coordination and cooperation — between the trades, the building designer, and the homeowner. I make it a point to have a preconstruction meeting with all the parties — the GC, the designer, the flooring contractor, and the owner — as early as possible to discuss the issues. At that point, hopefully it’s not too late to influence the decisions that have to be made — about the different types of radiant floors, the types of hardwood products and finishes, the system controls, the need for supplemental heat sources, and so forth. I try to get as much information out there as possible, to make sure that all the parties are on the same page.
Many failures of hardwood flooring are not failures at all, but simply the owners’ dissatisfaction with the tendency of wood to expand and contract. Even if the builder has done a great job of moisture-proofing the house, the hvac system is perfect, and the flooring is installed exactly as recommended, there will still be some seasonal movement in any wood floor. Let your clients know what to expect and how their choices will impact the end result. If the homeowner expects hairline cracks to show up in February, then it’s no longer a “failure” when it happens.
Options for Warm Wood Floors
The goal in designing a radiant system for hardwood floors is to provide continuous, even heat at as low a temperature as possible. There are several types of radiant floor systems, and some work better than others at meeting this goal.
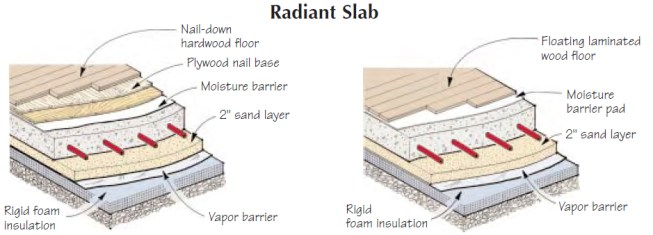
Whether you install nail-down strip flooring (left) or a floating laminated wood floor (right) over a radiant slab, be sure to include a moisture barrier on top of the concrete as well as below the slab. For nail-down flooring, lay a single sheet of 3/4-inch plywood or a double layer of 1/2-inch plywood as a nail base.
Slab Systems
When I have my choice, I always prefer a system using thermal mass over a staple-up system. The mass helps even out temperature swings, which benefits the wood floor. I see no real differences in performance between full-thickness slabs and thin slabs poured over wood framing. With thin slabs, I like Gyp-Crete because it’s less likely to crack than a Portland cement mix, though it’s more expensive. Another thermal mass option we’ve been using is to substitute dry sand for the Gyp-Crete.
The maximum fluid temperature I use in a concrete or Gyp-Crete system is 140°F, to keep thermal swings and possible fracturing in the concrete or Gyp-Crete to a minimum. The only times the design temperature would need to approach 140°F is if sleepers are laid on top of a slab and the hardwood flooring is installed on the sleepers, or if plywood is used to provide a continuous nail base. In general, I prefer to set the sleepers close together for good nailing, pour the thin mix in between, and lay the flooring directly over the slab and sleepers.
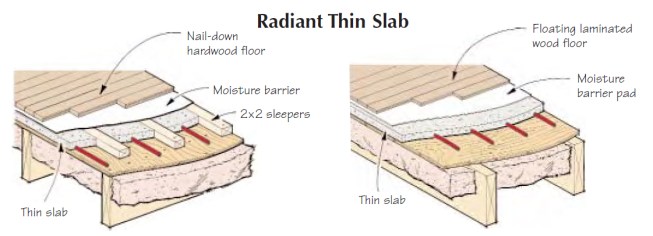
When installing nail-down strip flooring over a thin slab (left), the author recommends spacing the sleepers 8 inches on-center to provide good nailing. For wider sleeper spacings, you can use a plywood nail base, but the fluid temperature may need to be raised to overcome the plywood’s thermal resistance. A floating wood floor system (right) installs directly over the thin slab.
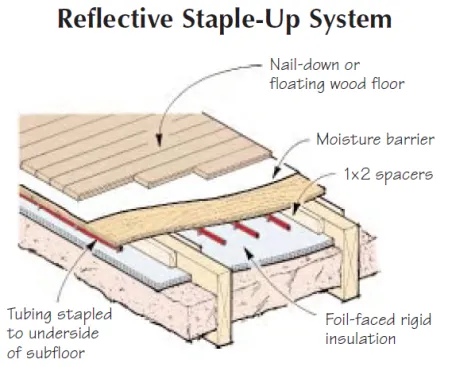
When installing underfloor radiant heating, the author staples the tubing directly to the subfloor, then adds an insulated reflective layer below — either foil-faced foam board, shown here, or a radiant blanket with batt insulation below.
Staple-Up
In retrofit situations, when the wood floor is already in place, or when the designer, for whatever reason, doesn’t want to pour a thin slab, my second choice is a staple-up with a reflective insulating barrier below. This might be foil-faced rigid foam board or a reflective barrier with batt insulation underneath.
Some installers use aluminum plates to help spread the heat sideways and prevent the “striping” effect. I don’t like the plates for a couple of reasons: They’re expensive — about $3 apiece — and they’re noisy when they’re walked over and when they expand and contract. I’ve found that as long as I use the reflective barrier, stapling the tubes directly to the subfloor without plates works fine. I’ve never had a complaint about striping as long as the floor is designed with minimum water temperature in mind.
Another variation of this system, also designed to prevent striping, is the “suspended tube” approach — where the tubing hangs an inch or so below the subfloor with the reflective barrier below. This just makes it harder to install the tubing with little to gain for the trouble. I’ve seen this technique misapplied, where the tubing was stapled to the sides of the joists — which does a good job of heating up the joist. I prefer the direct contact of the tubing with the subfloor.
Staple-up systems require slightly higher fluid temperatures, with the maximum I’d use being around 160°F. Usually, it takes about 130°F to 140°F in the joist bays to produce an 80°F surface temperature. A critical factor in designing any staple-up system is to make sure that the insulation R-value under the tubing is at least four times as great as the R-value of the materials above the tubing. The goal is to direct the heat up.


