The main challenge of the project shown here was to join irregularly shaped but relatively stable porcelain tiles to a wood-strip floor subject to the normal cycles of expansion and contraction. Our solution was to use an attractive, almost invisible movement joint.
The work was done as part of a whole-house remodel and involved considerable effort on the part of the lead carpenter, both in reframing the floor structure and in preparing the flooring to match the contours of the tile. In all, reworking the structure took about 30 hours, and shaping and finishing the wood floor another 54. By contrast, once the carpentry was done, the tile work took only about 26 hours, including 10 to prep the edge tiles so they would butt tightly to the wood; 12 to install the membrane and tile, including grouting; and three to complete the movement joint. This suggests that if you want to use a similar technique on a future project, a simpler design would make a very affordable enhancement.
Beefing Up the Floor
I noticed the deflection in this floor the first time I walked on it. The problem wasn’t with the 1/8-inch-thick plywood subfloor, but with the framing — 6-inch-by-8-inch joists 4 feet on-center. The floor wasn’t going to cave in, but tile requires joists on 16-inch centers, which meant the carpenter had to add 2x12s to create the proper spacing. We extended the new joists at least 2 feet beyond the area to be tiled and added full-depth blocking under all the plywood joints. I then checked deflection with weights and a dial indicator and found it to be well within industry tolerances. Nevertheless, to protect the installation, I decided to include a crack-isolation membrane in the tile substrate, NobleSeal TS (800/878-5788, noblecompany.com). For setting the tiles, I would use a premium thinset mortar from Custom Building Products (800/272-8786, custombuildingproducts.com) mixed with an acrylic additive in place of water, and a polymer-modified grout and color-matched sealant from the same manufacturer.
Laying Out the Pattern
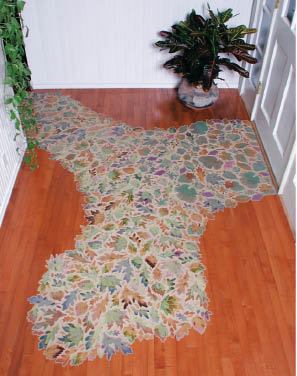
After removing the existing tile from the foyer, the homeowner used building paper and rope to lay out the approximate shape of the pattern he wanted. He lived with it for several days and made some modifications, then cut out the pattern and sent it to the tile manufacturer (Michelle Griffoul Studios, 805/688-9631, michellegriffoul.com), who assembled the required tiles and back-mounted them onto 1- and 2-square-foot sheets. Each mosaic sheet was given an identifying marker for accurate positioning according to a layout map provided with the tiles.
While waiting for the tiles to arrive, the carpenter proceeded with prepping the floor, using a router to cut out the rough outline of the mosaic and remove the stub ends of the strip flooring so new flooring could be woven in. Once the tile arrived, we filled the void in the flooring with 3/4-inch-thick foam panels; this would allow us to position the mosaic sheets on a smooth plane for accurate scribing. Our primary purpose was to precisely locate all the edge tiles, so that a line could be traced for routing the wood floor. But a critical secondary purpose for dry-fitting the sheets was to eliminate the appearance of seaming, which occurs whenever too much space is allowed between sheets of mosaic tile. Also, because the surface of hand-molded tiles is variable, I wanted to make sure that the perimeter tiles were the flattest possible. In some cases, I swapped slightly irregular edge tiles for flatter field tiles of the same pattern to minimize lippage where the tile would abut the perfectly flat wood floor.
Once we were satisfied with the dry-fit, I spent several hours squaring up the flared edges of all the perimeter tiles, first marking a line, then using a grinder to remove the material that would abut the wood. This ensured that I could maintain a tight 1/8-inch movement joint around the tile — the smallest recommended width for an interior movement joint. There was also a practical consideration: The owners have a very active dog whose claws would be too wide to slip into and ruin the soft filler in a 1/8-inch joint.
After grinding the perimeter edges, we repositioned the mosaic sheets and carefully traced a line to guide the router.


