I’m a carpenter on Vancouver Island, British Columbia. For a recent project, my partner Rob and I built a recessed ceiling dome for a client who wanted a focal point in an otherwise conventional bedroom.
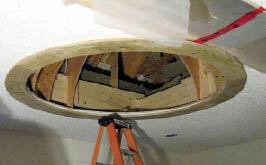
We started by drawing circles on the bedroom ceiling with a piece of string and a pencil to determine the dome’s size. About 5 feet looked right. Then we cut out the drywall and reframed the ceiling joists to create a square opening slightly larger than the circle, with the same center point. We stiffened the opening by cutting a 4-inch-wide ring from segments of 1/2-inch plywood, aligning it with the edges of the hole on the attic side of the drywall, and screwing the drywall to it. We cut another ring from 3/4-inch ply and screwed it to the outside of the opening, staggering the joints between segments.
Next we framed the dome itself. Using the nail-and-string method, we created a pleasing ellipse that would produce a dome about 2 feet deep. We scribed this onto pieces of 1/2-inch plywood, then cut out curved “ribs” with a jigsaw. We stood the first rib square to one face of the ceiling framing and screwed it to the plywood ring and blocking fastened to the framing, then added another rib on each of the remaining three sides. The upper ends of the ribs were screwed to a cylindrical block that functioned like the keystone of an arch.
Once those first four ribs were in place, we added more between them until we ran out of space at the peak. A small piece of plywood on the convex side, screwed to the central block and the converging ribs, acts as a gusset plate to tie things solidly together. The resulting frame is very strong – I could suspend my 200-pound frame from the peak with no deflection or movement.
Next we stapled up a poly vapor retarder and a layer of stucco mesh pieced together from narrow strips (we added short nailing blocks to the ribs for better fastening). Now we were ready to finish the interior. The small size of the dome worked against us here; there was little room to work and the surface was sharply curved.
So we assembled a self-centering, rotating screed out of one of the plywood cutoffs, a piece of one-inch black iron pipe, and some scraps of lumber. The ends of the pipe fit into 1 1/4-inch holes bored in blocks secured to the apex of the dome and the floor directly below.
This solution worked pretty well. We pressed the stucco base coat into the mesh with gloved hands and turned the plywood screed to strike it off at a uniform thickness, working in sections because the material set up quickly. Since the plywood base ring was slightly smaller than the base of the dome itself – forming a ledge that would later accommodate a string of rope lights – we had to disassemble and remove the screed between coats. Then we used a belt sander to remove a small amount of material from the leading edge to account for the thickness of the next coat.
The base coat, second coat, and a final thin coating of drywall mud added up to less than 1/4 inch of thickness overall. The final layer was the easiest, because the drywall mud remained workable for much longer than the cementitious layers had. And while the surface left by the plywood edge of the screed wasn’t perfect – an effort to get a smoother finish by covering it with a piece of smooth plastic weatherstripping turned out not to make much difference – some additional spot-spackling and hand-sanding yielded a very satisfactory finish.
To finish up, we stapled flexible plastic corner bead to the raw edges of the plywood ring and mudded them. The exposed face of the ring received a skim coat of mud at the same time. Finally, we installed a ceiling medallion at the peak and wired the rope lights and hanging light fixture.
Because there were so many unknowns, we did this job on a time-and-materials basis. By the time we were done with some structural work in the attic and moving and rewiring existing ceiling cans, the overall cost came to nearly $10,000. Still, the homeowners were very happy with the finished product.
Roger Gadd is a renovation carpenter in Ladysmith, British Columbia.


