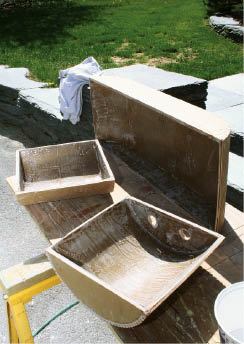
My design-build firm specializes in bathroom remodels, and I do a lot of custom tile showers. One job presented me with a new challenge: The homeowners wanted shower niches with curved backs, which they believed would look more interesting and be easier to clean than squared compartments. Since I couldn’t find any prefab niches with rounded backs, I decided to make my own — three in all (1). I used fiberglass and MDO (medium density overlay) and drew on a technique I had learned working in a boat shop years ago.
First I sized each rough form so that the mosaic tile layout would fit without any cutting (2). I made the forms from 1/2-inch MDO, kerfing the backs so that they’d bend smoothly around the top and bottom pieces (3). Waterproof wood glue and narrow-crown staples hold the assemblies together.
Then I covered the interiors with fiberglass cloth and four coats of resin (4), sanding between coats to smooth out ridges and provide tooth for subsequent coats. A pneumatic die grinder with a flexible sanding pad (5) works great for this task. I found that the fiberglass resin dries in 30 minutes or less, depending on the temperature and humidity. I also sanded the top coat, to help the trowel-on tile waterproofing membrane adhere.
Next I placed the niches in framed openings and had my tile subcontractor integrate them into the Hardie tile backer (888/542-7343, jameshardie .com) with Hydro Ban waterproofing (800/243-4788, laticrete.com). Hydro Ban spans small gaps and builds up better than other products we’ve used (6).
The finished niches were outfitted with low-voltage lighting, which highlights the decorative objects placed inside (7).
Making the niches took two full days. Fortunately, I did this part of the job on a time-and-materials basis.
Bob Petrichko owns Design Design in Stowe, Vt.
Working Inside the Bubble
by Tom Cleveland December isn’t the ideal time of year for getting started on a porch restoration in northern Vermont (1, 2). I knew that this would be a cold, wet project if we didn’t have any protection, especially given the pitch of the slate roof above, which would be sure to shed snow and ice on whatever — and whoever — happened to be working below.
Fortunately, my boss allowed me and my helper to cobble together a shelter out of staging, light framing material, and plastic sheeting (3). It took us about 20 man-hours to rig our plastic tent, and another eight or so to tweak it and tie down the loose ends. It proved to be sturdy enough to survive one of Vermont’s snowiest winters on record without damage (4) and allowed us to reproduce the porch’s moldings and other details (5) without fear of damaging our routers, shapers, and other expensive tools (6). Even when the temperature dropped well below freezing, we could safely do glue-ups (7) and apply finishes despite the fact we were technically working “outside.”
We heated the space with salamanders (8), using about $25 worth of K-1 kerosene on the coldest days. Occasionally, humidity was a problem, in which case we just plugged in a dehumidifier. Though shaded with huge old trees, the site has a western exposure; on a sunny afternoon, even when windy and cold, the sun radiated thru the plastic and cut our fuel use by half (9). We kept the working temp at about 55‚°F — any warmer and we began working up a sweat. In my book, those conditions are a lot easier to handle than working with frozen wood and freezing my tail off, and the homeowners were happy that their new porch was ready when warmer weather finally arrived (10).
10
Tom Cleveland is a carpenter with Prime Renovation Group in Williston, Vt. Photos courtesy Prime Renovation Group.


