


We’re roofing contractors (and also licensed general contractors) in Palm Beach County, Fla. In our environment, buildings take a beating from hot sun, frequent rain, and the occasional hurricane. So roofs have to be tough, they need maintenance, and they often need to be replaced.
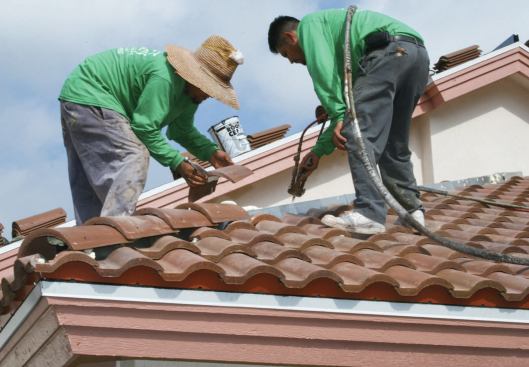
Both concrete and clay tile roofs are popular in our market. As with other types of roofing, the codes for tile roofs are relatively strict in South Florida because of the intense coastal climate. Over the years we’ve replaced hundreds of tile roofs; in this story, we’ll explain how it’s done, focusing on a concrete tile reroof.
Evaluating an Existing Roof
The job starts with a careful inspection to find out whether the roof needs spot repairs or a full tear-off and replacement. In a tile roof, underlayment is the ultimate weather protection – aside from looking good, the tile’s main job is to protect the underlayment. So what really determines the choice between repair and replacement is the condition of the underlayment.
Most of the underlayments we encounter consist of layers of asphalt felt paper with various cap sheets. Typically, the cap sheet is hot-mopped asphalt felt, but it could also be some sort of bitumen-backed synthetic membrane. Sometimes leaks and wear are limited to a few spots – such as points where a loose tile has been moving from expansion and contraction and wearing on the underlayment, or at valleys and around pipe and vent penetrations. In those cases, we may be able to just make local repairs. But if the membrane has dried out with age, it will crack as we lift it up to lap in the new underlayment, making spot repairs difficult.
If the estimate for repair work is a big percentage of the cost of a complete reroof, we’ll ask the customers to decide whether they want to replace everything at once – with the latest tested materials, over decking that has been replaced where necessary and is newly reinforced with extra nailing. In coastal Florida, an updated roof is less expensive to insure, which also weighs on the side of replacement.
In this area, a basic tile roof costs anywhere from $550 to $700 per square for tear-off and replacement (compared with $350 to $450 to tear off a basic composition roof and replace it with lifetime dimensional shingles).
Tear-Off and Disposal
Once the owners have decided on a full replacement, we educate them about what to expect when we start working. They need to understand that we’ll be removing a lot of material – tile roofs weigh about 1,000 pounds per square – and the house may shake a bit. We ask them to take down any lightweight items hanging on the walls, and we warn them that the commotion on the roof may cause some dust to fall from the ceilings inside.
We cordon off the work area, during both tear-off and installation. We have to work fast to remove the existing materials and get the new underlayment dried in before the next rain. Besides moving heavy debris, we’ll be firing up propane-fired kettles of hot asphalt, which can be dangerous for bystanders or passers-by.
Waste management is a big part of the job. We prefer dump trucks over dumpsters. For one thing, truck tires are less likely to crack driveway pavement the way a big dumpster can. Also, you can control when the trucks come and go, instead of having to work around the dumpster company’s schedule.
Occasionally, when the tile is in good enough shape, we try to save some – especially if it’s a particular style that matches other houses in the neighborhood. It’s nice to have a variety of tile in stock at our yard, for small repairs. But saving tile slows down the process, so we usually recycle the material instead, separating out any copper or aluminum flashing for the metal yard. The tile goes to a recycling center where it’s crushed and sold as clean fill for roads and site work.
We always tear off the roof and cover it up again within one day – it’s not unusual to have an evening thunderstorm even after a sunny day. In theory, we could tarp the house, but that’s taking a big chance of water damage if there were to be a heavy thunderstorm with high winds.
Our typical job is around 40 squares. That adds up to about one-and-a-half truckloads of scrap tile and a partial truckload of underlayment. We can remove that much material in a day and still have time to dry the roof in again before quitting time. We’ll do larger projects – ones with 50 or more squares – in sections.
This work takes careful planning: We don’t want to go out on a job if the odds of being rained out are high, because setup and take-down are expensive. For a 40-square roof, we may field a 10-man crew – and we’d rather not bring all those people back for an extra day if we can avoid it. So if the morning weather report predicts a 60 percent or higher chance of rain, we’ll call the job off and wait for better weather.
Repairing Structure and Sheathing
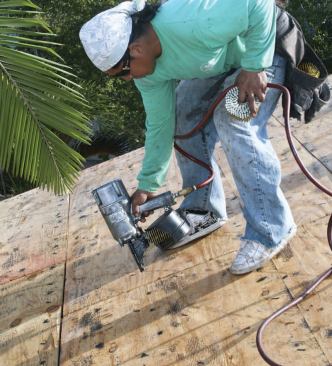
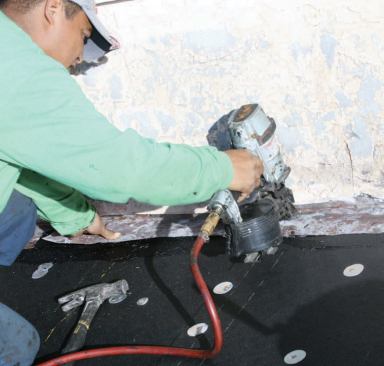
Once the existing roof has been torn off, we have to do some structural work. At a minimum, we have to ensure that the roof sheathing nailing schedule complies with the new, tougher codes. To resist the uplift force of hurricane winds, sheathing has to be nailed with 8-penny ring-shank nails at 6 inches on-center in the field and 4 inches on the perimeter. We use nail guns to drive the nails and have a second worker follow with a hammer to drive the heads flush to the plywood as needed. Otherwise, protruding nail heads will make holes in the tar paper. We also replace any rotted sheathing with sound plywood.
In rare cases, a reroof requires beefing up the attachment of the roof framing to the support walls. On any house valued at more than $300,000, we’re required to bring an engineer on site to inspect wall-to-truss or wall-to-rafter connections to make sure they meet code. If they don’t, we retrofit metal hold-downs, as specified by the engineer. But most of the houses we work on are new enough that they pass the engineer’s inspection.
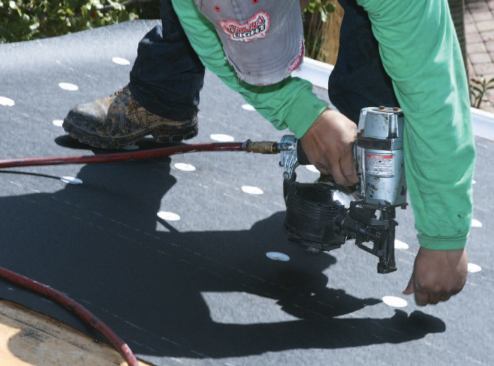
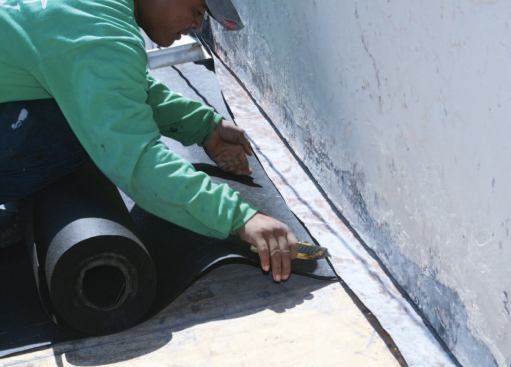
Dry-In
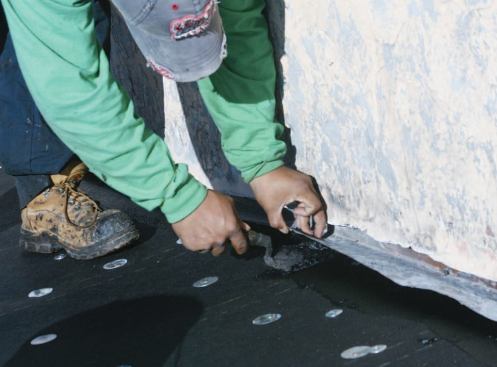
There are two stages in the underlayment installation – a base layer of 30-pound felt applied with cap nails, then a top layer of 90-pound granulated asphalt felt or modified bitumen membrane applied with hot-mopped asphalt. By the end of the first day, we’ll have the 30-pound felt down, along with any flashing needed to make the roof watertight.
We install the 30-pound felt with 4-inch overlaps on the horizontal joints and 6-inch end laps at vertical joints. We fasten it with 1 1/4-inch ring-shank cap nails with tin caps (plastic caps aren’t allowed in high-velocity hurricane zones). The idea is to make sure that the underlayment can’t blow off no matter how high the winds get. Our code authorities have beefed up the nailing patterns, and recent storms have shown that it’s working.


