Fifty years ago, if you had asked anyone how to rejuvenate a wood floor, you’d have been told there was pretty much just one way to do it — with wax, down on all fours. And it was not considered fun, which was one reason for the huge market gains that wall-to-wall carpeting began making in the 1950s: The promise of low maintenance put a huge dent in the wood-flooring trade.
When wood floors began their renaissance in the late 1970s, much had changed. Most notably, the use of waxes had decreased, while new coatings — the best-known being the various polyurethanes — had been introduced with the sole purpose of reducing maintenance. Although there is still debate about the durability and aesthetic desirability of these products, the numbers speak for themselves: Waxes are now used on about 1 percent of all floors being refinished.
While polyurethane finishes are obviously harder and more durable than waxes, floors are subjected to all manner of use and abuse, and in time even the best products need to be refurbished to restore lost luster or add protection. Typically, when the subject comes up, homeowners are quick to say they would like to do this without sanding. As popular as wood floors are, sanding and refinishing are right up there with root canals in the minds of most of my customers.
Fortunately, there are now good products available that allow me to renew a wood floor without sanding — and for a reasonable cost.
There are three main methods I use, depending on how the floor was previously finished and how it has been maintained over the years: recoating the surface, renovating a waxed or oiled surface, and — the traditional method — stripping off layers of old wax.
Recoating Urethane Finishes
Most floors sanded and refinished within the past 30 years have had some type of hard coating applied and are prime candidates for recoating. “Recoating” means just that — the application of a clear finish over an existing one. The process is not new; it’s been around for decades, but an inconsistent track record and unpredictable results made it a bit of a gamble in the past.
The most common problem was the failure of the new coating to adhere, usually because paste or acrylic waxes had been applied by homeowners on top of the finish coating. The results could be disastrous — the new finish would scratch easily or simply peel off the floor. The well-intentioned recoat often turned into a very expensive resand.
In an effort to remove the wax and improve the bonding of the new finish, many contractors simply tried more aggressive screening. Unfortunately, this left marks — fine, hairlike lines all over the floor — in the old finish that showed through the recoat finish. Plus, if the floor wasn’t perfectly flat, the screening might not even touch the low points — which could lead to delaminating as well.
New fast-cure products. Recoating became a viable option after two finish manufacturers, Basic Coatings and BonaKemi, correctly identified the problems and focused on providing products and strategies designed to reduce the risks associated with recoating. These two companies are the biggest manufacturers of waterborne coatings, which happen to be the ideal finish for recoating.
Because waterbornes dry and cure quickly and have low vapor and toxicity, they allow the flooring contractor to turn a job around more efficiently and with less disruption to the homeowner than is possible with any other coatings on the market.
Furthermore, recoating can now be completely dustless. A big advantage of the process is that there’s no sanding and no screening involved. Instead of screens, I use synthetic pads (3M maroon pads) on the buffer, which don’t leave scratch marks.
Whenever I’m buffing a dry floor to prep for applying the finish, I strap on a backpack vacuum (I have BonaKemi’s Back Vac), which picks up any dust. The dust-containment equipment available these days is so much better than it used to be that there’s no excuse to generate dust during a recoat.
Do your homework. If you’re serious about recoating, you’d better be prepared to do a little investigating. Since paste or acrylic wax will stop a recoat in its tracks, all the manufacturers recommend against recoating if either product has been used on the floor.
Perhaps a bigger problem, though, is that hardware stores and home centers are full of products that are designed to improve the look of a floor but that act as bond-breakers. Don’t hesitate to go to the cleaning closet and check what the homeowner has bought.
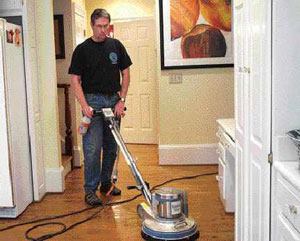
Cleaning. The key to a successful recoat is to thoroughly clean and prep the surface before applying finish. Both Basic Coatings and BonaKemi have good cleaners; I typically use the Basic Coatings line of products (see photo).
I start with Basic’s IFT (Intensive Floor Treatment), a strong detergent, followed by Squeaky, which cleans up the residue left from the IFT.
Recoating the floor. After a thorough cleaning, I have a choice. If the floor is reasonably flat, I’ll simply buff it with the maroon pad to scuff the previous coating so the recoat bonds well. After doing this I can immediately apply the finish coat.
If the floor is not flat — that is, it has high and low spots — I know the buffer pad will not make even contact. In that case I apply TyKote, Basic’s bonding agent (BonaKemi has a similar product called Prep). I have to let this dry — usually for a couple of hours — before applying the finish coat.
When applying the finish, StreetShoe, I often give high-wear areas — entryways; in front of the kitchen sink or refrigerator; underneath the chairs around the breakfast table — a first application before coating the entire floor. This allows me to get more build where it’s needed.
Except for those areas, one application of finish will generally suffice, but you can always apply more if you — or the homeowner — feel it’s necessary.
Even with the improvements in products and finishes, recoating is not foolproof. The likelihood of problems has been greatly reduced, but when in doubt I still don’t hesitate to do some test samples before committing to a job. I’ve had several sample failures, thereby dodging potential nightmares, so the testing was time well spent.
Renovating Oil Finishes
In homes where owners have objected to polyurethane coatings, the floors are usually finished with some type of penetrating or surface-applied oil. These finishes are typically applied to the floor and then the excess is either wiped or buffed off. Often wax is applied on top. Over time, these products start to lose their luster from everyday wear; the decline is even more obvious if wax was used.
Luckily, there are products called renovators that do a good job of bringing these surfaces back to life. As with recoating, application requires nothing more than a buffer. Both Dura Seal and BonaKemi have renovators in their lines of stains and finishes.
To apply the renovator, you cut in the edges of the room with a brush. Then you mop the material onto the field of the floor with a lamb’s wool applicator. It’s best to work in manageable areas — say, half a bedroom at a time. Break larger rooms up into several sections.
Allow the renovator to sit for about 15 minutes, then start working it with a steel-wool pad. It will gradually lift the wax and dried oils from the original installation and put them into solution. This forms a discolored residue on the surface that you should remove with rags.
One of the best aspects of this process is that the renovator itself, as it emulsifies the old products, reseals the surface while you are working it with the steel wool. To add a little punch, you can put a small amount of color in the renovator.
The net effect is that the floor undergoes a fairly dramatic visual improvement and is also pretty well sealed — so you can either buff the surface with steel wool to get an oil look or apply wax to get some luster.
With a trained crew, the whole process moves quickly. For a typical residential job, I add an extra day for a top coat of wax — the results can be impressive.
Be aware that renovators are not designed for use on any floor that has a hard coating like shellac or urethane underneath the wax. They work best when the original finish is an oil product.
It’s also important to carefully dispose of any saturated rags, which will be full of chemicals from the original stains and penetrating oils, as well as from the solvents in the renovator.
The Old Clean-and-Wax Routine
Although there was a time when everybody knew how to clean and wax a floor (and boy, did they hate it!), that’s no longer the case: You just don’t find many flooring contractors with a lot of experience in this area. Nevertheless, it needs to be done every so often, so it doesn’t hurt to know how to handle the job.
I always start by thoroughly vacuuming the surface. Next, with a quart-size spray bottle of mineral spirits (odorless, to keep smells down), I carefully spray the floor and begin cleaning it with a steel-wool pad in the buffer. It’s best to work in relatively small areas so things don’t dry up on you.
As the wax is dissolved, you begin to get some residue. By and large, the steel-wool pad will pick most of it up, but you might need to rag off the remainder, especially around the edges.
None of this should create so much residue that the steel-wool pad slings it up on the baseboards.
Restoring wood floors is a win-win situation. The work is simple, clean, and profitable. The jobs are not physically demanding, and they require minimal equipment. In the wood-floor business, it doesn’t get any better than that. |
Next, I let the area dry thoroughly, which doesn’t take long, since mineral spirits have a low vapor point and flash off quickly.
Now comes the fun part. I prefer the old paste wax to “liquid” paste wax. It’s sold by the pound or in gallon containers. Using a rag (half an old washcloth makes a good dispenser), I get down on all fours and start with a liberal application of wax. You don’t have to have 100 percent coverage, but you want enough that you can spread it over the whole floor.
In the old days, the next step would have been to use a bristle attachment on your buffer to spread the wax. These cost a small fortune, however, so I prefer either the white or the red synthetic buffing pads available from any maintenance-supply house.
I quickly spread the wax over the area until I’m confident I have good coverage, then just let it dry. After that, I put on a clean white pad and buff until the wax works its magic. There’s no time limit: You can buff up a luster and let it sit for an hour, then come back and buff it some more. I’ll often come back the next day and make a second application.
It’s quite true that there’s nothing as handsome as a waxed floor done right.
The Informed Homeowner
If there’s one thing I’ve learned about renewing old finishes, it’s to adhere to truth in advertising. It’s critical that the homeowner understands that deep scratches, indentations, and gouges will remain in the wood. The procedures I’ve described will make them blend in better — but not go away. As work progresses, if I think there’s even the remotest chance an area or spot will be visible, I make sure to point it out to the homeowner.
Also, none of these cleaners or procedures will remove old paint that has been dripped around baseboards, shoe moldings, or door casings. I’ve found that you can sometimes remove old paint with a plastic putty knife, which is a bit more forgiving than a metal putty knife.
Before committing to a job, it always pays to inspect the floor after furniture and area rugs have been removed, and point out any potential problem spots. And don’t forget that sample.
In rooms with direct sunlight and area rugs, you’ll often find fade marks where the rugs were placed. Remember: Since you’re working with a clear finish, these fade lines will show through.
Moreover, none of these procedures will do anything about dark water stains or animal-urine stains. That type of damage is absorbed in the wood; I would strongly advise against making any heroic efforts to remove these stains.
To make double-sure there are no misunderstandings, I always give the homeowners a written description of the process and the outcome they should expect. Interestingly enough, even with all these warnings, restoring and rejuvenating floors is becoming more and more popular with homeowners, who so despise sanding and welcome all of the advantages of this option.
Remodeling contractors are also increasingly likely to see the value of this approach: When a project entails minor cosmetic upgrades rather than a whole-house remodel, restoring floors — as opposed to resanding them — makes good sense. Even during a major remodel, if existing floors are protected well, restoring can be a good choice at the end of the job, and can save the client a bundle.
After any job I do, I advise the homeowners how to avoid damage and wear — for example, by putting floor protectors on the furniture, mats at the doors, and rugs in high-traffic areas. I also leave them information about the proper maintenance products, such as a manufacturer maintenance kit (BonaKemi and Basic Coatings each have one). I provide my own care and maintenance info, too.
This advice is always well-received. My audience tends to be very receptive; homeowners want to protect their investment and get the most out of their restored floors.
For me, restoring wood floors is a win-win situation. As long as we prep thoroughly, the work is simple, clean, and profitable. After more than 30 years of refinishing floors, I would be quite content to do nothing else from here on out. The jobs are not physically demanding, and they require little more than a buffer.
In the wood-floor business, it doesn’t get any better than that.
Michael Purser is a second-generation floor finisher. He owns the Rosebud Co. in Atlanta.
Testing for WaxThe greatest threat to a successful recoat is the presence of paste or acrylic wax on the surface of the floor being refinished. Either product can lead to disaster. Fortunately, there are simple and inexpensive ways to test for them. I start by cleaning a small test area in a low-traffic area in the room to be recoated, using the same cleaning products I use to prep for recoating. Paste wax will react to a few drops of mineral spirits; I let the drops sit for a few minutes and then wipe with a clean rag. If I get a yellow or brown substance on the rag, or if it feels waxy, I know that red flags are waving in my face. A few drops of a mixture of Basic’s IFT and ammonia will tell you if you have an acrylic wax by turning the area white. For more specific instructions, go to www.basiccoatings.com. Click on Contractor/Distributor, then on Training & Education; on the right side of the page will be a link to a PDF called “Test for Wax.” — M.P. |
For More Information
Basic Coatings
800/441-1934
BonaKemi
800/574-4674
Dura Seal
800/364-1359


