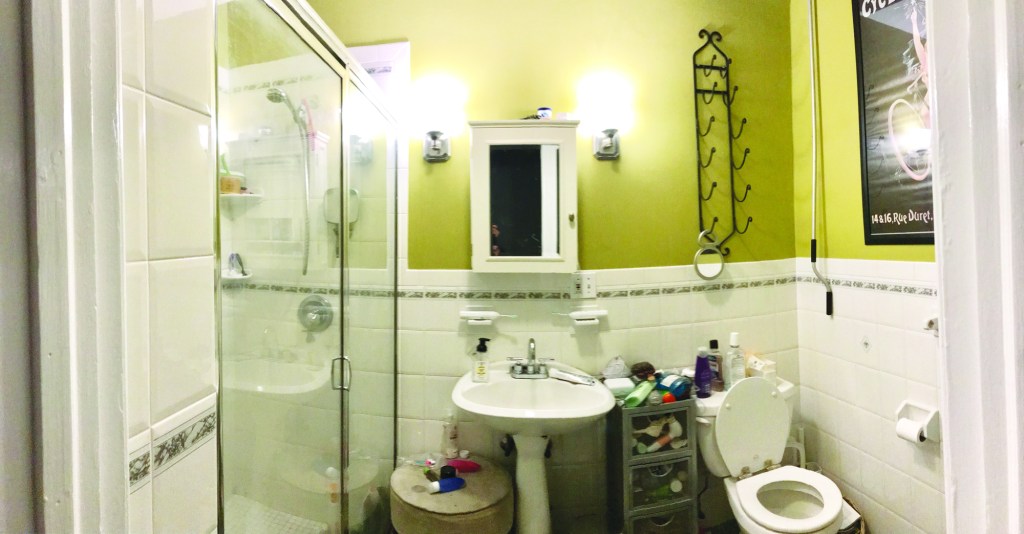
I always like getting a call from these particular clients. They’ve been periodically updating their Hoboken, N.J., row house (see “Retrofitting an Oversize Door in Structural Brick,” Oct/14) and have been contracting with our remodeling company to do most of the work. Their design preference is for contemporary rather than period fixtures and finishes, which can be tricky when working with an older brownstone building with a deep and narrow layout and oftentimes unique construction details. A case in point was the recent renovation of their 20-year-old third-floor bathroom, which our clients wanted to transform into a more luxurious space suitable for a master bedroom suite.
Tim Healey
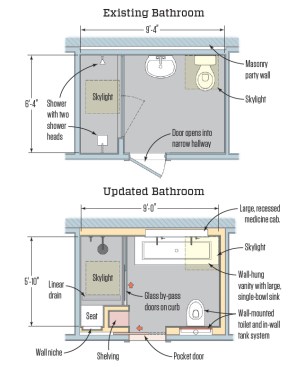
Demo. Though we weren’t changing the bathroom’s roughly 9-foot-by-6-foot footprint, we did need to remove the existing finishes. Because the work was to be done on the row house’s third floor, protecting the two flights of finished stairs leading up there was a priority, as was fast and efficient removal of the construction debris. So we hired a demo crew to remove the old finishes down to the studs and joists, safely transport the debris down the stairs without damaging them, remove the debris from the building, and dispose of it.
Framing. Besides the masonry party wall between buildings, the existing wall construction consisted of a blend of original plaster-and-lath walls over wood framing and more recent drywall over steel studs. In some places, the wood framing was installed on the flat to gain valuable floor space—in a 16-foot-wide building, every inch counts. Once the demo crew had removed the wall finishes and much of the framing and chipped away the tile floor, mud bed underneath, and wood plank subflooring, we started reframing the space.
To strengthen the floor system for the new tile, we sistered new joists onto the existing 2×8 floor framing, straightening and leveling the floor in the process. After the plumber made needed modifications to the underfloor shower and toilet drain lines, we laid down a new plywood subfloor, gluing and screwing the plywood to the framing (see before and after floor plans, above).
We reframed the walls using a combination of 2x4s and 2x6s, installing the wider studs where necessary to create extra depth for routing hot and cold supplies and DWV lines for the toilet, which was relocated to the opposite wall. We were also replacing the existing hinged door, which opened awkwardly into a narrow hallway, with a pocket door. Here, we left the existing hallway wall framing intact and framed the interior wall with 2x4s on the flat, leaving a 2-inch-wide space for the pocket door.
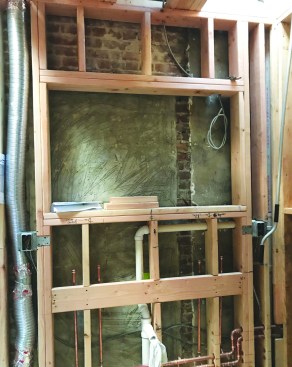
New 2×6 wall framing and solid blocking were needed for the wall-hung vanity and recessed cabinet above …
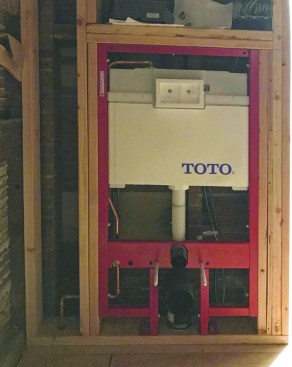
… and for the toilet’s in-wall tank and mounting system.
The Toto Aquia wall-hung toilet that our clients had selected required 2×6 framing. The unit has an in-wall tank system that requires a minimum 5 1/8 inches of clearance and has a steel support frame with specific rough-opening requirements. Because the walls would be clad with large-format porcelain tile, it was critical to use straight framing and install it so that it was perfectly plumb.
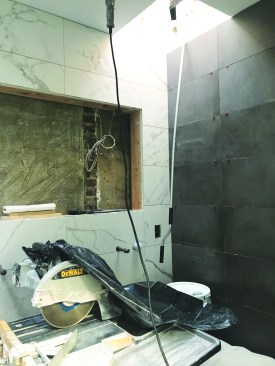
The “attic” in a typical row house is really just a narrow gap between the ceiling joists and the roof framing, which varies in height depending on whether the roof drains toward the center of the building (as is common) or toward the back. In this case, the rafters and joists were fairly close together, which simplified the framing of the wells for the room’s two skylights, a fixed one over the sink and an operating one over the shower. Thankfully, ventilation ductwork and electrical wiring were already in place, so no one had to crawl up there to install a new roof cap or pull new cable.
Once the walls were framed, our plumbing sub roughed in new copper supply lines and PVC DWV pipe for the shower, vanity, and relocated toilet.
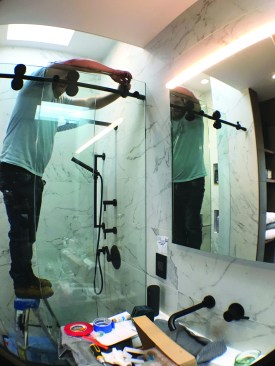
Tile details. In preparation for the tile, we installed cement backerboard in the shower area, taping the joints with mesh tape embedded in thinset, and installed moisture-resistant drywall in the rest of the room. Over the plywood subfloor, the tile sub installed a Schluter Kerdi membrane. In the shower, we installed Noble’s Pro-Slope preformed composite shower base, over which our tile sub installed a waterproof sheet membrane liner followed by a mortar bed. Before installing the tile, he applied a liquid waterproofing membrane to the walls.
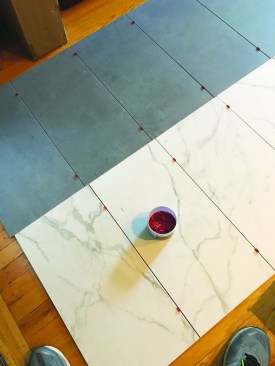
The two wall-tile selections were slightly different sizes.
Different sized grout joints were required.
This ensured the tiles lined up in the corners where they met.
When clients make their own selections and buy tile and other finishes online rather than through a showroom with professional guidance, the results can be mixed. In this case, they chose two contrasting porcelain tiles for the walls: matte-gray tile and white tile with a marble-like pattern. But when our tile subcontractor did a test layout with the two nominally sized 12-by-24-inch tiles, we discovered that they were slightly different heights. To accommodate the size difference between the two tiles so they would still be aligned at the corners where they met, he installed the white tile with wider grout joints.
The clients selected all of the finishes and fixtures, including the recessed cabinet.
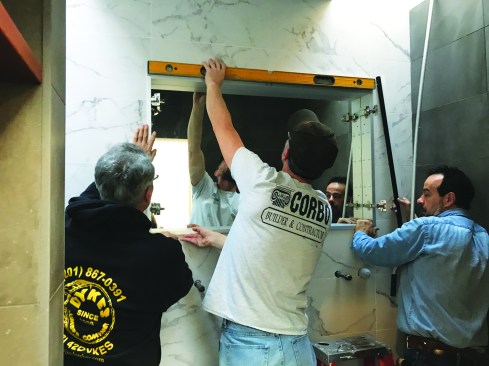
Finishing up. To prepare for the installation of the room’s large recessed medicine cabinet, we had framed a rough opening in the wall and roughed in wiring for its integral lighting. After the tile was grouted, we installed the cabinet, along with the wall-hung vanity beneath it.
Barn door–style hardware for the shower door
To maximize the small room’s volume, our clients opted for a bypass-style shower door sourced from a local supplier, Glasscrafters. The shower features a built-in seat topped by a solid black granite slab that matches the stone used to cap the shower curb. Recessed niches above the seat provide plenty of shelf space for shower accessories. We also replaced a pair of skylights, one in the shower, and one over the vanity.
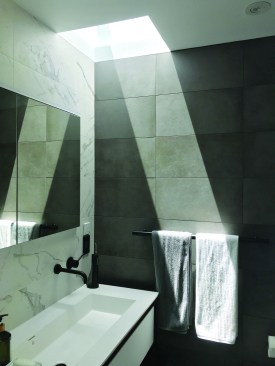
Skylights over the shower and sink make up for the room’s lack of windows.
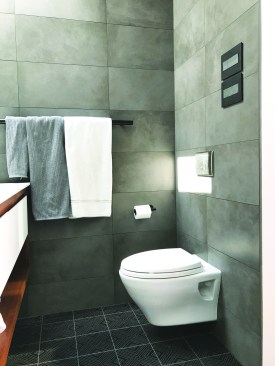
A wall-hung toilet lends the new bathroom a contemporary look.
Our clients chose the wall-hung toilet because of its contemporary, easy-to-clean style, but it also offers another benefit: It occupies slightly less floor space than a standard toilet, projecting out from the wall only 21 inches, compared with 26 inches or more for a standard toilet. The few extra inches—along with the relatively narrow, 22-inch-deep wall-hung vanity—make a difference in a bathroom that is less than 6 feet wide. This particular model has a dual 1.6/0.9 gallons per flush feature, with controls mounted on a panel above the toilet.
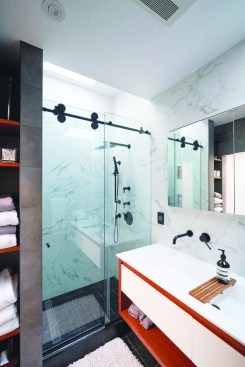
The frameless bypass door provides easy access to the shower.
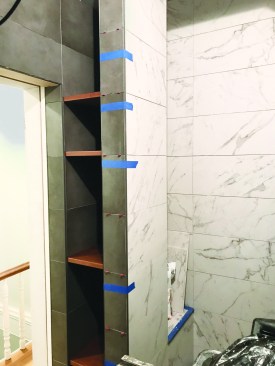
To supplement the storage under the vanity, we built a niche next to the entry door. The cherry shelving in the niche matches the vanity and adds a warm touch to the hard surfaces in the room. Pleased, our clients next focused their sights on their second-floor bath.
Photos: David White Studio NYC


