
I am a hardwood installer who specializes in creating intricate images and patterns in my clients’ flooring projects. To demonstrate the techniques I’ve developed through trial and error (a lot of both) to achieve fillerless results in 3/4-inch hardwood, I’m going to use a project I created for this article—a multicolored ball made from wenge, maple, Brazilian cherry, and white oak. Like any other learned skill, these techniques take practice and patience to execute. You can use the tools you have, of course, but I generally use a 4-foot-by-24‑inch oscillating belt sander, a 1-inch-by-42‑inch vertical belt sander, an oscillating spindle sander with spindles of various diameters, and a band saw with a 3/16-inch blade. With these four tools, I have created many intricate, nonlinear inlays in flooring.
Projects all start with a design penciled out and separated into pieces. Depth and definition of the design are then created by using different colors of wood like paint. A basic color palette can be started with maple for white and wenge for black and then expanded with as many different species as needed.
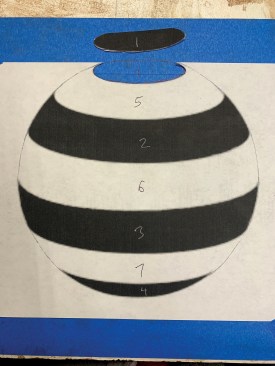
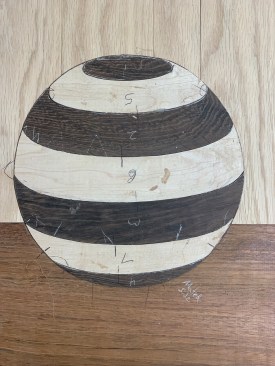
The author uses a ball design he drew up for this article to template 3/4-inch-thick pieces of maple and wenge.
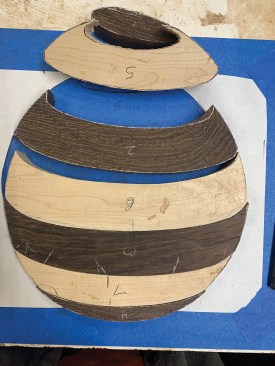
With the first cuts the author makes, you can see the illusion of depth created by the contrasting colors and attention to grain orientation.
Some basics. A clear line is key to accurately mating inlays. I prefer using a pen because the ink lays down a dark (or white) line that stays a consistent width, whereas a traditional pencil point changes dimension as it wears. Mechanical pencils are consistent in width, but the graphite doesn’t show up well on some woods. My definition of a line for these techniques is a mark that has two edges (one on either side) and a middle, which are all important to recognize when I cut.
I distinguish two types of cuts: a side-cut and a through-cut. For a side-cut, a blade cuts with its kerf just to the edge of the line but never touching it. I use this cut when the line is on a part of the wood piece to be saved. A through-cut has the kerf of the blade cutting through the middle of the line but always leaving just a bit of the line showing so as not to cut into the piece of wood to be saved. I use a through-cut when one edge of the line is at the edge of the piece of wood being saved, but the line itself is not being saved.
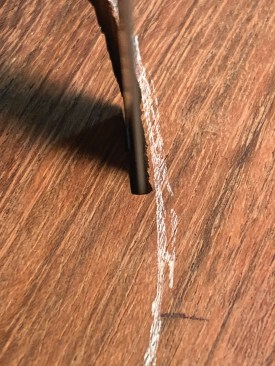
The white pen leaves a consistent and easily seen line on the dark wenge.
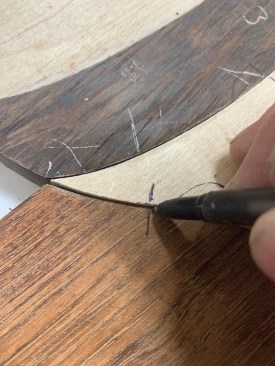
Here is an example of a through-cut in a section of maple. A slight back bevel allows for easier fine-tuning later.
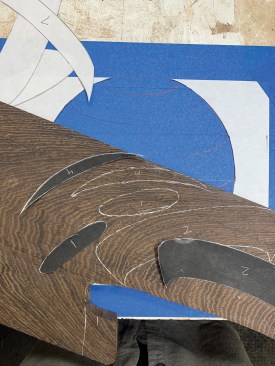
Only the edges—the set edge and the mating edge—of two pieces of wood are paired together at a time. For example, in the photo below right, the darker wenge marked “4” is the set piece, and the lighter maple with a “7” is the mating piece. The set edge is to be cut to the desired shape with only the kerf cuts sanded smooth. No further work needs to be done to its edge; think of this as set in stone. The mating-edge piece is then cut to fit to the set edge by scribing.
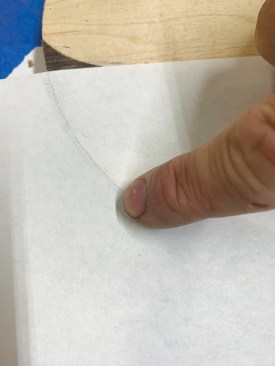
A darkened finger tip run along the edge of the wood on the paper creates a crease and an easy-to-see line. Cutting along this line will make a template.
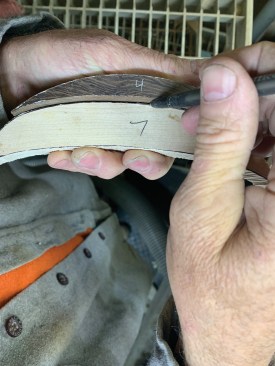
Here, the author is top scribing. The part marked with a “4” is the set edge and the one marked with a “7” is the mating edge.
The through- and side-cuts work in tandem with the lines created by scribing nonlinear shapes from a set edge. Scribing the nonlinear shape onto the mating piece from the set-edge piece can be done with the following four techniques: Paper scribe, top scribe, rough parallel scribe, and high side scribe.
Paper scribe. I use paper to copy the shape of the set edge and transpose that edge to another piece of wood (the mating piece). I put the paper atop the workpiece to be copied and secure it with two points of contact (I use two fingers; tape is too slow and messy. Remember, it is important that the paper doesn’t move). Holding the paper firmly over the set edge with at least two points of contact, I lightly run a finger on the paper along the edge of the wood underneath, creating a slight crease. Coating the finger with pencil graphite first defines the crease with a darkened line, making it easier to see where to cut. Using a sharp utility knife and the darkened crease as a guide, I smoothly cut the paper along the edge of the wood, making sure to cut right to the edge of the wood (I am still holding the paper with at least two points of contact).
I remove any excess paper and place the resulting pattern onto the piece to be mated (I use the grain as another design feature, so it may determine where on the mating piece I place the scribe paper). Again maintaining two points of contact, I use the thickness of the paper’s edge as a guide for the pen tip to draw a line. I make sure not to apply too much pressure against the paper’s lip so I don’t draw under the paper’s edge. Three points of contact work best here, as two fingers walk along the edge to hold the paper down firmly while the third repositions.
A top scribe is similar to the paper scribe in that the set-edge piece (like the piece of paper) is placed atop the mating piece. I follow the same procedures as before, with care taken to keep two points of pressure on the set edge to prevent movement when tracing the set edge on to the mating piece.
The rough parallel scribe is used when the two workpieces are already similar enough that they can be placed closely together. This closeness allows the scribe line to be hand-drawn parallel from the set-edge piece onto the piece being mated. I do this first to get close and then transition to my high-side-scribe technique.
For the high side scribe, I hold the set edge slightly higher against the mating piece but not on top of it. Depending on the size of the gap between the set edge and the mating edge, I either hold the tip of the pen (when the gap is tight) against the set edge to make the mark or use the outer diameter of the pen to distance the tip away from the set edge (with a larger gap).
Once the line is established by any of the methods above, I determine if the line should be cut with a through-cut (the line is not part of the piece you’re saving; see the fourth photo, above) or a side-cut (the line is part of the piece you’re saving; see photo, below left). After I cut the mating piece and it appears to fit closely, I lightly sand off the kerf marks before moving along to fine-tuning.
Sanding is a more precise means of removing material at this point. Using an oscillating belt sander or other sanding device, I carefully sand almost all of the line off and check to see how the pieces fit together. Marking two lines as “anchors” on both pieces of wood (the mating piece and the set piece) maintains their collaborative orientation throughout the fine-tuning process. The anchor lines (see photo, below right) are needed because as the fit between the two pieces tightens, any shift errantly in either direction can create new gaps or high spots and can lead to removal of more material than needed.
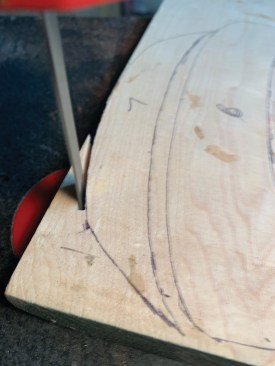
The author makes a side-cut in the Brazilian cherry that will have the bottom part of the ball set into it.
Anchor marks help the author keep the pieces in alignment as he refines the fit.
Fine-tuning. As the pieces fit more tightly together, fine adjustments are required to get the final tight fit. High spots are the single areas on the mating edge that touch the set edge first, preventing the rest of the mating edge from coupling tightly together. The three principle kinds of notations I created for marking areas to sand are anchor hash marks, apex hash marks, and transitional arcs. Anchor marks designate both starting and stopping points of material removal and serve as positioning points common to the set and mating pieces across the edge where they meet. Apex hash marks are perpendicular to the anchors and indicate the point where the mating piece is the farthest away from the set edge. Transitional arcs with anchors are the combination of two anchors and an apex, with the arc representing the amount of material that needs to be sanded off the mating piece.
Using this marking system helps me further refine the fit but, depending on how much I still need to work the edge, I use a second simple marking system. This is for my final fine-tuning. The first of these marks are just half-circles that mark where a bump to be removed starts and stops. The type of marks you use are up to you; the important thing is to keep organized as you work the pieces closer together. There can be multiple bumps on an edge, and I find noting as many of them as possible at a time reduces the number of trips to the sander and helps keep them highlighted for the long trip to the tool.
With the various marks the author uses, he is able to highlight points of reference and areas to be removed.
I keep my sander right next to me, but that’s still far enough away for my brain that I often forget what needs to be sanded. Most edges require multiple sets of notations and with that comes notation congestion. So to keep track, the marks I make have an order to them. The first ones are the half-circles mentioned above, next are “V’s,” then a “V” with a dot. The point is I can tell how far along I have come and what I’ve worked on already. You can get creative to differentiate the marks; when there are too many notations, I sand them off with sandpaper that I have handy, and start fresh.
Using a hot glue gun, once the set edge and the mating piece are as tight as you want them, dab a few drops on one of the edges and quickly smash them together with the anchor marks aligned. The hot glue is forgivable in this situation; if the two pieces need to be separated, for whatever reason, they can be easily pulled apart and the glue scraped off without too much worry about damage. I have found the hot glue essential for keeping hundreds of pieces together and organized while I’m constructing very intricate inlays.
I use the grain and color of the wood pieces to accentuate the design. I also try to forecast how the wood color will change with time so that the pattern will maintain its look. I’ve found that the most important tool I have, however, is patience, so be sure to give yourself plenty of time and find the process that works for you.


