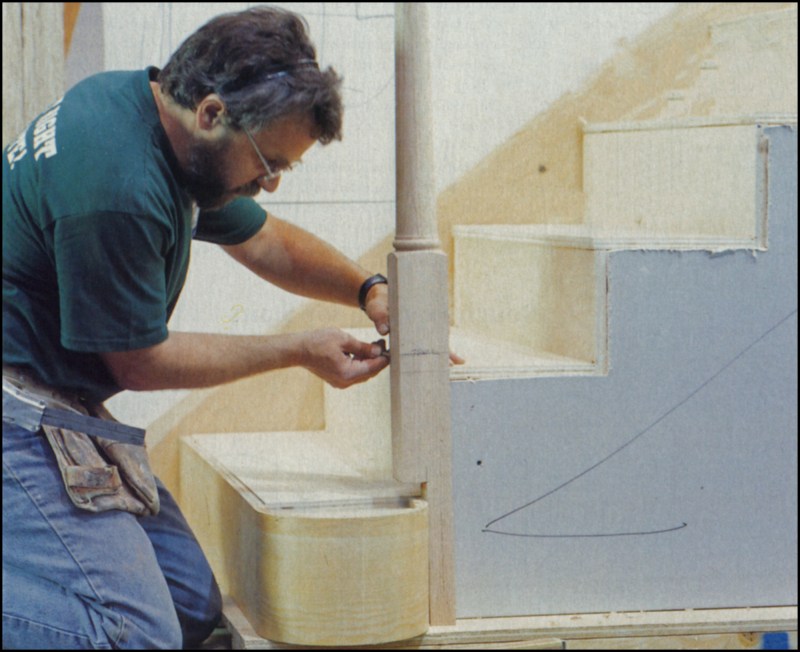
I’ve been building stairs full-time for the last 16 years in high-end homes in the Boston and New York City areas. Most of these stairways are complex, with curves and spirals. But when it comes to straightforward stairs, I’ve developed a technique that can easily be followed by any decent site carpenter, even without access to a millwork shop. In this article, I’ll walk you through the way I would go about trimming out a fairly simple, but elegant, staircase made entirely out of stock parts — something you might put in a high-end spec house, for example.
Obviously, before trimming a staircase, you’ve got to design and build the structural undercarriage. I use several framing details that lead right into my trim-out technique (see Figure 1, “Rough Framing for Stairs”). If I’m not building the undercarriage, I try to get the framers to incorporate the key features of my system.
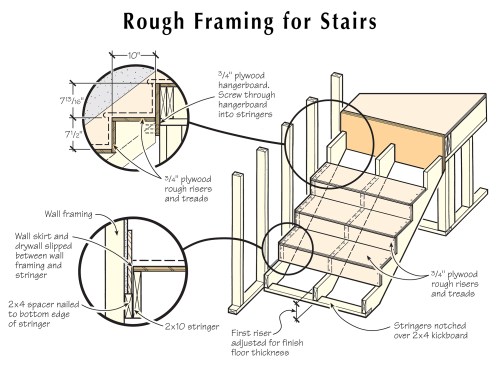
Figure 1: The author spaces the stair undercarriage out from the wall framing with a 2×4 along the lower edge of the inside stringer to leave room for the drywall and the wall skirt. To strengthen the entire carriage system, he installs 3/4-inch plywood sub-treads and sub-risers — glued and screwed.
Newels Are Key
The first step in trimming out a stairway is to set the newel posts. In this article, I’ll be discussing turned newel posts with a block at the top — where the handrails are cut to fit between the starting and landing newels (post-to-post). Because the newels bear the strain that goes on the rail, they need to be locked in tight. I put the newel posts in first and fit all the other trim to them.
Locating newel posts is a straightforward procedure that works off the centerline of the handrail and balustrade.
Bottom newel. I like to place the bottom newel on the second step, just above the starter step. If you put the newel on the front of the bottom tread, you end up with a very narrow stair. It looks like a cattle chute and doesn’t feel very welcoming. Also, when the newel is placed slightly up on the stairs, it’s much easier to put your hand out and step on the first tread from the side, so you actually turn as you begin going up. The curved bullnose tread and starter step that I often use make this common sideways approach comfortable.
To locate the bottom newel front to back, I set it where it will catch the front overhang of the second tread, plus a slight reveal. To find the side-to-side location, I work off the centerline of the handrail (Figure 2, “Laying Out the Bottom Newel”). The rail centerline is determined by the width of the balusters and by an arbitrary decision as to where the balusters are placed. I think that balusters always look better when their edges line up with the skirt board below. I also prefer the first baluster on each tread to sit right on the corner so that its front edge lines up with the riser below. The balusters seem to grow more naturally out of the stairs that way.
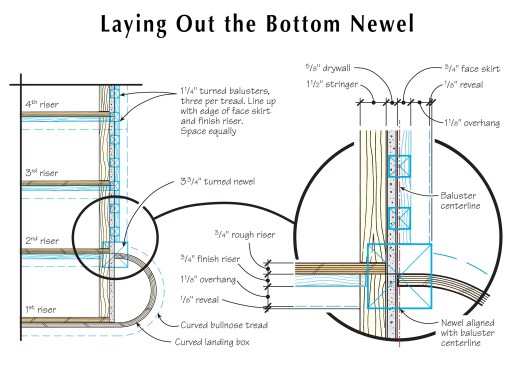
Figure 2: If the baluster edges line up with the face skirt edge, the centerline of a handrail is going to be half of one baluster in from the face of a face skirt. The treads are typically cut to overhang 11/8 inches. The minimum width of newels equals half of the baluster width plus the tread overhang plus an optional reveal — times two. Because many readily available newel posts are not wide enough to notch solidly into position, the author always specs wider newel post styles.
Where nosing meets newel. Traditionally, the tread nosing dies into the newel posts. For this to work out, the newel posts must be wide enough to catch the nosing. To calculate the minimum newel width, add half the baluster width to the tread overhang, plus the reveal where the tread dies into the newel — then double it. For a 1-1/4-inch baluster (minimum standard size), a 1-1/8-inch overhang, and a 1/8-inch reveal, you need at least a 3-3/4-inch newel. That’s bigger than most readily available commercial newel posts, which may be 3 inches square or even smaller.
If you use a wider 1-3/4-inch baluster, you’re going to need at least a 4-1/4-inch newel post. Any other solution will cause design problems. You’ll have to make a little return on the nosing where it extends past the newel post, or worse, put the centerline of the handrail in so far that you create a weak newel attachment.
Cutting newels to length. When laying out a newel post, I first determine the best side and lightly mark it with an “F” for “face.” Next, I cut the newels to length at a dimension determined by the handrail height and how far the newels extend below the subtread. (For more on this, see “Laying Out Newel Cuts.”) I put the landing rails at a height of 36 inches above the finish floor, and the rake rail at 32 inches above the tread noses.
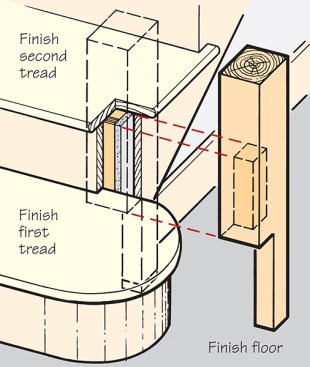
Editor’s note: See “Laying Out Newel Cuts” for more information on how Jed deals with bottom and landing newel posts.
Notching the bottom newel. After a newel is cut to length, it’s time to figure out how it will be notched. The bottom newel needs a pocket notch that lets the tread of the first step slide underneath while the newel face continues down over the drywall. Newel posts are expensive, so the cuts for pocket notches have to be figured carefully. Work your layout from the centerline of the handrail and from the face of the subriser. Remember, the notch dimensions are determined by the dimensions of the baluster, drywall, face skirt, and reveal. When marking the notch cut, make sure that it accurately accounts for the riser height as well as the thickness of the stair tread and finish flooring. I still scratch my head over these things, even after building stairs for years. Drawing the whole scenario out on the post and looking at it while holding the post in position is essential to avoid costly mistakes.
Landing newel. The landing newel is longer than the bottom newel because it catches the landing rail at 36 inches above the finish floor and then runs below the tread far enough to catch the face skirt and scotia molding. All that said, a typical landing newel would be cut about 55 inches down from the top of the newel block. The newel will appear to extend down below the landing and will need to be finished with a dropped finial. To lay out the pocket notch, I follow the same rules as for the bottom newel, except that I allow 37 inches above the finish floor.
Before making these notch cuts, check the carriage and walls for plumb. You may have to rough-cut the pocket notches, then scribe the newels plumb to the plaster before making the final cuts.
Cutting pocket notches. To cut the notches, use a circular saw set to the proper depth. Before cutting, clamp the newel to a bench, because accuracy is essential on the cuts where the newel meets a tread or drywall. Finish the notch cuts little by little with a good, sharp chisel. I use cheap, all-steel chisels, so I can hit them hard (Figure 3). The steel in them is not bad, but you’ll need to take the time to keep them sharp.
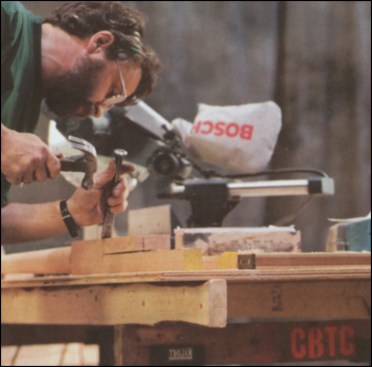
Figure 3: The author completes the newel pocket notches with a sharp chisel.
After the pocket notch is complete, drill for the screws. I use a 1/2-inch counterbore and come back later to fill with 1/2-inch bungs that match the grain of the wood. I line up the grain of the bungs, and pare them off smooth. If I’m making the bungs in my shop, I’ll use a piece of scrap wood from the newel to cut them. That’s especially important with mahogany, because the color varies quite a bit, and you can match the grain better if you use a bung cut from the same piece.
I use a level to plumb the newels, then I fasten them into the framing with 3-1/2- or 4-inch lag screws. I don’t glue the newel to the framing because the lag screws are strong enough. However, I always glue all the other abutting trim, such as the risers and skirts, onto the newel so the joints stay tight over time.
Skirt Boards
Traditionally, a straight run of stairs gets a skirt board on both sides. The wall skirt runs on the same plane as the flooring baseboard and gets finished out with the same base cap. On the open side, the face skirt acts as an apron running below the treads, and also gets finished out with base — except here the cap is run upside down.
Wall skirt. I’ve seen old-timers scribe and notch the wall skirt around each tread. I’ve tried it once or twice, and it’s come out okay. But it’s tricky, and if it doesn’t come out right the first time, you can end up chasing an elusive good fit forever when you try to tune it up. I don’t think it’s worth it. Instead, I always leave a gap between my rough stair and the wall by installing a 2×4 between the bottom edge of my first rough stringer and the wall studs. This leaves room for the drywall to be slipped down first, followed by a 1×10 wall skirt.
To mark the cuts for the wall skirt, I temporarily tack the uncut board along the corners of the rough treads (Figure 4).
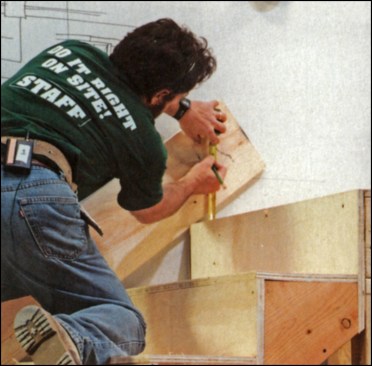
Figure 4: To notch the wall skirt around the landing framing, the author tacks the wall skirt along the nosings of the rough treads and marks a level line one standard rise above the landing floor.
I then set a compass to the distance of one rise and scribe level cuts at the main floor and the landing floor. This scribe technique allows the cut wall skirt to slide down flush to the floor so that its bottom edge will be hidden behind the finish treads and risers. I use a level to mark a plumb cut line at the top where the skirt hits the landing. This plumb cut line intersects the landing level cut line and together they mark a notch that fits around the landing where it’s attached to the wall (the landing is not spaced away from the wall the way the stringers are).
If you’re tying into baseboard that is thinner than 3/4 inch, I recommend you plumb-cut the wall skirt at the top and bottom to simply catch the baseboard. But, if you’re using two-piece or 3/4-inch baseboard, you’ll want your baseboard to continue down the stairs as your wall skirt. Decide on the height of the baseboard first, then set the skirt board so the top edges will meet in a smooth transition. Instead of making a plumb joint, which exposes end grain on the skirt board, I prefer to make a miter cut. If you know the theoretical angle, you can simply halve it. If not, you can use a simple compass technique to manually bisect the angle (Figure 5, “Mitering the Skirtboard”).
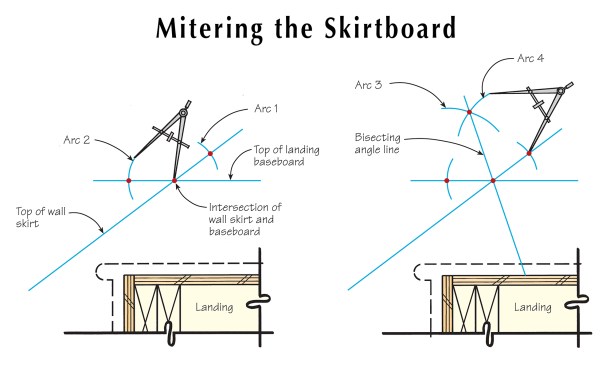
Figure 5: To bisect an angle where the wall skirt and baseboard meet, the author marks lines showing the tops of the wall skirt and landing baseboard and extends them several inches beyond where they intersect. After setting a compass to 4 inches, he strikes Arc 1 and Arc 2, then resets the compass to 8 inches before swinging intersecting Arc 3 and Arc 4. He bisects the angle by marking a line that connects the two points of intersection and runs to the floor. Finally, he picks up the angle using a bevel gauge and transfers it to a speed square.
Face skirt.The face skirt has level cuts at all tread overhangs and vertical miter cuts that will tie into the risers (Figure 6).
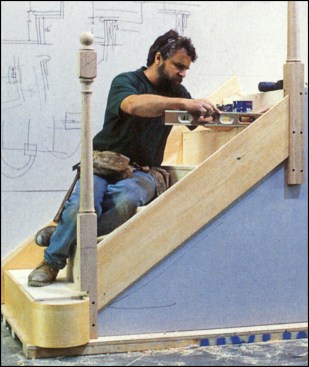
Figure 6: To scribe the face skirt, the author uses a level to mark true plumb and level cuts for each sub-riser and sub-tread.
When installing the face skirt, I nail only along the bottom edge, so the top is “flapping in the wind.” That way, later on, I can move the top of the board to align it with the miters on the risers. Don’t forget to glue the ends of the face skirt to the newel posts.
To cut the face skirt to length, first make a plumb cut where the skirt meets the bottom newel. I usually cut this to the theoretical plumb cut for the stair — 36.9 degrees in this case. Then, I hold it in place and mark the top plumb cut where it meets the landing newel. At this point, I can’t assume that my newel posts are perfectly parallel, so I cut the skirt slightly long, then scribe it to fit with a sharp block plane.
After fitting the face skirt to length, I tack it over the ends of the rough stair, holding it a little high to allow for the top corners of the finish risers, which are going to be 3/4 inch proud of the rough riser. I then use a level to mark the cuts for each rise and run. Because the framing may be slightly out of square, I center the bubble for each line I mark. Then I pull the board off, and using the same level, I transfer the lines back where the cut needs to be made.
These lines are on the inside of the skirt board. The plumb cuts, which will miter into the risers, will be cut on a 45-degree bevel, and the horizontal cuts will be square. I start by cutting the miters. This is a right-hand stair (when you look up the stair, the handrail is on the right-hand side), so I can cut the miters with a circular saw, which usually has the blade set to the right. On a left-hand stair, I would need to use a saw with the blade set on the left side, like most worm drives. Cutting from the backside of the face skirt, where the marks are, you can overcut the miters a little in the corners, because the kerf won’t show through on the face. This makes it possible to remove the triangles entirely when making the level cuts.
Risers and Treads
At this point, the newel posts are up and the skirt boards are cut and installed. The bottom step has a radius-end tread, which installs on a premanufactured wraparound riser box that returns to the bottom newel post. On the second and top steps, the risers and treads must be scribed to the newel posts. The landing requires a special tread with a rabbeted underside so that its top is at the same level as the 3/4-inch strip flooring, but from the front it will appear to be as thick as a manufactured tread (1-1/16-inch).
Installing risers. Eventually, the risers will sit on and cover the treads. With the type of frame that I build, the treads are well supported and won’t move up and down — so this gap along the riser edge is going to stay tight. But the treads are usually around a foot wide and they’re going to move as the humidity varies. I run the tread under the riser edge so that any movement does not show up as a gap.
Risers can be ripped to a width equal to the net rise minus the tread thickness. For measuring and marking risers and other pieces that meet the wall skirt on one end and the newel post on the other end, I use my handmade stair gauge (Figure 7). Alternatively, you can use a scribe. Cut the risers with a 45-degree bevel to match the face skirt. Install them by spacing off of the sub-tread with tread scraps, gluing the miter joints, and nailing off from the bottom working upwards.
![Figure 7: A stair gauge helps to mark cuts for both risers and treads. You can make a stair gauge out of two pieces of plywood, cut off at a bevel, screwed to a stick cut to the right length. You just push them into place and screw them together with the stick. Or you can make up a permanent adjustable gauge by routing an adjustment slot and attaching the bevel pieces with adjustable wing nuts. You can also buy a gauge like the one shown here. [Editor's note: The gauge tool on left has been discontinued since the article’s original publication; the adjustable gauge on the right, the “Stair Wizard” from DNB Tools, is currently available and sells for about $200 on Amazon.]](https://www.jlconline.com/wp-content/uploads/sites/4/2025/06/0399-jlc-dixon-stairs-remediation-07.jpg?w=653)
Figure 7: A stair gauge helps to mark cuts for both risers and treads. You can make a stair gauge out of two pieces of plywood, cut off at a bevel, screwed to a stick cut to the right length. You just push them into place and screw them together with the stick. Or you can make up a permanent adjustable gauge by routing an adjustment slot and attaching the bevel pieces with adjustable wing nuts. You can also buy a gauge like the one shown here. [Editor's note: The gauge tool on left has been discontinued since the article’s original publication; the adjustable gauge on the right, the “Stair Wizard” from DNB Tools, is currently available and sells for about $200 on Amazon.]
After the risers are in place, there is one quick task to take care of — notching the face skirt where the treads slide into place under the risers (Figure 8).
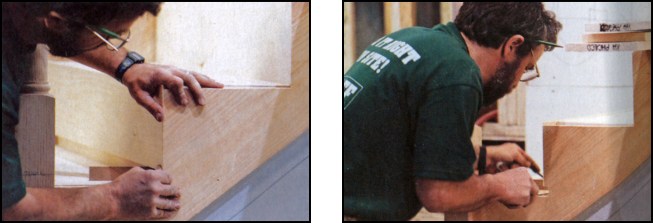
Figure 8: The author spaces the finish risers off the sub-treads before gluing the miter joint and nailing the riser off (left). He then notches the face skirt to make way for the treads later on (right). The depth of the notches equals the tread width minus the net run minus the overhang. For example, if the treads are 11-1/2 inches, and the net run is 10 inches, and there’s a 1-1/8 overhang, the face skirt needs to be notched 3/8 inch.
Treads. Manufactured treads are reversible because they are sanded on both sides. After scribing each tread to fit (Figure 9), I put construction adhesive on the underside of each of the treads and slide them underneath the already installed risers.
If the fit is tight, try using a 5-lb. non-marring rubber hammer to persuade them into place. I use my white rubber Porta-Nailer mallet. Be sure to double-check the overhang. The risers will pin the treads to the frame on the backside, but the treads still have to be nailed off along the front to ensure a good glue bond. To finish out the treads, I glue, and brad scotia molding under the tread nosing and nosing return.
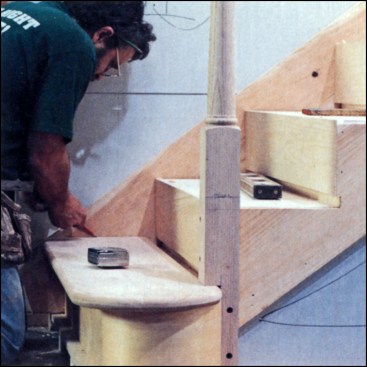
Figure 9: To install treads, the author first cuts them approximately to length — to within scribing range. He then puts them each in place temporarily, making sure the overhang along the front is even. After setting a scribe to the distance between the nosing return and the face skirt, he marks that dimension against the wall skirt. On steps with newel posts, he also has to scribe around the newel post.
Handrail and Balusters
I cut the handrail the same way I cut the face skirt. First I cut the bottom to the theoretical angle, then I prop the rail into place and mark the other end. I cut it a little long on the first try so I can trim it until I have a good fit. While checking the fit, I’m careful not to push the newels out of plumb. I temporarily fasten the handrail with 3-1/2-inch countersunk screws through the newel posts. Later, I fill the holes on the newel posts with bungs taken from scraps of the same wood. However, before permanently installing the handrail, you need to lay out the balusters.
Baluster spacing. Most codes require a maximum 4-inch space between balusters (Figure 10, “Fastening Balusters and Railings”). Remember that if you’re using balusters that have been turned on a lathe, the maximum spacing rule applies to the thinnest portion along the profile. If you have a turned baluster with a 1-1/4-inch base on a 10-inch tread, you actually end up needing three balusters per tread. With 1-3/4-inch balusters on 9-1/2-inch treads, you might only need two per tread.
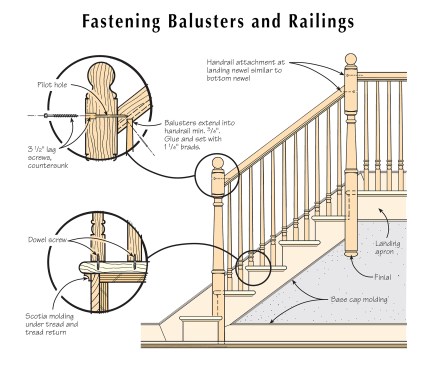
Figure 10: After the baluster bottoms are tightened into place using dowel screws, the author installs the handrail over the pin-tops and runs lag screws through the newels to fasten the balustrade system together.
The corner of the first baluster goes right over the corner of the riser and the face skirt. With 1-1/4-inch balusters and a 1-1/8-inch overhang, the centerline is 1-3/4 inches in from the edge. After measuring in from both the side and the front, mark the centerpoint of the first baluster on each tread. To measure the other two baluster centerpoints on a tread, calculate the spacing based on the net run — so that the spacing between the last baluster on one tread and the first of the next is the same as the spacing between the balusters on the same tread. With a 10-inch run and three balusters per tread, you can divide 10 by 3 using the 12th scale on your framing square.
Once you have centerpoints marked on the treads, you can transfer them up to the handrail with a level or plumb bob. At this point, the balusters need to be cut to length and holes drilled in the underside of the handrail, taking care not to blast through the top. I find drilling baluster holes while the rail is temporarily fastened in place works well.
With balusters, I like to see the detail of the turnings follow the pitch of the rail down the stairs. I do this by varying the height of the bottom baluster blocks. In addition, I think that manufactured stock balusters often have ridiculously long bottom squares. I like the longest bottom square on a baluster to be just one rise in height.
On a staircase with a net rise of 7-1/2 inches, the three balusters on each tread will become successively shorter by 1/3 of the rise, or 2-1/2 inches. That makes the bottom squares 7-1/2, 5, and 2-1/2 inches, back to front. After the bottom squares are cut, pin-top balusters should be cut so that they extend at least 3/4 inch into the rail. Square-top balusters should be individually fit and cut so that they butt into the underside of the rail.
For attaching balusters to the treads, all of the stair manufacturers provide a type of dowel screw (a screw that has a lag-type thread on both ends). When screwed into the bottom of a tread, 1/4 x 2-1/4-inch dowel screws really hold a baluster down. To use dowel screws, you have to predrill holes in both the treads and balusters. Some manufacturers predrill the balusters.
To install the balusters, remove the handrail and use the dowel screws to attach the bottoms, making sure the squares line up. Using dowel screws with square-top balusters is harder because they need to tighten to one exact orientation. But with some fiddling, it’s still the best possible option.
Setting the handrail. For pin-top balusters, place glue on the baluster tops and handrail ends. Set the handrail onto the balusters and permanently fasten it into position. Use 1-1/4-inch brads to hold the balusters in position. For square-top balusters, fasten the handrail into position and then plumb, glue, and nail each baluster to the underside of the rail, taking care to center the baluster on the rail. When post-to-post newels are turned on the lathe, blocks are left at the bottom for attaching the newel to the carriage and at the top where the handrails attach. Rails are typically attached to newel posts one inch below the edge of the top blocks.
Photos by JLC, illustrations by Tim Healey