Over the years I have spent thousands of hours troubleshooting plumbing problems — everything from burst water mains to clogged stack vents on the roof. The problems are varied, and some are seasonal. But there are many that simply occur over and over. Here are a dozen of the most common ones:
Sink Solutions
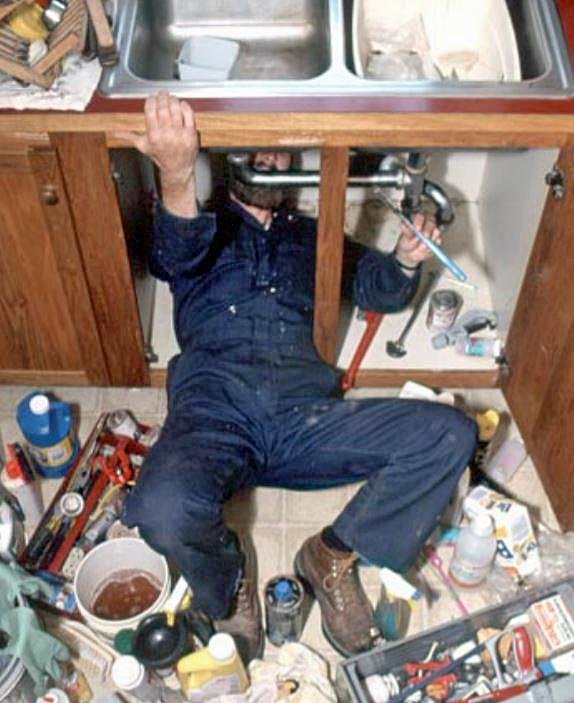
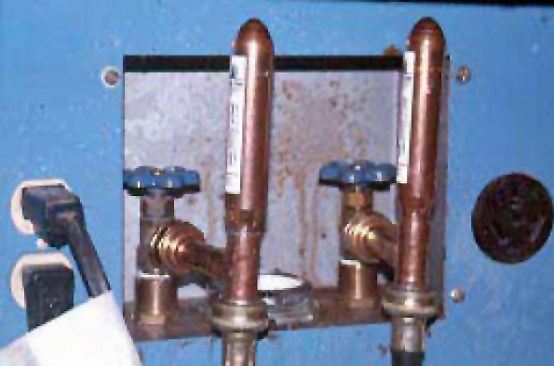
A typical kitchen sink drain assembly, with its leak-prone slip fittings, leaves a lot to be desired. This two-sink setup has no less than six slip connections.
Leaks under the kitchen sink. Kitchen sink drain lines are arguably the most ill-conceived systems in American plumbing — they are simply designed to leak. Everything is held together with slip joints — those hand-tightened connections that come loose every time they’re bumped. And since all the traps and drain lines are placed right up front, you can’t help but bump them every time you reach into the cabinet. I would wager that at least 60% of those reading this article currently have a leak under the kitchen sink.
I used to hate working under the kitchen sink. I would fuss until I got the right no-leak combination, call it a day, and then someone would bump the trap or drainpipe and the leaks would start again. But that’s all changed, ever since I figured out a drain-line configuration that works. Now remedying undersink problems has become a high-profit area.
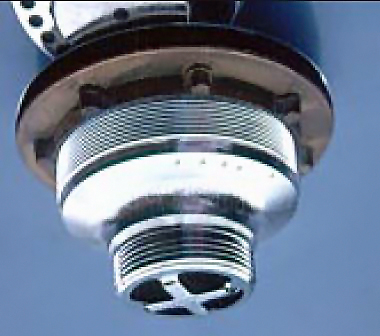
The author likes the Kohler Duostrainer for kitchen sinks — its cut threads are less likely to leak than the rolled threads on cheaper strainers.
Strainers. Many leaks come from cheap strainers: The water leaks under the strainer’s lip right down onto the outside of the drain lines. The fix is simple: I replace cheap strainers with high-quality ones — usually the Kohler 8801-CP Duostrainer, which is chrome-plated solid brass and has an O-ring on the strainer insert (see image at left). The Duostrainer also has cut threads, like a threaded steel pipe, as opposed to the leak-prone rolled threads on cheap strainers. I also install my strainers with a Dow Corning 100% clear silicon sealant — never plumbers putty. (Even so-called nonhardening plumbers putty hardens and cracks.)
New drain lines. Under the sink, I throw away all the existing drain lines, all the way to the schedule-40 main drainpipe coming through the wall or floor. As a replacement, I use one of several methods, depending on the budget.

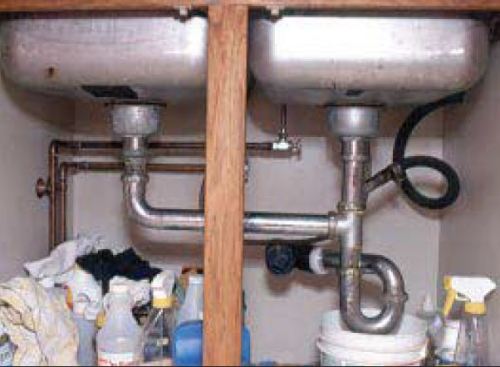
For a leakproof drain and trap assembly, the author uses glued plastic fittings and places the pipes at the back of the sink cabinet. The rubber 90-degree elbows, attached with hose clamps, allow for quick disassembly.
The best (and most costly) method is to move the trap and waste arm to the back wall of the sink cabinet so they won’t get bumped (see image at left). This only works in installations where the water lines are not in the way and the drain line is toward the back of the cabinet.
Instead of thin-wall metal waste lines and slip fittings, I use 11/2-inch glue-type schedule-40 plastic traps, pipe, and fittings (either ABS or PVC). I make an immediate right turn below each strainer with a flexible PVC 90-degree elbow (more on flexible PVC later) pointed toward the back wall. At the back wall I glue a 90 on each arm and connect the two waste arms together with schedule-40 plastic pipe and a 11/2-inch double L, then drop straight down into a schedule- 40 trap. (A trap with a built-in cleanout at the bottom is best.) If I’m slightly offline entering the main drain, I’ll use a 11/2-inch flexible coupling.

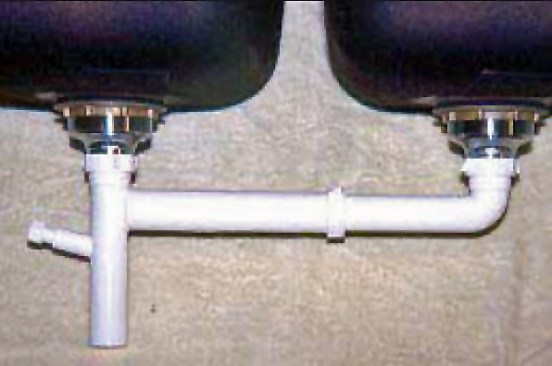
For connecting a dishwasher, a double-Y fitting with a galvanized reducer in the center hub works well
Connecting the dishwasher drain. Whenever the under-sink lines need to accommodate a dishwasher drain hose, I use a double T or Y in place of the double L (see image at right). Besides having drain inputs on both sides for the sink waste arms, these fittings have a center hub that points straight up. Here I glue a plastic threaded reducing bushing. I screw a galvanized reducing bushing into the plastic bushing, then a galvanized street 90, and finally a barbed fitting for the dishwasher hose to connect to.
Low-budget option. For a faster and less costly method, I use a waste assembly system that attaches straight to the strainers (see image below). This way I avoid those idiotic standpipes that place the drain lines and P-trap so low that they are assured of being constantly in the way. This assembly also has an attachment point for the dishwasher so I don’t have to have another fitting, cutting out two more potential leak points.
This less costly but improved drain configuration replaces the typical vertical standpipes — as well as their slip fittings — with screw-on elbows attached directly to the strainers. The only slip fitting is in a horizontal position, so it is less likely to leak.
To minimize leaky slip joints and keep the P-trap off to one side, out of the way, I always use an end-outlet waste assembly as opposed to the more common center-waste.
Leaky traps. If I can’t stop a trap from leaking, I replace it with a flexible PVC trap that fastens with stainless steel clamps. If I can’t stop a leak from around the strainers threads, I install a flexible trap adapter. I also use the flexible drain and trap connector to connect onto the main drainpipe whenever the pipes are slightly out of alignment. These flexible PVC fittings are a little more expensive than rigid plastic, but they install quickly and are easy to disassemble if needed. I buy fittings made by Fernco (fernco.com) These should be available at most professional plumbing supply shops.
Clogged Kitchen Drain
Unlike in the TV commercials, my kitchen drain problems are always in the drain line and rarely in the trap.
Sometimes kitchens are located on the opposite end of the house from the rest of the plumbing, resulting in a long kitchen drain line. If a shallow slope (1/8 inch per foot) has been used with 11/4- or 11/2-inch drainpipe, it’s only a matter of time until the drain will become totally clogged. In this case, it’s actually much faster to replace the drain line than to try to clean out a 40-foot run of totally plugged pipe. I normally replace it with a 2-inch, or preferably, 3-inch drain with an increased slope (1/4 inch per foot minimum).
Slow Drain Coming
Here the complaint is, “My kitchen sink takes forever to drain!” Again, if the pipe is almost totally clogged for a long length, I replace the entire pipe with a larger one. But sometimes there’s a blockage at some point along the line.
To diagnose an isolated blockage, there’s a simple test that often works. First, drain all the water out of the sink and the drain lines. Then run hot water into a bucket until the water coming out of the faucet is extremely hot. Once hot, let the water run into the sink drain until it backs up into the sink. Shut off the water and run your hand along the drain line. You’ll feel the hot water (especially noticeable on metal drain lines) until you come to the clog — at that spot the pipe will feel cold. Cut the line there and clean it. Once it’s clean, I install a cleanout at the cut.
Toilet Troubles
Toilet never stops running. There are three common problems that can cause a toilet to “run.”
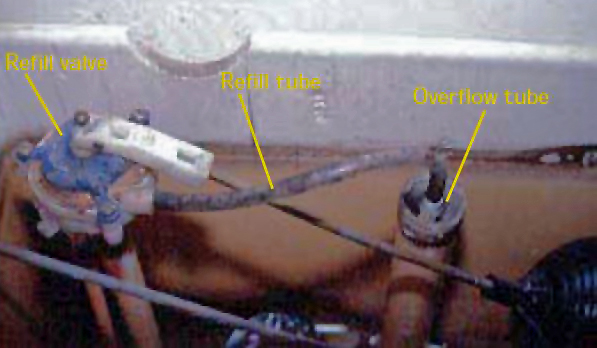
The refill valve (left) opens when the toilet tank empties. The refill tube (center) shunts water back into the bowl via the overflow tube (right).
Refill valve. First is a faulty refill valve (see image at left). The refill valve controls the flow of water entering the tank. Waterborne trash — such as powdered granite from drilling the well, pieces of rust flaking off galvanized pipes, or gravel from a water-main break — can get into the turn-off mechanism and prevent the valve from turning off.
Or the valve can simply wear out. It will be obvious if the refill valve is faulty, because the water in the toilet tank will be flowing into the overflow tube — that 1-inch tube that sticks up in the center of the tank.
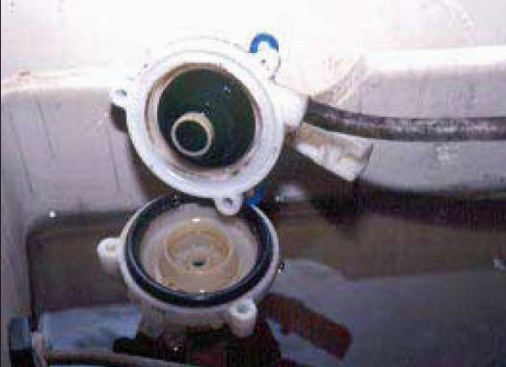
Sometimes replacing the seal in the refill valve can remedy a running toilet. More often, though, the entire assembly must be replaced.
I either replace the seals on the refill valve (see image at right), assuming parts are locally available, or I replace the entire assembly — the more common fix.
You’ll notice a small flexible pipe running from the refill valve into the overflow tube. This is called the refill tube — it puts water back into the bowl during the refill cycle. Make sure that this small pipe is not broken off and that it runs into the overflow tube.
Overflow tube. A second common problem, especially on older units, is the overflow tube itself. If the tube is brass, it may have corroded at the threads where it screws into the tank.
Plastic tubes, on the other hand, sometimes crack along the side. If the overflow tube is damaged in any way, water will constantly flow through it into the bowl. A damaged overflow tube will have to be replaced.
Flush valve. A third possibility is that water is leaking out of the tank because of a faulty flush valve — the stopper that keeps the water inside the tank until the toilet is flushed.
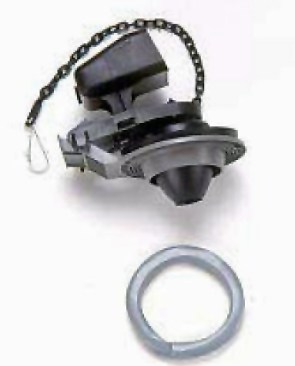
This flapper replacement kit comes with a putty ring for cushioning jagged edges in the outlet of the toilet tank, ensuring a good seal.
Replacing the flush valve, normally a rubber flapper or ball, will usually fix the problem. However, if the seat area under the flush valve has jagged edges, a new rubber flapper alone will not stop the problem. Instead, you’ll have to use a special replacement unit with a putty seal that covers the rough seat area (see image at left).
A minor but annoying problem is a flush valve stuck in the open position, so that you have to jiggle the handle to get the rubber seal to fall back into place. To solve this, readjust the linkage from the flush valve to the flush handle arm as necessary. Also check to see that nothing is catching the flush valve and keeping it from dropping into place.
Water or Sewer Gas Leaking
Leaks around toilet. If water or sewer gas is leaking out at the base of the toilet, it means the wax ring is not sealing the joint between the toilet “horn” and the toilet flange. In this case, I have to replace the wax ring, but I also have to figure out why the seal has failed; otherwise, the problem is likely to recur.
For instance, if the toilet rocks back and forth on the floor, the wax ring will compress, leaving a gap that water and sewer gas can escape through. Often, the toilet’s attachment bolts have come loose or rusted through. Or sometimes the floor has rotted, causing the toilet to tilt to one side. I also often see closet flanges installed too low. The flange is suppose to be installed on top of the finished floor — not level with it.
If the flange is too low, I may have to install two wax rings, one on top of the other, to obtain a good seal.
There are two types of wax rings (see image below). I use the type that has a built-in plastic funnel that goes down into the flange. The cheaper type is a simple wax ring. I never use this ring itself — I’ve seen too many leaks with these. When extra height is needed, however, I’ll use a plain ring in conjunction with the funnel type.
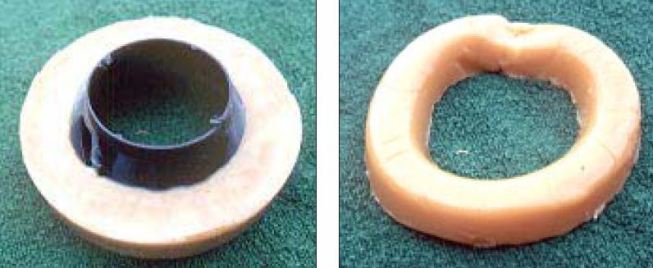
When setting toilets, the author always uses a wax ring with a built-in funnel (left). A plain wax ring (right) may eventually leak.
If the floor is rotted out, it has to be rebuilt. But before I remove a toilet to replace a seal, I always make sure that the water around it is not coming from condensation or a leaky water pipe.
Toilet Won’t Drain or Drains Slowly
This is caused either by mineral buildup in the toilet itself or by an obstruction in the toilet or drain line. If the toilet is old and the problem has been getting worse over the years, it’s probably from mineral buildup.
In that case, a new toilet will be needed. As for obstructions, I’ve pulled toys, wire baskets, plastic cups, toothbrushes, and other things too numerous to mention out of toilets. I’ve used everything from wire grippers and a closet auger to clothes hangers to fish things out.
If a toilet flushes fine for two or three times and then starts to have problems, there is probably a restriction in the sewer line. This could be caused by tree roots, foreign matter, or a shift in the sewer pipes in the ground. The solution can involve anything from cleaning the lines with a snake to digging up the yard and replacing old drain lines.
Supply Problems
No hot water. This can be the result of a tripped breaker or blown fuse, a bad heating element, a faulty thermostat, or the water heater’s overload switch. The problem with water heaters is not figuring out what happened, but why something happened. What happened will be obvious to a good plumber — but it may take a Sherlock Holmes to find out why.
As a remodeler, you can waste a lot of time trying to figure out what’s wrong with a water heater. I wouldn’t bother — call your plumber. But there are a couple of preliminary tests you can do before you make the call to give the plumber an idea of what’s happening.
Look around the water heater for signs of leakage. Also, determine how old the water heater is. For electric heaters, check the breaker. If the breaker’s tripped, reset it and see whether it trips again. If so, you may have an electrical problem. If the breaker’s still open, find out whether there’s no hot water at all, or only a limited amount— a sign that the bottom heating element may be worn out while the top one is still working.
Another quick test you can do is to raise the setting on the thermostat to see whether the heating elements come on. If they don’t, it may mean the thermostat has worn out. Beyond that, it’s best to call a plumber.
Leaky Copper Pipes
Sulfur and excessive oxygen in the water can cause copper pipes to fail prematurely. Pinholes will appear, with a resulting spray of water. Installing a union or coupling at the hole will temporarily fix the problem, but the rest of the pipes will eventually fail. All the pipes should be replaced and water conditioning installed to prevent the corrosion from recurring. With really aggressive water, I usually recommend plastic (CPVC) or polybutylene supply lines rather than water conditioning.
Water hammer. “It sounds like there’s a jackhammer in the walls!” — a common complaint whenever metal supply pipes are installed along with fast-closing faucets and valves. Whenever any faucet, valve, or solenoid opens, the water rushes through the pipes to the outlet. Then, when the valve closes quickly, all that fast rushing water slams to a stop. But its energy is transferred into the metal pipes. From there it reverses itself and hits the opposite end of the water lines, then comes back again. The noise sounds as if someone is hitting the pipes with a hammer.
A common solution is to install an air column — a vertical pipe with a cushion of air in it — to dissipate the pressure of the rebounding water. This is not a good long-term solution, however, because the air that provides the cushion will eventually dissolve into the water and the problem will return.
Water hammer arrestors — not simply vertical pipes filled with air — are the best way to prevent water hammer.
Special shock absorbers made by Sioux Chief Manufacturing (siouxchief.com) are designed just to prevent this problem and should be installed at point of use and at the end of the plumbing line. Called the Mini-Rester, this patented shock absorber comes in many configurations for a variety of installations (see image at left).
Leaky Faucets
Leaky faucets seem more common today than in the past. I suspect this is because there’s an overabundance of cheap fixtures available in do-it- yourself stores. But if your customers pay their water bill on a per gallon basis, and especially if their sewer bill is based on water consumption, a small drip can be very expensive.
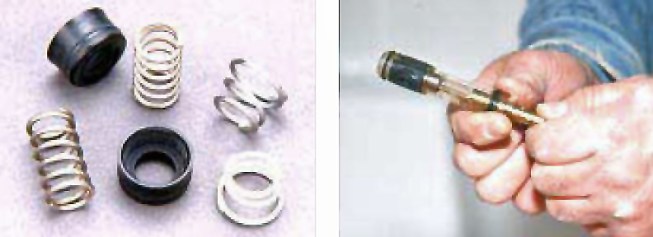
This Delta single-lever faucet repair kit includes new springs and gaskets (left); for other faucet designs, such as the Moen, the entire cartridge is replaced (right).
Some single-lever faucet designs use springs to help close the valve — the springs press little rubber seals against a plastic seat (see image at right). If the springs lose their tension over a period of time, or if they rust or get cut by debris in the water, they’ll typically need to be replaced (as a temporary fix, I have been known to restretch the springs by simply pulling them apart with a pair of needle- nose pliers). If the faucet is the type with a plastic ball — a poor design that never worked well — replace it with a stainless steel one, which should be available at a plumbing supply house. If the faucet has a worn-out cartridge, replace that. If the faucet leaks around the handle only when the faucet is turned on, replace the appropriate gasket or O-ring. (If it’s a cheap faucet, I simply replace it with a high-quality one. It costs more to maintain a cheap faucet than it does to install a good one.)
Older-style faucets have many replaceable parts — the stem assembly, the washer, and the seat itself. The stem assembly removes with a socket or crescent wrench, the washer with a screwdriver, and the seat with a hex wrench. Between all the old and new designs, no one can keep all the parts in stock. Therefore, when you can’t find the part you need, you’ll have to replace the faucet. Be sure to install one from a company that has been around a long time and has easily obtainable parts.
Low Water Pressure
When low pressure is the complaint, I ask several questions: Is the problem throughout the house, or only at one or two faucets? Or, is there a problem only on the higher floors of the house? Also, is the problem in both the hot and cold lines?
The most common complaint is low pressure on both the hot and cold sides at only one faucet. Usually the faucet screens are clogged with silt or sediment, although sometimes trash gets caught in the faucet body itself or at the stop valve beneath the sink. If the problem is throughout the house, don’t forget the obvious — is there an in-line cartridge filter that is clogged with trash?
If the customer is on city water, I check the water pressure from the utility by cutting into the line where it enters the house and hooking up a pressure gauge. If the pressure is good coming into the house, then the problem must be within the pipes. I first check the faucet closest to the incoming main to verify its pressure, then work from there. In old homes, the galvanized lines are commonly choked with rust.
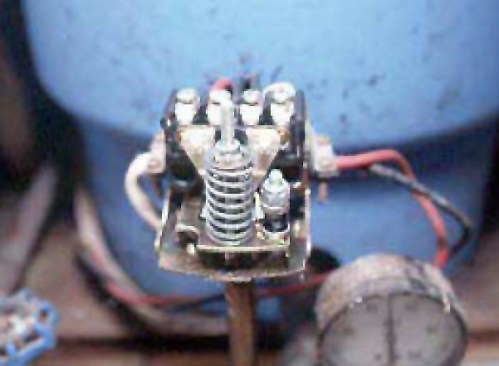
There are two screws on a water tank’s pressure switch. Turning the tall screw clockwise raises both the high and low cut-off pressures; turning the shorter screw clockwise raises only the high cut-off pressure.
New homes suffer more from incorrect supply line design, or from debris lodged in the lines. When the pressure problem is only on the top floor, the house pressure must be raised. For city dwellers, I install a booster pump. In homes with wells, I simply raise the setting on the water tank’s pressure switch and increase the air pressure within the tank (see image at left).
Frozen Water Lines
If a water line freezes, it usually means the line was installed improperly. After thawing a supply line, I prefer to relocate it to within the heated space of the house. If the customer doesn’t want to pay for that, I will install a UL-approved low-wattage heat tape. If a drain line freezes, it’s because it wasn’t pitched properly. Water should never be in a drain line except when it’s flowing through to the septic tank or sewer main. I have seen drain lines pitched uphill on which the owners installed heat tape to prevent freezing.
Eventually, though, PVC or ABS drain pipe will start to deform and sag because of the heat. Never use a welder when thawing metal water lines —it’s a dangerous tool that can cause fires. For metal pipes, use a torch; for plastic pipes, a hair dryer will have to do. (Whenever I use a torch in a “tight” location, I always use a fiberglass fireproof backstop to prevent a house fire.) A sometimes faster option is to cut the frozen areas out and either replace them or take the iced-up pipe into the house and let it thaw out.
Different types of pipes respond differently to freezing. Galvanized pipe splits, and copper will either split or change diameter. With copper, I often have to cut away large sections of pipe to find a section that’s not too deformed to accept a fitting. On occasion, I have had to use my flaring tool and squeeze a small section of copper pipe back to its original diameter so I could slip a fitting on.
Plastic pipe cracks in long sections, while polybutylene normally expands. Polybutylene will occasionally break, but freezing problems are minimal compared with other types of pipe. Polybutylene is also flexible enough that I can use pliers and gently squeeze the pipe to find the frozen areas — the pipe, which will normally compress when squeezed, remains inflexible when frozen. I find the frozen sections this way, and simply cut them out and replace them.


