Most of us who work on old houses have a love-hate relationship with plaster. We love it for its rock-solid character, but we hate it when we have to patch a crack, rip out water damage, or simply cut a hole in it.
I have never mastered the art of mixing traditional plaster and making it stick to a wall — much less a ceiling — but I have figured out how to fashion seamless patches using drywall products.
The techniques I use vary according to the extent of the damage and the location.
Determining What Can Be Saved
Hairline cracks are inevitable with plaster, but significant plaster damage doesn’t just happen; the culprit is most often a water leak of some sort. Remodeling activities like excavation and demolition can also inflict strains that cause cracks, even in parts of the house not under construction.
Frequently, I’ll discover serious cracks during the course of a remodeling job that are decades old but concealed beneath a thick layer of wallpaper. In such cases, it’s important to make absolutely sure before beginning any repairs that whatever caused the damage is no longer a player.
If I’m looking at areas of major failure, where the keys have broken and the crumbling plaster is literally hanging by a thread, I start by gently prying the debris loose with a flat bar. When I reach sound plaster, I stop, no matter how jagged the edge. I’ll come back to straighten the cut later.
After all of the loose plaster has been removed, I move on to inspect areas where the plaster is cracked but otherwise intact.
To make sure I don’t overlook any of the cracks, I’ll thoroughly scrutinize every inch of the walls and ceilings while holding a powerful work light at a shallow angle to the surface. Wherever I find a crack that needs attention, I mark it with a pencil.
Often you can’t tell how bad a crack is until you cut it open. Plaster is brutal on sharp edges, so I use two different cutting tools for this process. First, I use a standard utility knife, to separate the paint and the top layer of plaster. The blade gets dull fast, but a few passes across a pocket-sized whetstone restores enough of an edge to keep working.
After the first incision, I reach for a small hand tool called a crack opener (www.hydetools.com, 800/872-4933) to scrape out loose plaster and undercut the edges of the crack. A “church key” or a painter’s 5-in-1 can be equally effective, but since the crack opener is made from high-carbon steel, it stays sharp much longer. When it does get dull, I have a Dremel nearby, set up with a mini-grinding wheel, to restore the edge.
Power tools, such as a RotoZip or a minigrinder, are also effective options for excavating plaster cracks, but they must be used with care, because they’re very messy. Also, they carve through sound plaster almost as fast as through the damaged stuff, so it can be hard to know where to stop. When I’m using a hand scraper and meet up with sound plaster, I know it instantly.
Installing Plaster Washers
Cracks that survive the scrape-out without crumbling into chunks are filled and taped. Before breaking out the mud, however, it’s important to verify that the plaster is firmly attached to the lath; otherwise, future cracking is inevitable.
I apply pressure with my hands at various locations along either side of the crack. If the wall feels the least bit spongy, I’ll use plaster washers and screws to secure the lath and plaster tightly to the framing.
Plaster washers are designed to reattach loose but otherwise sound plaster to the framing without causing cracks. The thin, perforated discs flatten as the screw draws tight, but even when fastened correctly they remain proud of the wall surface by at least 1/16 inch. To get a flush surface, which speeds the finishing process, I usually countersink the washers with an expendable 11/8-inch spade bit.
First, after locating the particular studs or joists, I drill 3/32-inch pilot holes a couple of inches away from each side of the crack. I then make the countersink hole, boring through the paint layers but stopping the drill as soon as the bit carves a circle into the finish coat of plaster. You don’t want to drill as deep as the brown coat, or the plaster will be too weak to withstand the pressure from the washer.
I install the washers with 2-inch screws driven through them firmly into the studs. The washer manufacturer, Charles Street Supply Co. (800/382-4360, www.charlesstsupply.com), recommends exterior-grade screws to prevent rust bleed-through.
After fastening the plaster to the studs, I check the spaces in between for movement. If further reinforcement is needed, I’ll fasten plaster washers to the lath alone. This time I use 11/8-inch Type S drywall screws, which are made for steel studs; they have narrower threads, so they’re less likely to split old wood lath. Even so, this operation requires a light touch on the screw gun.
Countersinking also becomes more challenging when there’s no framing support, because the sharp tip of a spade bit will bore through the lath. So I use a 11/4-inch carbide hole saw (one made for tile cutting) instead.
Mud and Mesh
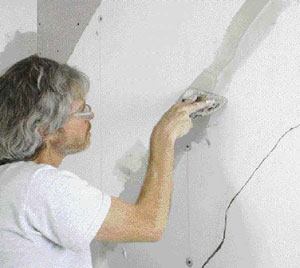
When all of the washers have been fastened and the wall feels solid, I brush or vacuum all loose debris out of the crack. I then lightly mist the crack with water to prevent the dry plaster and lath from drawing the moisture out of the joint compound while it’s curing.
I use a setting-type joint compound like Durabond 90 to fill the gaps, mixing up only as much as I can apply in about an hour. I cover the seams with fiberglass mesh tape, followed by a second coating of Durabond. The advantage of using Durabond is that it sets up as hard as plaster but dries quickly, so if I’m in a hurry I can second-coat it the same day. Durabond is almost unsandable, though, so I make sure to wipe the edges and overlaps clean.
I use all-purpose, ready-mix joint compound for the succeeding coats, which I apply exactly the same as I would for a drywall job.
Drywall Fills Big Gaps
During the excavation process it’s not unusual to find one or two cracks that are worse than they appear — perhaps a chunk of plaster on one side or the other is loose, or the plaster’s surface is riddled with a spiderweb of hairline cracks. Places like this get the same treatment as the crumbling sections mentioned earlier: I cut back to sound plaster, then patch the gaps with drywall.
To avoid having to scribe a sheet of drywall to meet a jagged edge, I’ll cut a straight line through the plaster that will remain. Once I find a place where the plaster feels solid, I mark the cut line using a straightedge and a pencil.
Over the years, I’ve tried many different methods of cutting plaster, with results that varied from maddeningly slow to horribly messy. The best compromise I’ve found is a spiral saw equipped with a 1/4-inch plaster-cutting bit. This setup generates plenty of dust and requires a steady hand, but it gets the job done quickly.
Holding a vacuum hose close to the bit helps to reduce the mess, but coveralls are a good idea and a HEPA filtered respirator is essential. And be careful not to push the bit too hard or it will overheat and lose its edge. A minigrinder is a faster alternative, but it kicks up a storm of dust.
Regardless of which tool you choose, cut no deeper than the top surface of the lath, then strip off the plaster with a flat bar, leaving the lath strips unmolested.
Plaster thicknesses vary, so I keep an assortment of scrap drywall on hand (1/4-inch, 3/8-inch, 1/2-inch). Using a straightedge, I measure the gap at a variety of places around the perimeter, then choose the appropriate board; if it’s not a perfect match, too thin is obviously better than too thick.
I mark the stud locations on the face of the board and fasten it with 15/8-inch drywall screws. Wherever I have to fasten the board to lath that’s not backed up by framing, I put down a bead of construction adhesive and use 11/8-inch Type S screws.
After all the drywall patches are in place, the joints are filled and taped in the same manner as the cracks. Wherever there’s a corner to be taped, however, it gets paper tape, which is easier to fold than mesh tape.
I apply the second and third coats of mud following standard drywall procedures. But if the patch is in a highly visible place, I’ll apply an additional skim coat of thinned joint compound and extend it several feet onto the existing plaster.
Covering Damage With Drywall
If a surface is riddled with cracks but isn’t crumbling or sagging, a third option is to laminate a new layer of drywall over the old plaster. This technique works best in small rooms, for obvious reasons. And it’s much more suitable for ceilings than walls, because the thickness of the drywall is not a concern. I always use 1/2-inch drywall for ceilings.
Walls are more troublesome, because the drywall’s thickness noticeably reduces the profile of moldings. If you decide to laminate over a wall surface, remove the baseboards and crown if possible.
If you plan to reinstall the same molding, prevent collateral damage by separating the paint lines with a sharp knife and gently prying the moldings loose. Pry only over studs, using the smallest pry bars that will work, and cushion their impact on plaster surfaces with a putty knife or a wood shingle. To prevent confusion later, I number the pieces of trim, bundle them together, and store them in a safe place.
If you can remove the casings, and apply jamb extensions to account for the drywall’s thickness, you can cover the walls with any thickness of drywall. Otherwise, 1/4-inch drywall is the only option; it doesn’t have a lot of meat for screws to dig into, so I use plenty of construction adhesive and only as many screws as needed to clamp the board tight while the adhesive cures.
I try to fit the drywall fairly tight to the casings (1/16-inch tolerance rather than 1/8 inch, which is the standard for drywall). And I finish the joint by flat-taping with paper drywall tape.
Tom O’Brien is a restoration carpenter in New Milford, Conn.


