Q. I am trying to put 1/2×4-inch redwood beveled siding on a wall with a 4-ft. 8-in. radius. It doesn’t seem like a very tight radius, but so far I have only gotten up three courses before a board splits out. It seems as if each piece wants to pull further from the wall at the top. I have some pieces soaking in a tub of water hoping that will make it more pliable. Do you have any suggestions?
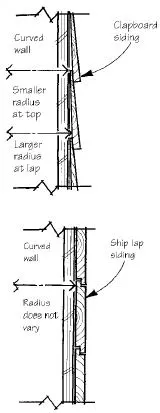
A. Cyrus Miller, production supervisor for Common Vision Inc. in Hamden, Conn., responds: Beveled siding will not bend properly around your curved walls because of the gap created by lapping each piece over the piece below. You are, in effect, increasing the circumference of the wall at the lap. Your clapboard is tight to the sheathing at the top of the board (the thin part) and therefore is a true 4-ft. 8-in. radius. At the bottom, however, the lap means you are bending around a 4-ft. 8 1/4-in. radius. What happens is that the ends of the clapboard rise above the horizontal course line if you keep the board tight to the sheathing, or you get a gap between the sheathing and the top edge of the clapboard.
I have found two ways to deal with this without soaking or steaming the wood. The easiest is to use a non-beveled rabbeted siding — one that makes full contact with the sheathing across its back, not just at the top edge (see illustration). Since most rabbeted sidings come in 3/4-inch thickness, you may have to have this milled in 1/2-inch stock so it’s flexible enough to bend around the wall.
A more labor-intensive method, but one that works with clapboards, is to cut the siding to a shape that will bend around the wall and still stay horizontal (use 6-inch-wide clapboards for this). To get the right shape, nail a starter strip around the bottom of the wall, then scribe a line around the wall at the height of the top of your 4-inch clapboard. Make a mark in the exact middle of a length of 6-inch clapboard and tack it to the wall with one nail so that its top edge touches the scribed layout line at the center mark. Then, with a person on each end of the clapboard, bend it around the wall so that its top edge is pressed flat to the wall. You will see that the ends fall below your horizontal line. Tack the clapboard to the wall so that each end is an equal distance below the line. Now scribe horizontal lines for the bottom and top of the clapboard. Remove the clapboard and cut to these lines; the clapboard will have a flattened U shape. Cut as many pieces as you need to that particular curve; the length of the pieces doesn’t matter.
In cases where the length of the curved clapboards isn’t great (for example, if you’re siding between windows), it’s possible to start with a curved board, and make a number of successively less curved boards, until, maybe ten boards later, you are working with straight boards that are arching as you put them on. The change from curved to straight is gradual enough that no one can tell that your boards arch up off the horizontal line. Ten boards from the soffit, you need to start cutting progressively more curved boards until the last one is the right shape and lies parallel to the soffit again. I did this recently on a three-story tower with 4-inch clapboards and I only had to cut the 20 boards; the rest came straight out of the bundles. No one can see the arch unless I point it out.


