Q: When you’re installing cedar shingles on a wall over a gable roof, how do you detail the courses to keep the shingles at a consistent angle off the wall?
A: Chris Yerkes, a cedar-shingle installer certified by the Cedar Shake and Shingle Bureau (CSSB), and owner of Cedarworks, in Brewster, Mass., responds: This is a great question to ask, because I’ve seen many installers get this detail wrong. If not done properly, the angle of the shingles off the wall will be inconsistent and the shingled siding won’t shed water properly.
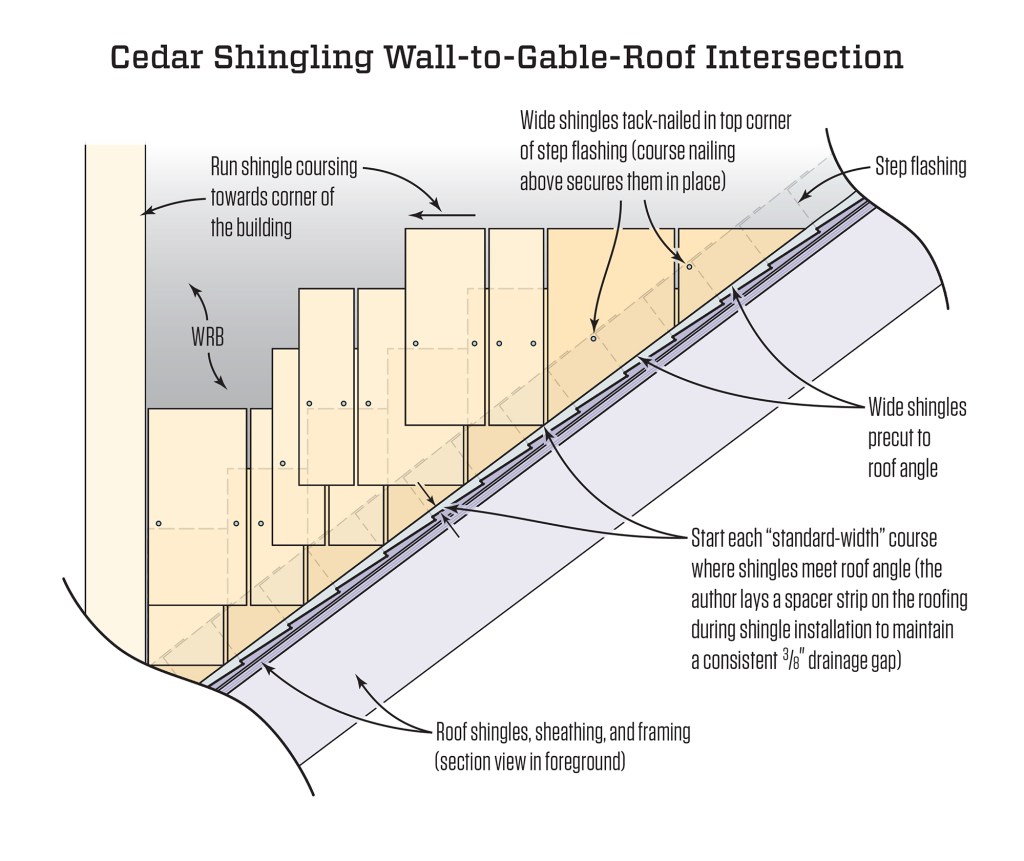
The key is letting each course of shingles continue up the angle of the roof until it dies out completely. Each course then runs in the opposite direction all the way over to the side of the building. Where the shingles are cut to the angle of the gable roof, they should get progressively shorter as the course continues up the roof, while the tops of the shingles run level across the wall.
I usually start each course at the point where the course meets the roof angle, and work up the roof and back toward the side of the building from there. We precut the angled shingles on the ground, using a bevel gauge on a table saw to ensure uniformity of the cut angles.
The cutting process is much easier if you save wide shingles to use for this detail. In a previous article (“Nailing Wide Shingles,” Q&A, Oct/17), I mentioned that while I’m shingling a wall, I set aside any shingles more than 8 inches wide specifically for this purpose. Cutting the angled shingles from wides saves me from having to cut a bunch of smaller shingles for the angled sections. I will typically cut the angled shingles for a number of courses at one time to minimize my trips up and down the ladder.
Proper nail placement is a key for the angled shingles. I’m always careful not to nail too low or too close to the roof-to-wall intersection. To secure each angled shingle, I drive one staple (or shingle nail) at least 2 inches above the lower edge of the next shingle course and into the top corner of the step flashing.
Another key to having the roof drain effectively while making this detail look professional is to create a consistent gap between the roofing and the cedar shingle siding. We typically rip a furring strip to about 3/8 inch and use it as a shingle ledger above the roofing material. This strip lays flat on top of the roofing surface, and the shingles rest on the strip as they are nailed in.
We remove the strip after we’ve finished installing the shingles, and the gap that’s left creates a neat and even drainage channel between the roof and the siding. This gap keeps the butt ends of the shingles from wicking water, which would greatly reduce the longevity of the siding.
A quick and easy way to make a ledger strip for along the roof is with a length of standard beveled clapboard. The bottom edge of the clapboard is typically around 3/8 inch thick, so we just lay the scrap on the roof with the thick edge against the wall. Then we install the angled shingles on top of the clapboard, removing it when we’re done to leave an even drainage gap.


